SharePoint Migration Checklist
If your organization transitioned to Teams and Microsoft 365, one inevitable task you would need to complete is the migration of file shares/content from its current location to SharePoint Online. The process is not always straightforward as SharePoint has different architecture and limits than file shares and other document management systems. Having participated in numerous migrations over the years, I would like to share my experience in the form of the SharePoint Migration Checklist – the high-level tasks you should focus on during the migration process.
Before I proceed with the checklist, I want to clarify that it does not matter where your current content resides. It could be on file shares (network drives), an old version of SharePoint (SharePoint on-premises), or other cloud DMS (i.e., Dropbox, Google Drive). The tasks and checklist items outlined below are generic enough to apply to any process. Likewise, it also does not matter which migration tool you plan to use (if at all).
Step 1: Educate your audience about the power of SharePoint
Before you even start the migration process, the very first thing to do is to educate your audience on what SharePoint is all about, what are its primary uses cases, what are its unique features (compared to the current system), and what the organization’s vision is regarding SharePoint and Microsoft 365 ecosystem as a whole. The importance of the SharePoint demo is so critical, that it will really make or break your SharePoint migration project and will define whether SharePoint succeeds or fails within your organization. Now, I am not talking about detailed training (this is something that I will discuss later in this article). Instead, focus on the high-level benefits of switching to SharePoint. Here are a few pointers in terms of what can be included in the SharePoint Demo:
- SharePoint Intranet capabilities
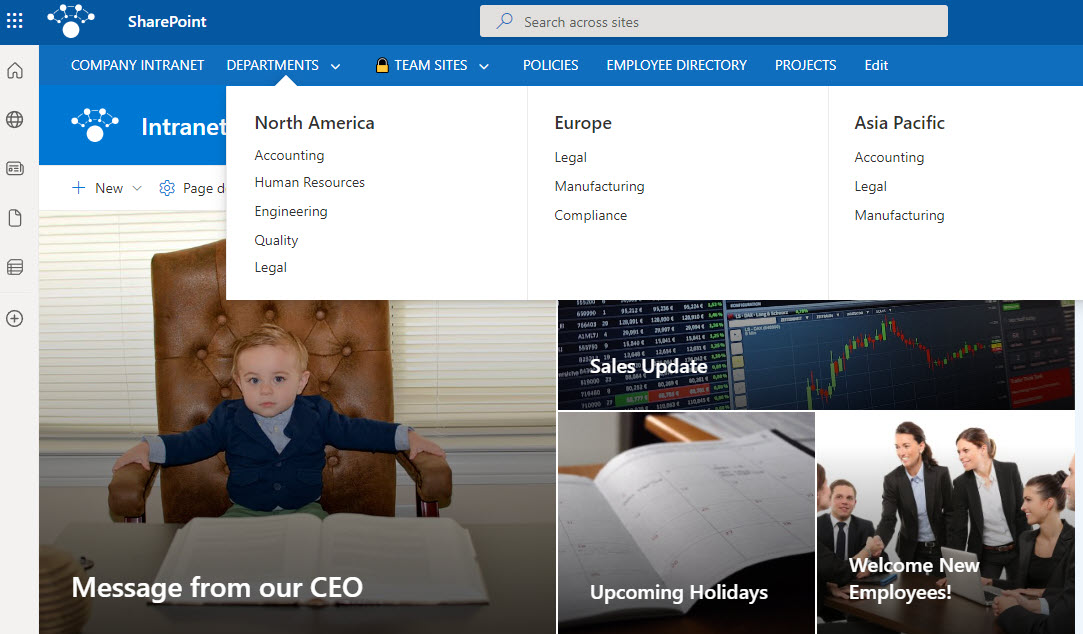
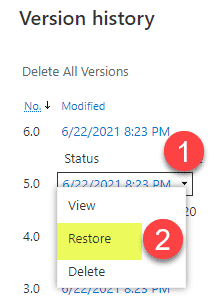
- SharePoint Document Management capabilities (i.e., version history, check out, metadata)
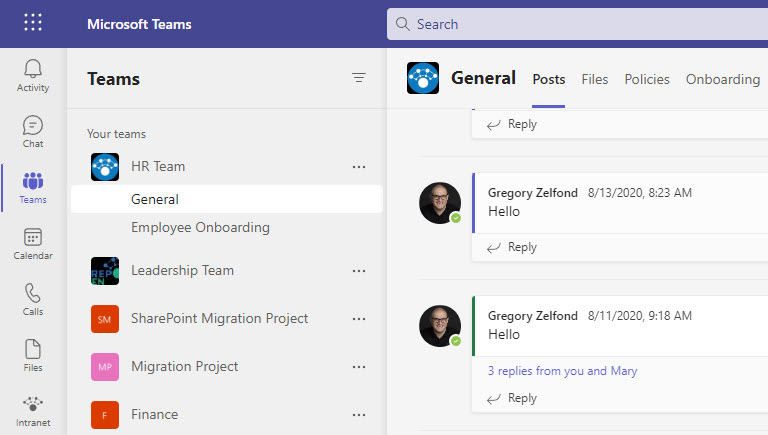
- Seamless integration with Teams
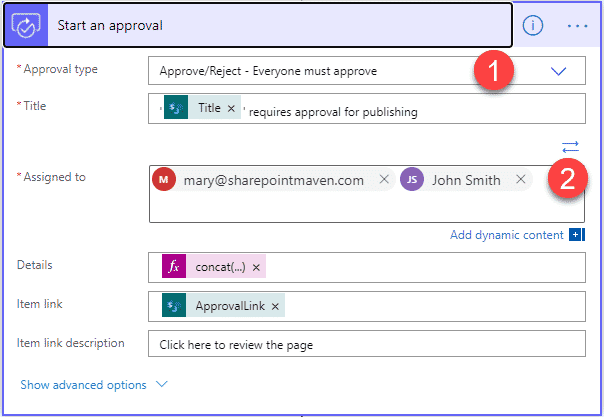
- Workflow Automation opportunities
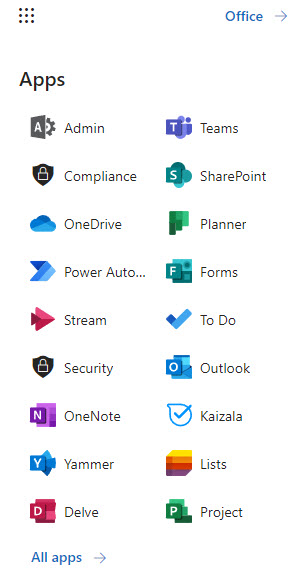
- Access and integration with other Microsoft 365 applications (i.e., OneDrive, Planner, Lists, etc.)
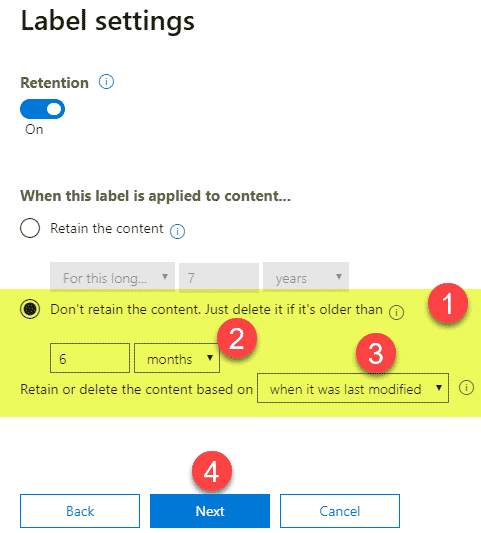
- Retention and Records Management capabilities


SharePoint demo is your opportunity to sell SharePoint and make it exciting before switching to it.
Step 2: Locate and evaluate your current file shares
Once the above step is completed, it is time to roll up the sleeves for you and your business users, because you will need their help! You must identify all the current locations the content is stored at. The chances are, there are multiple locations where employees keep their content. It could be file shares, the old version of SharePoint, employee C: Drives, company cloud DMS (i.e., Dropbox, Google Drive), personal cloud storage using the above applications that users may have created, and so on. To take advantage of SharePoint search and collaboration features, all those locations would eventually need to be merged/migrated.
Once all the current file shares are located, it is time to evaluate and understand the data stored. Does all the data need to be stored and migrated? Can some of it be archived or deleted? This is where you will need to involve your business users since they obviously would be the SMEs for this specific task. You will be surprised how much you will learn about “shadow” storage locations during this step, as it is not uncommon for employees to use personal OneDrive, Google Drive, or Dropbox accounts to bypass the need to VPN into company file shares.
Step 3: Clean up your current file shares
Clean up, clean up. Everybody, let’s clean up. Yep, just like in a famous kids’ song, it is cleanup time. Junk in/Junk-out, right? So you should not really move content that nobody owns or needs anymore. When you must decide to permanently delete the content, even if the last time it was accessed was in year 2000 – it is always a hard thing to sell and execute.
One alternative to complete and permanent deletion of content is to define it as an archive. Then, when you do the migration, this content will be migrated to special Archive sites (more on this later in this article). The archive sites might have restricted access for those “just in case” situations and will be set up independently from working Teams and SharePoint Hubs.
Step 4: Re-organize your current content according to function/security
This particular task can be completed in parallel to the cleanup activity or right after it. If you have been reading my blogs, you are probably aware that in SharePoint, we think in terms of sites, not folders. So the first containers we need to identify are high-level Sites you will need to create to accommodate all this content from file shares. The rule of thumb is that every time you have a unique security/set of permissions, it is always best to create a separate site. So take a look at your file shares and decide the high-level sites you would want to create. For a given department, you might have multiple sites as well. For example, let’s pick Human Resources. HR might have a private Team site connected to Teams for internal content, an employee-facing communication site for employee content, and a few private team sites shared with other functions within the organization for collaboration.
Step 5: Decide on the proper Information Architecture
Once you have a high-level idea about the pool of sites you might create, it is time to refine the list and develop proper architecture. This is where you document the actual sites to be created, the security/permissions model, and so on. Below is a more thorough list of things you need to address and document in this step:
Site Types
There are three site types available in SharePoint:
- Team Site (with a Microsoft 365 Group attached)
- Team Site (without a Microsoft 365 Group attached)
- Communication Site
All sites differ in terms of look and feel, assets/features you get, and the permission model. So depending on the use case and objective, you might need to pick one over the other. I explained the different types of sites in this article.
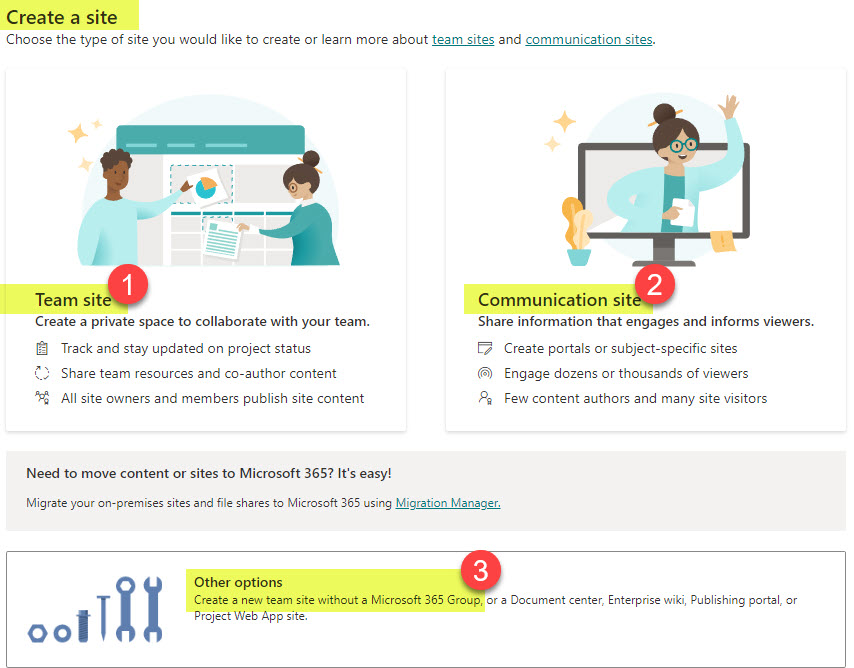
Three types of sites to consider prior to SharePoint Migration
Site Privacy Level
If you opted for a Team Site (especially those connected to Teams), you would need to decide on the proper privacy level:
- Private
- Public
- Org-Wide Team
I explained the difference between different privacy levels here.

Three types of privacy level in Teams (Private, Public, Org-Wide)
Number and types of channels
If you are creating Teams (which gets you a SharePoint site for document management), you will need to consider creating additional channels to separate the content. If so, you will need to decide on the type of channel to create (Standard, Private, or Shared).
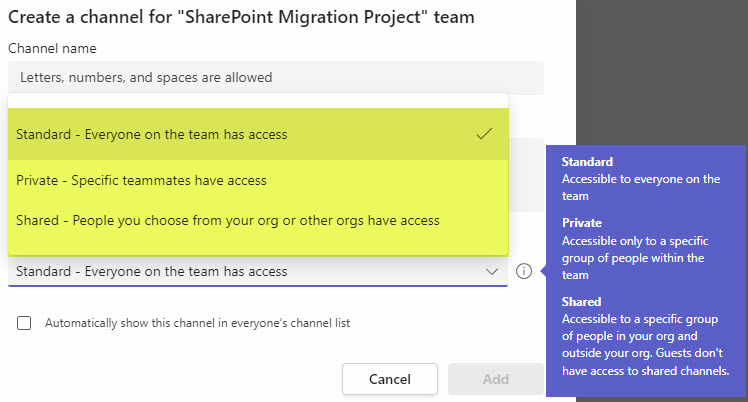
Three types of channels in Teams (Standard, Private, Shared)
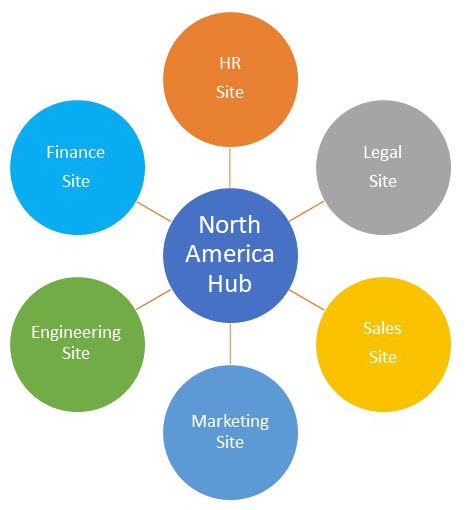
Number of Hubs
You will also need to decide on the number of Hubs to create and which sites from the list above will be part of a given Hub. To help you with that decision-making – check out this post.
Number of document libraries on a given site
Document Libraries have limitations – and that will probably be the major deciding factor in terms of the number of libraries you will need to create. This article will explain this and other reasons as well.
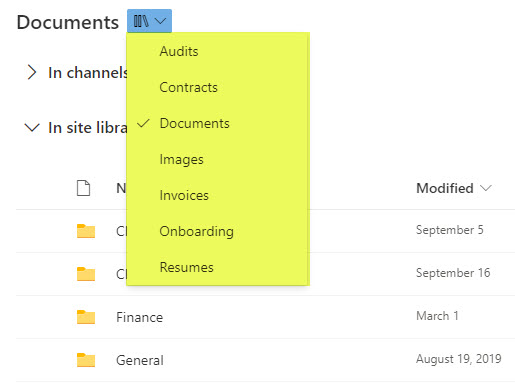
Document Libraries in SharePoint Online
Security/Permissions model
This is where you decide how you will manage permissions. Will you solely rely on Microsoft 365 Groups or Active Directory groups?
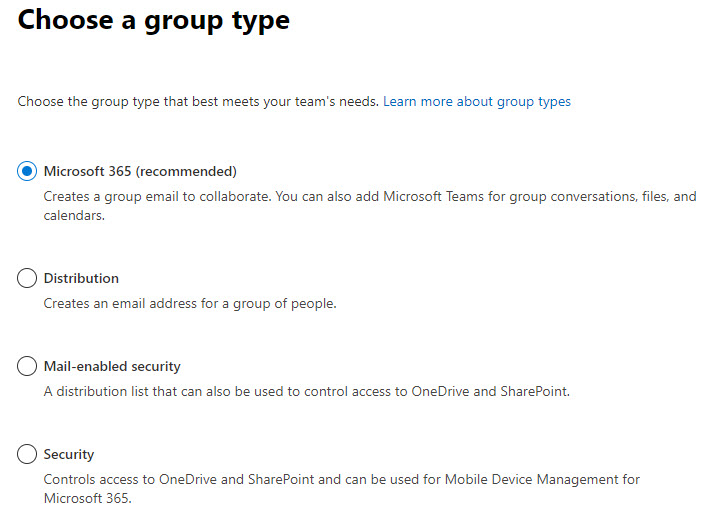
Different types of Groups that exist in Microsoft 365
Step 6: Decide on the Teams vs. SharePoint debate
One of the biggest dilemmas during the SharePoint migration is whether to migrate content to standalone SharePoint sites or those connected to Microsoft Teams. The issue at hand is that in file shares, we randomly organize content in folders and subfolders, but in Teams, things are organized by the types of conversation. Moreover, if you opt for Private or Shared Channels, you will get separate SharePoint sites, and that’s where the content will need to be migrated to. There are two options out of this:
Option 1: Create a Team Site without connecting it to Teams
Create a Team Site without connecting it to Teams and migrate content to that site and let the actual Team decide whether the site needs to be connected to Teams in the first place.
Option 2: Create a Team in Teams
Create a Team in Teams, which will, of course, create a SharePoint Team Site and migrate all the content to the General Channel (folder) and then let the Team decide on extra channels and channel types that need to be created. This option assumes that Team (users) will reorganize the documents later on themselves and move them to respective standard, private, and shared channels.
Step 7: Create proper sites/teams/hubs
This step is where the sites/teams/hubs are actually created according to the roadmap defined above. So essentially, this is where the shell is set and getting ready for the migration. Depending on the number of sites, you might do some of these tasks manually and automate via some scripting/PowerShell.
Create an Archive Site
As mentioned above, when you execute a SharePoint migration, I also like to see an Archive Site created. It won’t need to look pretty or be branded like the other sites. It also won’t be connected to the main hub or any hubs for that matter. Instead, it might be a site with several document libraries containing documents that Business Users do not really use but have a hard time letting go of. You might also want to create unique permissions for this site, so that it does not mix up the search results when searching for active/ongoing documents.
Step 8: Migrate content
OK, now that all the homework has been successfully completed, it is time to click that Migrate button. There are plenty of choices when it comes to the migration of content, from manual drag-and-drop to a Free Migration tool that is part of SharePoint Admin Center to 3rd party migration tools. But this is purely a mechanical process that will move the content from the current location to the new destination in Teams/SharePoint Online.


Step 9: Conduct Staff Training
Remember that SharePoint demo you did at the beginning of a project? Well, now it is time to do serious training. Working with documents on a network or even Google Drive is very different from working and collaborating in Teams/SharePoint Online. Everything behaves differently; you get features you did not have before (version history, check-in/check-out, co-authoring, and so on). Moreover, many users prefer to mimic the file share experience and synchronize document libraries locally. Well, this is where the trouble starts, because, once again, it does behave differently, and there are limitations that will cause unforeseen circumstances. Long story short, training is mandatory for the success of the project. Training does not need to be boring or lengthy. In this article I published a bit earlier, I list various training courses and resources you might want to consider.
Training is also an excellent opportunity for you to sell the final product, set some guidelines, and start the conversation about Governance.
Step 10: Re-evaluate the architecture
Now, though core SharePoint migration might be a one-time event, you might need that migration tool a bit later to help reorganize content within SharePoint. As your employees become more mature and hands-on with Teams and SharePoint, there might be a whole new set of needs and requirements that will prompt extra migration. For example, the team might realize that they need to create several private and shared channels within a Team and need to move a bunch of documents from the General folder to the newly created channels (separate sites in the case of Private and Shared channels). Since there are limitations in terms of how much you can move using the built-in move command, you might want to dust off that migration tool again.
Moreover, you might need a migration tool to move other, non-document components as well if such exist and are used on a SharePoint site (i.e., lists, calendars, pages).

Share Article