How to track documents in SharePoint using Document ID feature
Today I would like to talk about a feature that has existed for quite some time in SharePoint. The feature I am talking about is called Document ID. Historically, it has been used by organizations to track documents in SharePoint. However, it also has some other benefits as well. Though SharePoint went through a renaissance lately with a whole suite of modern features (i.e., Modern pages, Office 365 Groups) – the feature is still available, so I would like to explain what it is and how to track documents in SharePoint using Document ID.
What is the Document ID feature?
Document ID is a feature available at a site collection level in SharePoint that assigns each document uploaded to SharePoint a unique ID. This ID allows us to quickly find a document within SharePoint by this uniquely assigned number. Moreover, the documents also get a permanent URL (via the same unique Document ID assigned to it). So in case the document is moved to another location within the same site collection – the URL does not change.
What are the benefits of a Document ID feature?
Some time ago, I wrote a post on Unique ID feature that one can display in any document library or list. The Document ID, though, has the following advantages over the Unique ID mentioned above:
- You can search a document in SharePoint by the Document ID (instructions towards the end of the post)
- The document gets a permanent URL in case a document is moved to another location within the same site
- Unique ID is unique to a list or library, while Document ID is unique to the whole Site Collection!
How to configure the Document ID feature
Document ID feature is automatically enabled in Document Centers, but those sites should not be used (might want to check out this post to find out why). So below, you will find instructions on how to enable the Document ID feature on any site (classic, modern, Office 365 Group site or Communication Site).
Step 1: Activate the feature
The first step you need to do is activate the feature at a site collection level. To do this:
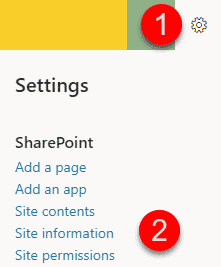
- Gear Icon > Site Information
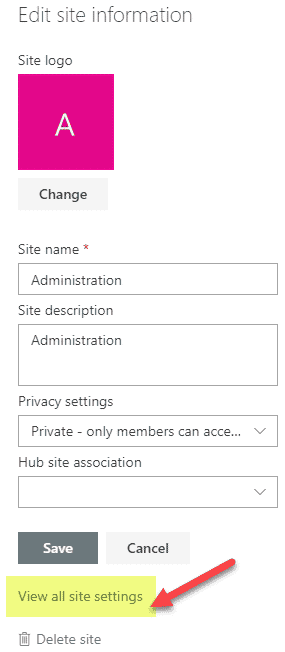
- Click on View all site settings
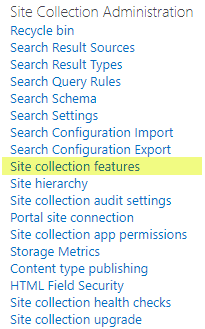
- Under Site Collection Administration, click on Click on Site collection features
- Scroll down to Document ID Service and click Activate

- Give it a few seconds to activate, and it will look like this

Step 2: Configure the Document ID feature
Once the feature has been activated, you need to configure it.
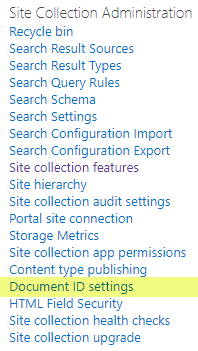
- Again, under Site Collection Administration (in Site Settings), you will see Document ID settings. Click it.
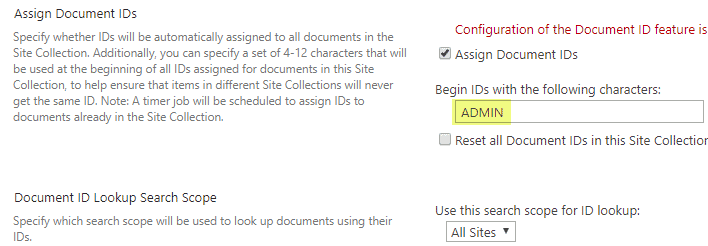
- On the next screen, you can specify a custom prefix for your Document IDs. By default, it arbitrarily assigns some characters, but you can assign your own if necessary

- Go ahead and change the prefix as you wish. In my case, I want the prefix to be ADMIN. Click OK
Step 3: Display the column on a Document Library
With steps above, we just activated the Document ID column, but if you wish to see it in your document library, you need to display it. To do that:
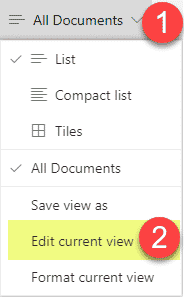
- Edit the View
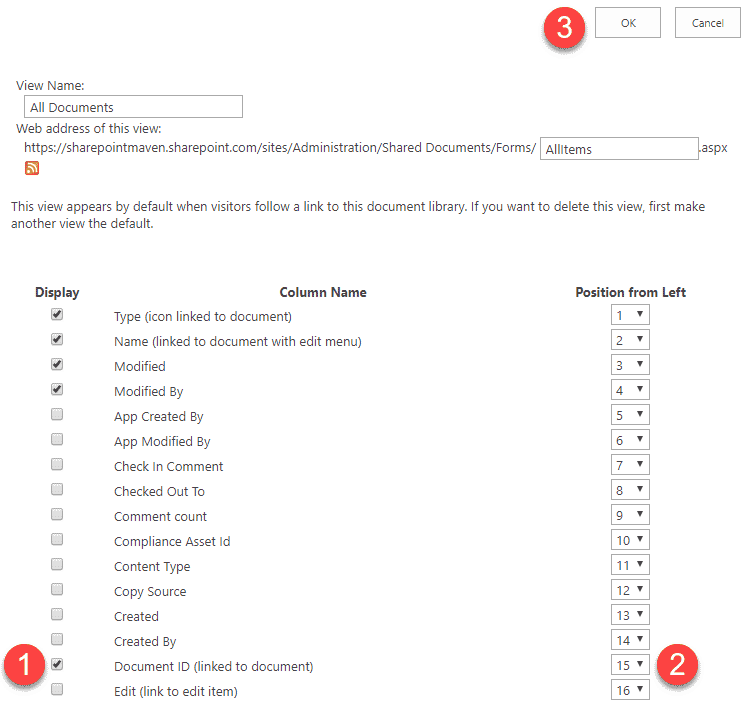
- Check the box next to Document ID column, specify the order and click OK
- You will now see the Document ID column appear in your library! Mazel Tov!

Step 4: Upload documents
The basic setup has been done, and now we can upload some docs. I suspect you know how to do this (either Upload or Drag and Drop).
You will notice that if you had some documents in your library already – they do not have a Document ID assigned (it is blank). Also, the new documents uploaded still carry the old Document ID prefix. Both issues are due to the fact that Document ID assignments and changes are not instant. There is a timer job that runs in the background that takes care of these changes. You might need to wait up to 24 hours.
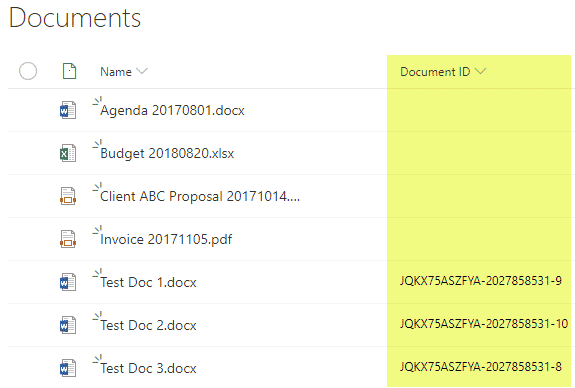
Document Library shortly after the Document ID feature has been enabled
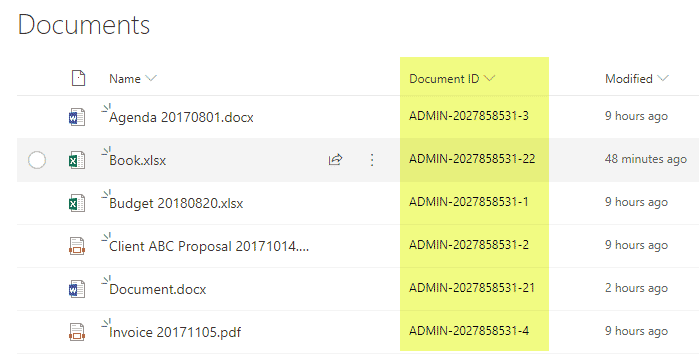
The same library after timer job ran (up to 24 hours)
Cool things to do with the Document ID feature
Here is how you can take advantage of the Document ID feature:
Search
Modern SharePoint
If you want to search by Document ID in modern SharePoint, you need to use this syntax:
DlcDocId:Doc ID #
I will not go into details why this is the case, but will just mention that we are searching by Managed Property of a Document ID (something I plan to explain in my future posts).
So for example, if a Document ID is ADMIN-2027858531-3, you will need to type in DlcDocId:ADMIN-2027858531-3 into the Search Box in SharePoint. If you type the Document ID, partially or in full, the search will not pick it up.
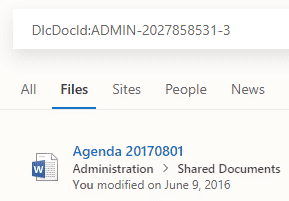
Search results for search above
Classic SharePoint
Things are a bit easier with classic SharePoint pages. Over there, we have a web part called Find by Document ID that allows you to search simply by Document ID without any additional properties/prefixes.
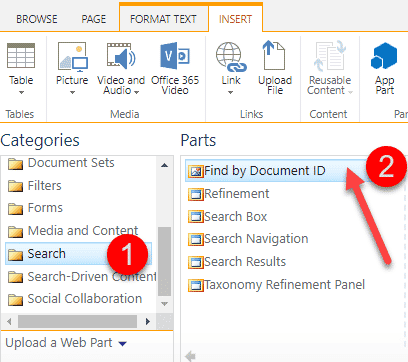
Once added to the page, it adds a tiny search box

You can either search by full Doc ID # (i.e., ADMIN-1294483281-3) or use a wildcard search by putting an asterisk (*) around the partial text (i.e., *1294483281*).
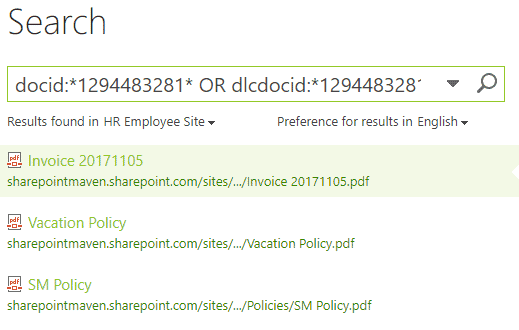
Search results for a wildcard search above
Embed property in Microsoft Word
Another cool thing you can do with Document IDs is to embed them in Word documents. This is handy if say you share your documents outside of SharePoint (i.e., with external vendors or clients). Having an embedded Document ID feature “stamped” on the documents allows users to quickly locate the “original” in SharePoint, should this need arise.
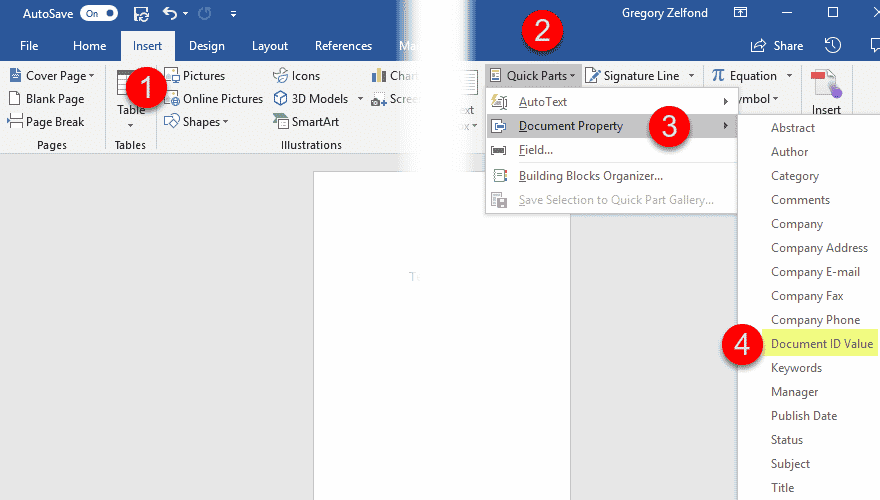
Add Document ID field to Word using the steps above
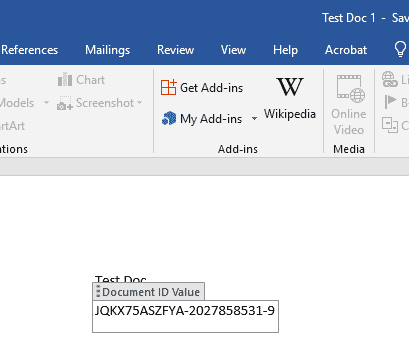
And this is how SharePoint Document ID is displayed in a Word document
Move Documents to other Sites
The cool thing about Document IDs – they “stick” and remain the same, should you move the documents to a different site. The most critical requirement for this – destination site (collection) must also have Document ID service enabled; otherwise, it will be lost. Joanne Klein, a leading SharePoint expert I deeply respect, performed many tests on the various move scenarios and documented in a great post, which can be found here.


