How to create a custom list in SharePoint
We have lots of out of the box web parts at our disposal in SharePoint. We have Tasks for task management, issues for issues management, a calendar for events, and so on. But what if you want to create a custom list in SharePoint with your own custom columns and replicate, say an Excel spreadsheet? It is not that hard at all to accomplish in SharePoint – let me show how to do this.
Step 1: Create Custom List web part
The first thing you need to do is create a custom list web part. That’s right, there is a web part specifically for custom lists. To do this:
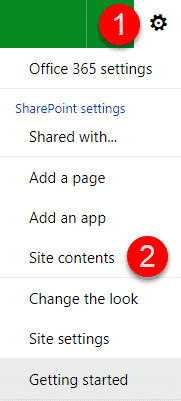
- Click Gear Icon > Site Contents
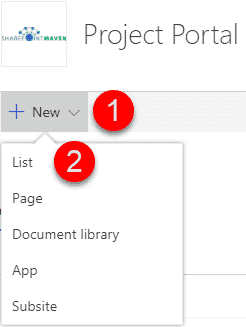
- New > List
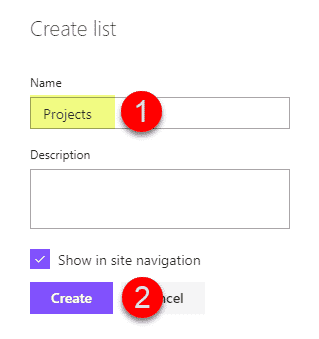
- Give it a name and click Create
- You will now see a blank custom list on the screen


Step 2: Enable versioning
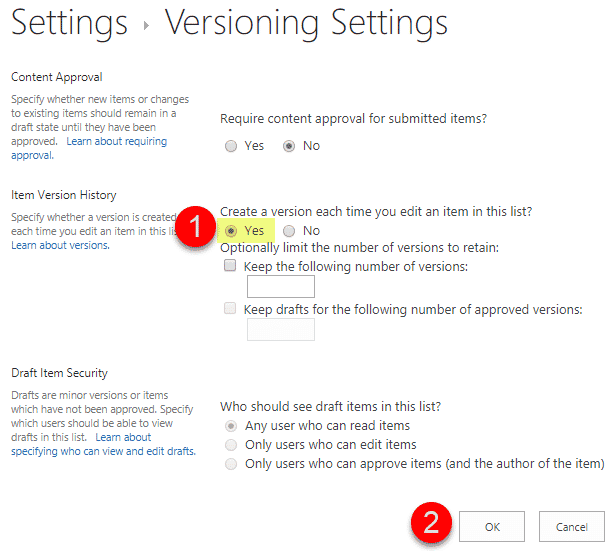
Before we create columns, we have to take care of few housekeeping steps. The first one is related to Versioning. While in SharePoint Online versioning is enabled by default for document libraries, it is not enabled by default on lists. So you have to enable it manually. The reason why you might want to enable versioning is that it allows you to track the history of an item. This might become handy as say a project changes its status. I wrote a post on versioning previously, you can check it out here.
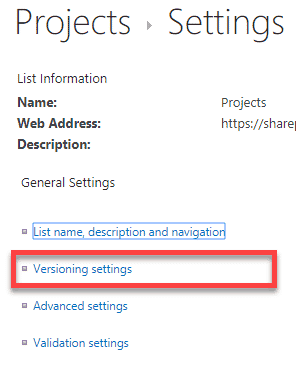
How to enable versioning on a SharePoint custom list
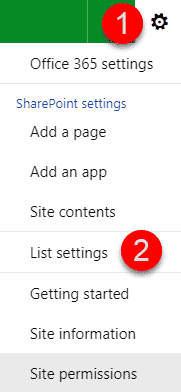
- Gear Icon > List Settings
- Click on Versioning settings
- Set the Create a version each time you edit an item in this list? radio button to Yes, then click OK


Step 3: Disable Attachments
Another housekeeping step to take care of is to disable attachments. There might be some unique situations where you would leave them on, but for most custom lists, it is a good idea to disable them. I provided some arguments for this reason in this post. You can also reference the same post for step-by-step instructions on how to disable attachments on the list.

Step 4: Create custom columns
Now we are ready to create some custom columns. The column types you will create will depend on what it is that you are building. Say, we are building a custom list of Projects (project dashboard) for the Project Management Office. In this case, we will create the following columns:
- Project Name (text entry)
- Project Manager (people picker)
- Department (drop-down)
- Budget (currency)
- Status (drop-down)
If you are in SharePoint Online and use a modern list, you have 2 ways to create columns (from front-end and back-end). If you run classical list or have SharePoint on-premises, you can only create columns via back-end. To demonstrate both options, I will create the first column via back-end and 2nd column via front-end. NOTE: I am going to skip Project name column for now and you will understand why in Step 5 further down.
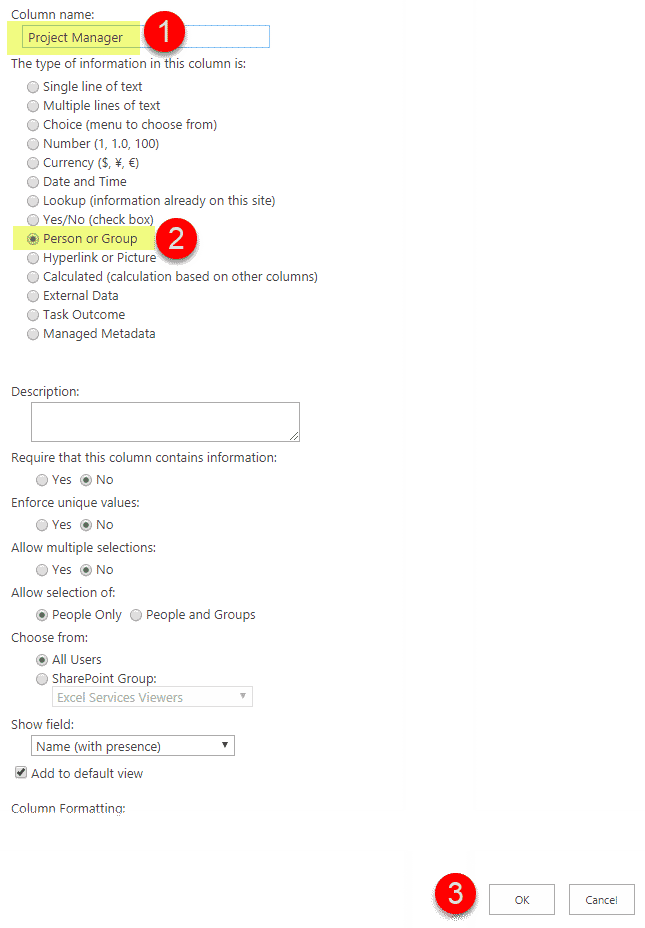
- To create Project Manager column (via back-end), click on Gear Icon > List Settings
- In the Columns section, click on Create column
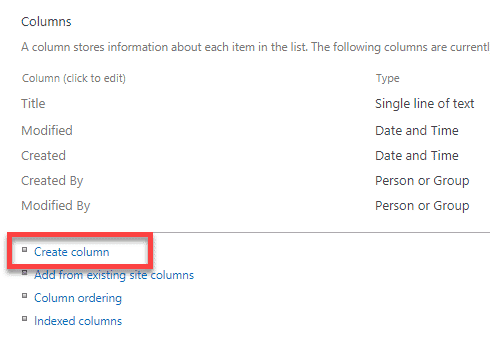
- Fill in the Column Name, choose the corresponding column type and click OK
- The column will now be added to the list

- To create Department drop-down (via front-end), go back to the list and click the “+” sign, then choose Choice option (Choice means drop-down)
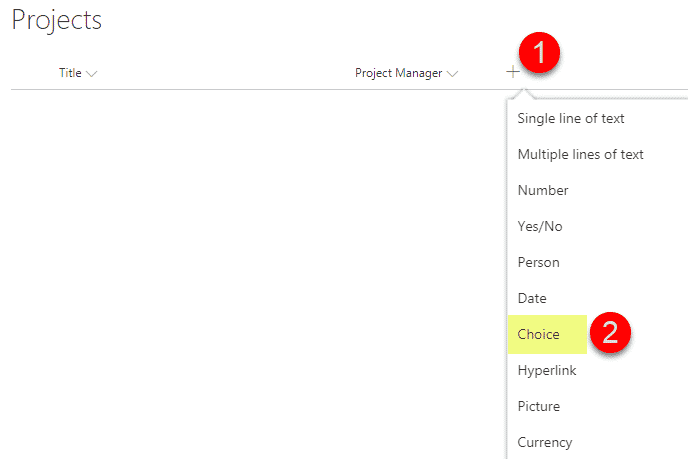
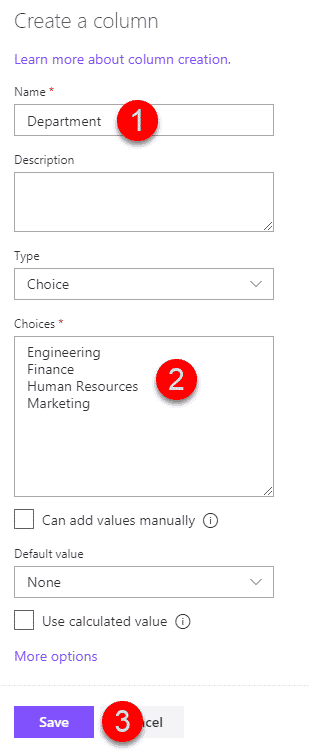
- On the panel on the right, fill in the column name, drop-down choices, then click Save
- The column will be added to the list – it is looking good!

- Add all remaining columns to the list by repeating the above steps.. When all is set and done, we will get the following:


Step 5: Re-purpose the Title Column
If you look at the image above, you will notice that we still have the default Title column. The title is a default (and mandatory) metadata that is part of a custom list. That said, the column name does not make a lot of sense to us. We can either hide it or re-purpose it (I documented all the options in this post). In our case, we will re-purpose. It is text column, and Title is a text column, so all we have to do here is rename Title to Project Name, and we are done!

Step 6: Add some data entries
OK, we are now at a point where we can add some data to our list. To do this, just click the New button and fill in the blanks!

Repeat a few times to get several rows of information in.

Step 7: Create custom views
The coolest thing about custom lists (like any lists with metadata) is that you can create many different views. For example, we can group our projects by Status or Project Manager or have filtered views by Status (i.e., Active projects only). To create grouped or filtered views, follow instructions in this post – it is super easy! By the way, make sure to create a new view, do not edit the existing All Items View – here is why.

Cool things you can do with Custom Lists
Following steps are optional and will extend your custom list functionality depending on your business scenario. Important to note that some of those suggestions below are only available for modern lists (SharePoint Online/Office 365 only).
Enable Item-Level permissions
This step is not necessary, but you might want to consider it if you want to enable item-level permissions. Say, you want some entries (rows) to only be visible to those who created them. In this case, Item Level Permissions is your friend! I explain all about it and how to set it up in this post.

Enable Content Approval
Once again, this is optional but might become handy. Say, you don’t want to have entries added automatically to the list and instead, want them to go through an approval first. Guess what – you can enable Content Approval feature and have entries approved first by those with special privileges before they are visible to everyone on the dashboard. Once again, I have written a post on this already, you can check it out here.

Create a workflow
If you are in SharePoint Online/Office 365, you can create and execute a workflow using Microsoft Flow. For example, you could create a custom list in SharePoint for Vacation or Purchase Order Approvals and then have a workflow carry it through a round of approvals. Speaking of which, I talk about this very topic here.

Build a PowerApp
You can go one step further and use your custom SharePoint list as a foundation for an app. All of that, thanks to PowerApps functionality. This does require an above the average power user know-how though. Pretty advanced, but powerful!


Share Article