How to create Hub Sites in SharePoint
It is hard to believe, but Hub Sites in SharePoint have been around since 2018 now. Hub Sites allow organizations to create meaningful site structures based on the company hierarchy so that users can easily access and navigate around the SharePoint sites. I published a step-by-step article back then on creating hub sites in SharePoint. However, just like with most features in SharePoint, Hub Sites improved in terms of additional functionalities. As such, I decided to write a new article to capture the latest features and nuances. Enjoy!
What is a Hub Site?
If you are new to the whole idea of Hub Sites, first, I would like to explain what the Hub Site is all about. As you create SharePoint sites in your Microsoft 365 tenant, they each have their own look & feel, design, URL, navigation, security, and content. However, sometimes you might want to navigate from one site to another easily, which is impossible without a few clicks. While you can create navigation links from one site to another, you have to do the same on the other site as well. With tens and possibly hundreds of sites your organization might have, this simply becomes impractical to maintain.
Luckily, we now have this Hub Site functionality. In simple terms, a Hub Site ties all these separate sites together via a common navigation. The idea behind the Hub Site is that you maintain the hub navigation on one site (parent site), and all the sites connected to the hub inherit that navigation (associated sites).
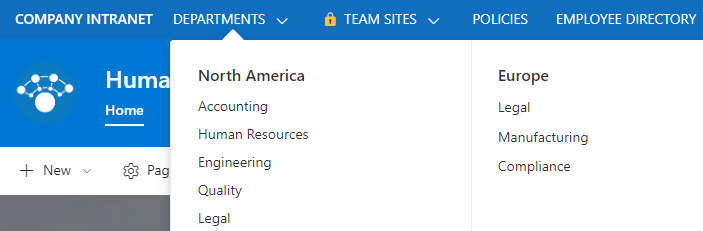
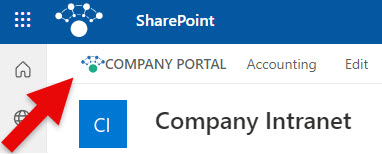
Example of the Hub Site Navigation in SharePoint
Use Cases for Hub Sites
There are plenty of use cases for Hub Sites. Essentially, whenever you want to create common navigation among multiple sites, you must create a Hub Site. Specifically, I would like to highlight the following use cases:
- Intranet Hub Site (Intranet Hub Sites with links to various department sites within an Intranet)
- Department Hub Site (A hub for a given department to link all the various department sites)
- Project Hub Site (A hub for PMO with links to all the different project sites)
Hub Site Limits
As of the writing of this post, according to Microsoft, the following hub limits exist:
- Max of 2,000 Hub Sites per tenant
- There is no limit on the number of associated sites per single Hub
While the limit above is a technical limit within SharePoint, you might wonder what the optimal hub structure should be and how many hub sites to create. I provided that guidance in this article.
Step 1: Register a site as a Hub
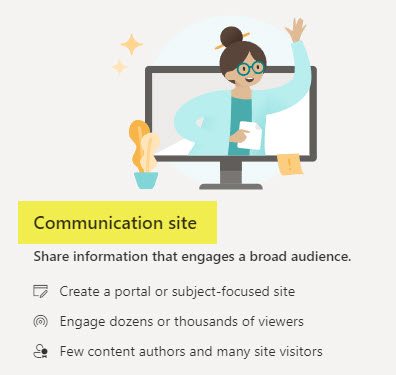
The first step in the process is to register a site as a Hub. This will be the “parent” site that will tie all the other sites together. This will ultimately be the site where you will manage hub navigation and hub theme (more on this later). Before following the instructions below, make sure that you will register a Communication site as a Hub. You do not want to choose a Team Site, since it implies restricted access. The parent Hub Site should be accessible by all the users within a Hub, and a Communication Site is always an excellent choice for this type of arrangement. To better understand the difference between a Team Site and a Communication site, read this article.
- Make sure you create a Communication Site first
- Navigate to the Microsoft 365 Admin Center
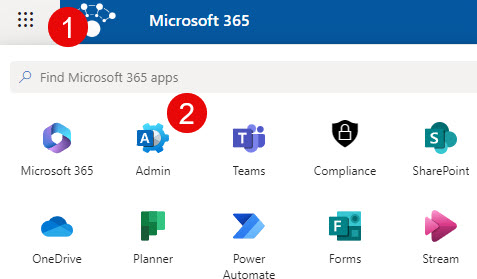
- Under Admin centers, select SharePoint Admin Center
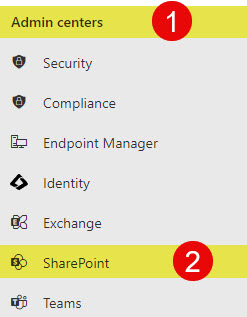
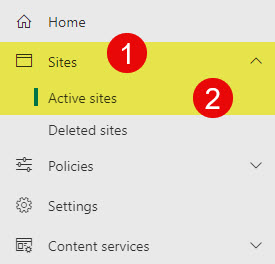
- Once in the SharePoint Admin Center, click on Active Sites (under Sites)
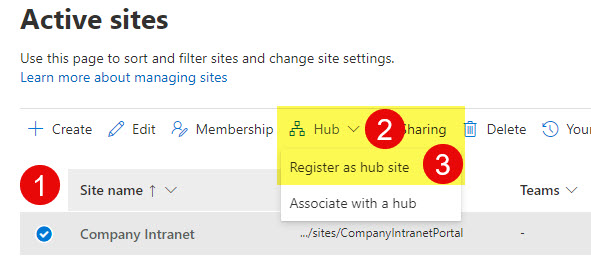
- Next, check the box next to the site you want to be the Hub Site (Parent), then Hub drop-down > Register as hub site
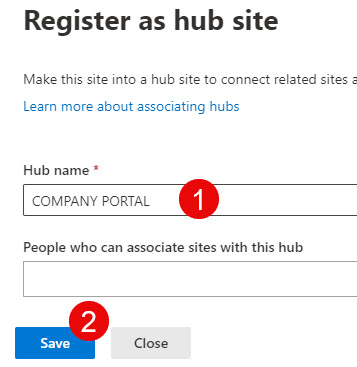
- On the next screen, give the Hub a name (you can change it later). Click Save.
Step 2: Associate other sites to a Hub
The next step in the process is to associate a site (or multiple sites) with a Hub. This can be done from 2 places:
- SharePoint Admin Center
- SharePoint Site itself
It is important to note that a given site can only be associated with 1 hub at a time!
Associate a site to the Hub from the SharePoint Admin Center
To associate sites with a Hub from the Admin Center, do the following:
- Check the box next to a site (you can select multiple sites, too), then Hub drop-down > Associate with a hub
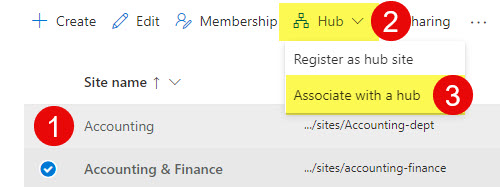
- Choose the Hub you want to connect to and click Save.
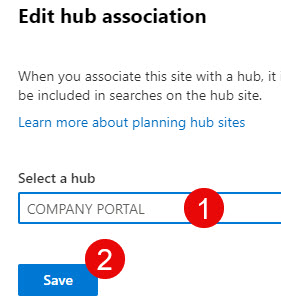
Associate a site to the Hub from a site itself
By default, any Site Owner can also connect to any hub within your environment. We can prevent this, I will explain how later in this article. But here are the steps for the Site Owner to connect their site to the Hub:
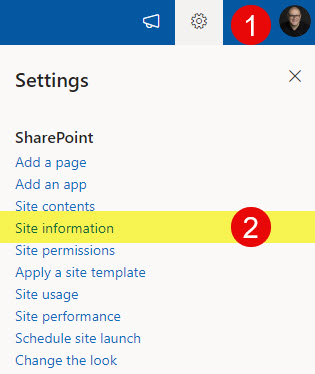
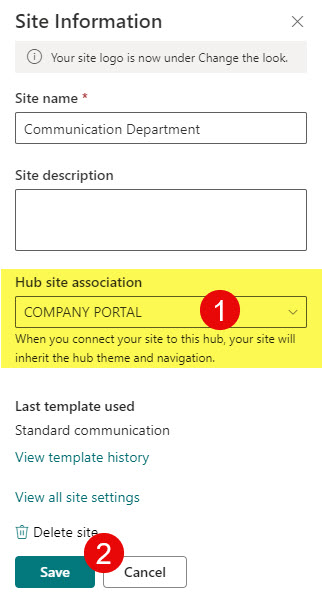
- From a SharePoint Site, click Gear Icon > Site Information
- Choose the Hub you would like to connect to and click Save.
Step 3: Build Hub Navigation
The next step is to build out the Hub navigation. This is not something that happens automatically once the site is associated to the Hub. Hub Navigation can only be managed by the Hub Site Owner.
- Navigate to the main Hub Site
- Within the Hub Navigation, click Add link
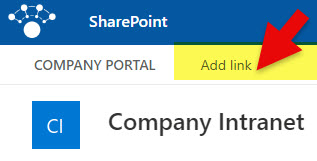
- Paste the link to one of the associated sites, give it a name (label), click OK, and Save.
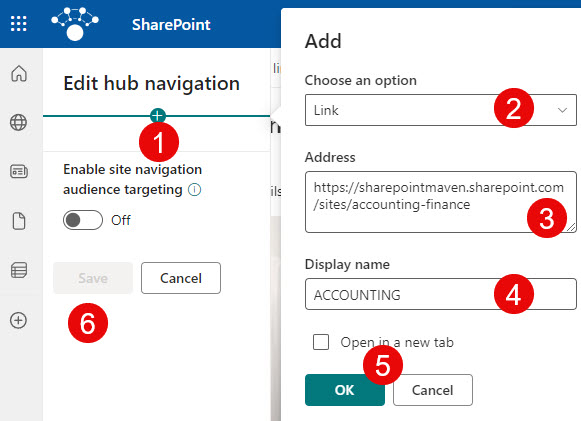
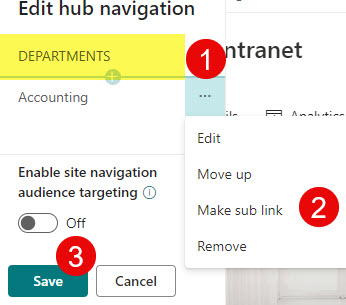
- If you have way too many links, you can also create Labels with sublinks to organize them better.
What happens when you create a Hub
It is important to note that when you create a Hub Site in SharePoint, it is not just the common navigation that the sites get. There are a few other important benefits.
Navigation Inheritance
Whatever navigation you create at the Hub Site (parent) level propagates all the way down to the associated sites. This is essentially why we have Hub Sites in the first place.

Example of Hub Navigation inherited from the Parent Hub Site
Theme and Header inheritance
Another essential element that propagates from the Hub Site to associated sites is a theme and header background color. This is a super important feature when you build, say, an Intranet Portal and want to ensure consistency in terms of branding, look, and feel.
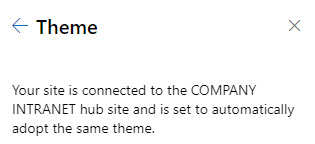
Example of an error message when user tries to change a theme on an associated site
It is important to note that the site logo does not propagate. Just the Theme and Header color.
Hub Search Scope
Another thing that occurs is that an associated site becomes part of the Hub Search Scope. In other words, if you want to search the entire hub and all associated sites, you will see Search across sites, and that search box will search all sites that are connected to the hub. Of course, just like with anything in SharePoint, search results would be based on permissions to the associated sites.

Example of the Search Box from the Parent Hub Site
What DOES NOT happen when you create a Hub
It is equally important to note that some things users expect to be inherited or occur when you create a Hub do not actually happen. Specifically:
No impact on security & permissions
Contrary to popular belief, nothing happens to its permissions when you connect a site to a Hub. If you, say, connected a private/restricted Team Site to a Hub, Hub visitors will not get access to that restricted site. They will get an access denied message. There is a way to allow Hub Visitors to access the associated site, but this requires consent from both the Hub Owner and the Restricted Site Owner. More on this will be discussed at the bottom of this article.
No Site Logo inheritance
As mentioned above, there is no logo inheritance. You would need to manually change the logo on each site within a Hub.
No automatic navigation
As we already found out, the associated site does not magically get added to the Hub navigation. You have to add it manually. We covered this in Step 3 above.
Hub Data Aggregation/Roll-Up
There are other important benefits to creating Hubs. And they have to do with data aggregation and roll up. Certain Web parts allow you to aggregate content from associated sites within a Hub.
Roll up News in the Hub
If you utilize the News Web Part within the Hub Site and associated sites, you can roll up news and announcements from those sites and display them on the main Hub Site. This could be an invaluable mechanism for letting various Department Owners post news to their respective sites and then aggregate them all on an Intranet Homepage (Hub site).
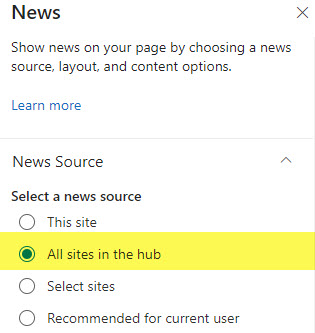
Example of an extra source (All sites in the hub) option appearing within the News Web Part on Hub Sites
Roll up Events in the Hub
Likewise, we can roll up calendars from associated sites using the Events Web Part.
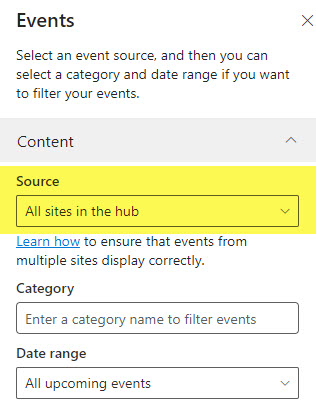
Example of an extra source (All sites in the hub) option appearing within the Events Web Part on Hub Sites
Roll up documents in the Hub (HCWP)
If you have ever used an HCWP web part, you can use it to roll up documents and other content from various sites. In the context of the Hub Sites, you can choose all sites within a Hub as a source.
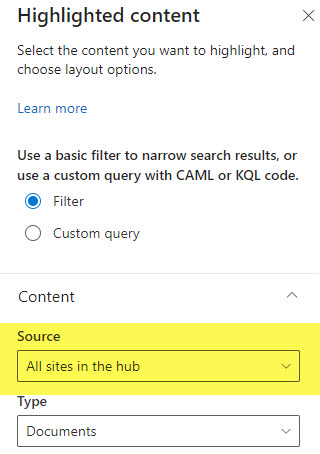
Example of an extra source (All sites in the hub) option appearing within the HCWP Web Part on Hub Sites
Display all sites within a Hub (Sites Web Part)
This last trick is not so much a roll–up as another “hidden” benefit of Hub sites. If you add the Sites Web part to a Hub Site, it can automatically display all the sites that are part of the Hub!
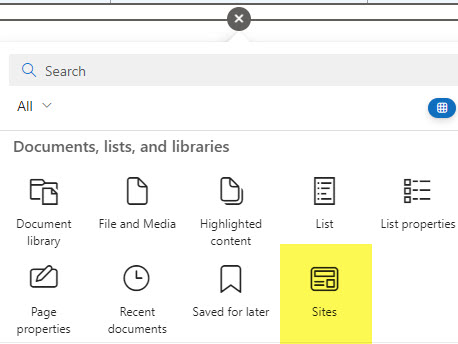
Sites Web part in SharePoint
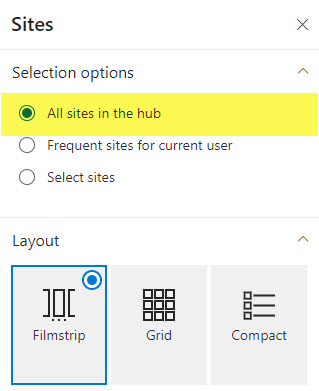
Example of an extra source (All sites in the hub) option appearing within the Sites Web Part on Hub Sites
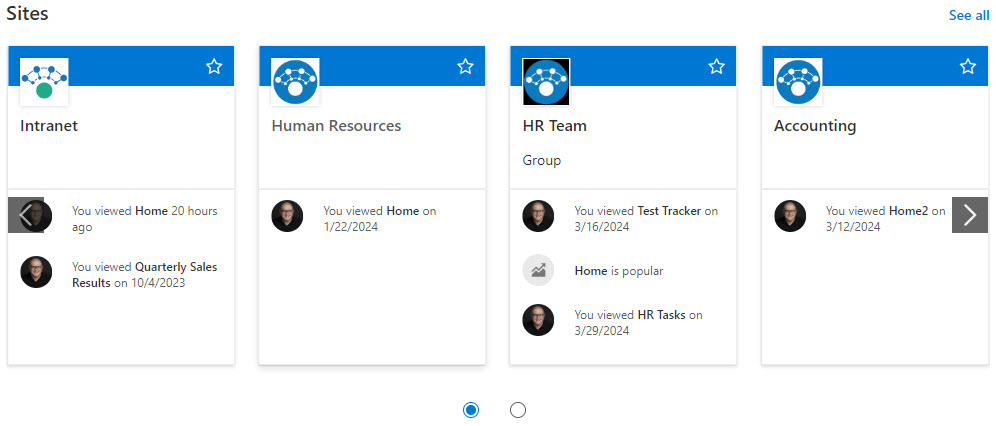
Display of all Sites within the Hub using the Sites Web part in SharePoint
Optional Steps after Hub Site Creation
I decided to outline in this section optional steps that you might opt to implement based on your unique business requirements.
Add Hub Logo
Just like we can add a Site Logo, we can add a Hub Logo. It will appear to the left of the Hub Navigation. And it does serve its purpose. No matter where you are within a Hub (any site), clicking on the Hub Logo will take you to the Hub Site (parent site).
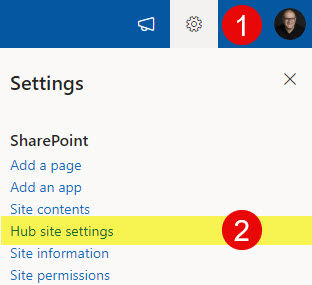
- Click Gear Icon > Hub site settings
- Click Upload and choose the logo (make sure it is small and square)
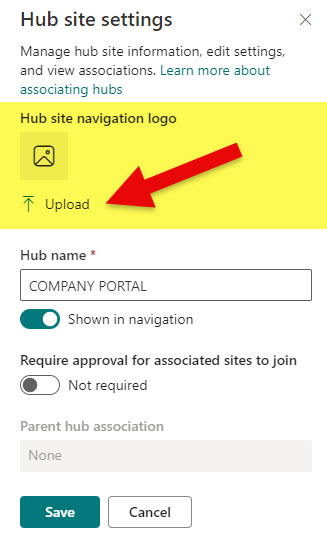
- Click Save
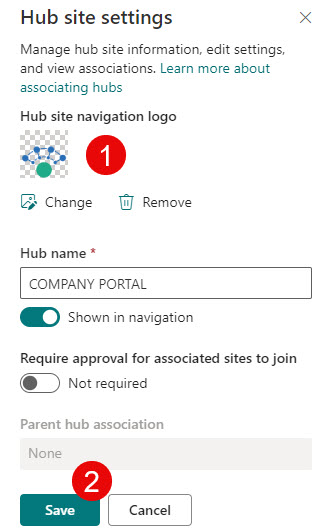
- This is how Hub Site Logo will appear on the site.
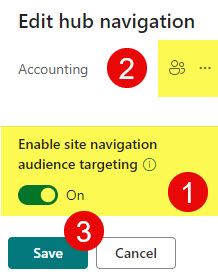
Set up Audience Targeting
The next thing you can do is set up Audience Targeting. This is handy if you connect restricted/private sites to the hub and do not want them to be displayed in the navigation for users who do not have access. By default, the labels and links you add to Hub Navigation will be visible to all the visitors. However, based on permissions, you can target them to specific audiences (groups). This feature will allow you to personalize the navigation menu based on who is logged in. I explain how to set up navigation Audience Targeting in this article.
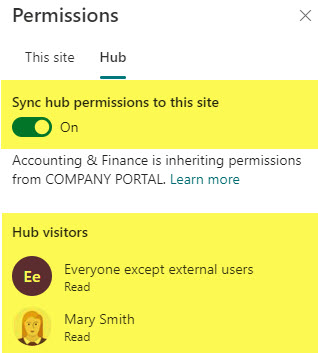
Sync Hub Permissions
To be honest, this next step is not something I endorse. As mentioned earlier, when you connect a site to the hub, it does nothing to its permissions. However, if you want to quickly allow Hub Site Visitors to get read-only access to the associated sites, you can do so with the Sync Hub Permissions feature. I blogged about it previously.
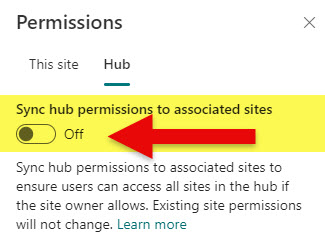
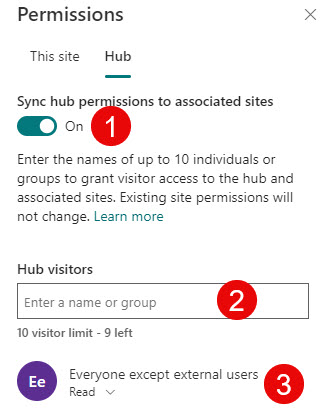
It is important to note that even if you enable it, each site owner must manually sync their site’s permissions and enable the feature. This way, if you are a Site Owner of a private/restricted site, you still control/access your site, not the Hub Site Owner!
Set up who can connect/associate sites to the Hub
The next setting that might be worthwhile to implement (especially if you are part of a large organization) is to configure who can connect (associate) sites to your Hub. By default, any site owner can associate their site with any hub! So, if you do not want any unwelcome guests in your portal, you might want to tweak those settings.
There are 2 ways to prevent users from connecting to the Hub:
- By specifying users within the SharePoint Admin Center
- By creating an approval workflow for Hub Connection requests
I documented both options here.

Example of an approval workflow for Hub Association
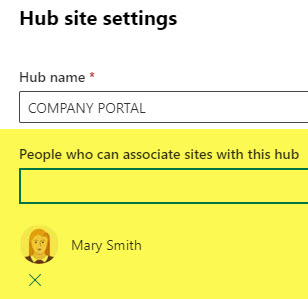
Example of Hub Approved Users who can associate sites to the Hub (set up in SharePoint Admin Center)
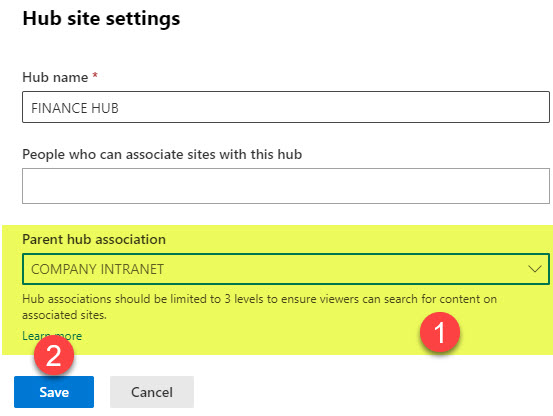
Embed a Hub within another Hub
Another thing you can do with Hubs is nest them. This might become necessary if you have several Hubs in your tenant and want to mimic the organization structure. For example, you have a Hub for a Business Unit, Region, or Department and would like to nest it inside the Corporate/Intranet Hub. I explained how to nest hubs and the important nuances/limitations here.
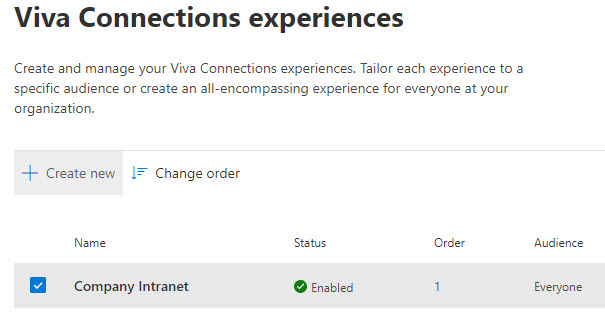
Register a Hub Site as a Home Site
This step might only be necessary if your Hub happens to be an Intranet Site/portal and you would like to promote it as the leading site in your organization. You can register the Hub Site as a Home Site to do this. This will allow your site to later be included in Viva Connections, SharePoint App Bar, etc.
Check Hub Usage
Finally, when you register a site as a Hub, you get an aggregated Site Usage Analytics Report, accessible from the Site Usage. While you can get analytics for individual sites, when you choose the Hub option, it gives you analytics for the whole Hub and its sites. It might be handy in some cases.


Share Article