6 ways to save files to SharePoint
I had an interesting and trivial question being asked the other day by one of my clients. “How do I save files to SharePoint?” I almost responded, “You must be kidding.” I thought, just like breathing and eating – this was intuitive and common knowledge. But then, as I was explaining the options, I realized that there are way too many techniques to save files to SharePoint, each with its pros and cons. So, to answer my clients’ question and for my own sanity, I decided to write this post and document all the options for you. Here we go.
Method 1: Upload Button
The most basic and intuitive option would be to use the Upload button on the library. For those who are in SharePoint Online, you can upload multiple files and folders. Those living with older versions of SharePoint or those who run SharePoint on-premises or those still running classical look and feel of a document library – you can only upload one file at a time using this method.

Method 2: Drag and Drop
This is the new feature that became available with SharePoint Online/SharePoint 2013. The convenience factor here is that you can drag and drop multiple files and folders from any location right onto your browser. Please note that just like with previous option, you cannot drag and drop folders unless you have SharePoint Online and use modern experience for a document library.

Method 3: Save As from Word, Excel, PowerPoint
March 2018 Update
Since I have written this post, Microsoft has implemented a change which allows for a very smooth and different user experience than described below. So for the latest instructions on this particular technique, please reference this post. The technique described below still works but is not as user-friendly as the one mentioned in the link above. You might still need to utilize below technique if you run older versions of MS Office suite. So keep reading!
***********
If you are authoring a brand new document in Word, Excel, PowerPoint or OneNote, you can save documents directly to a specific SharePoint site/library. This might prove very convenient, as you don’t need to save a document to the desktop first and then upload to SharePoint, eliminating an unnecessary step.
Here is how you do this:
- Copy the URL of a SharePoint site you want to save a document to
- From Word, Excel, PowerPoint or OneNote, do File > Save As > Browse. In the window that pops up, paste the URL of the SharePoint Site in the address window. Make sure to not include the full path though. For example, if your site address is https://companyname.sharepoint.com/sites/intranet/accounting/SitePages/Home.aspx, only paste the part up to /SitePages/Home.apsx (https://companyname.sharepoint.com/sites/intranet/accounting). Otherwise, it won’t resolve, and you will get an error message.
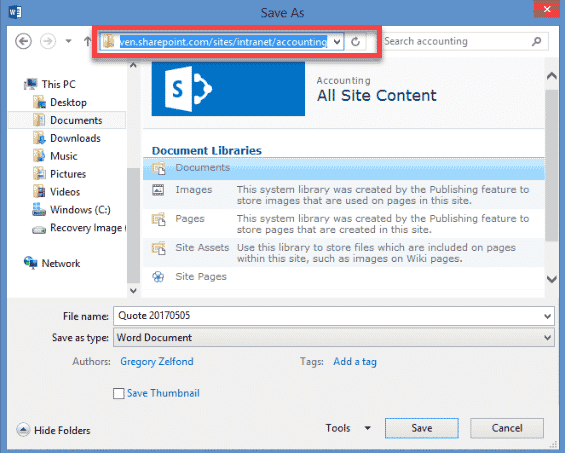
- Once you do the above, you will see contents of the site. So just navigate to a library and specific folder where you want to save a document to and click Open
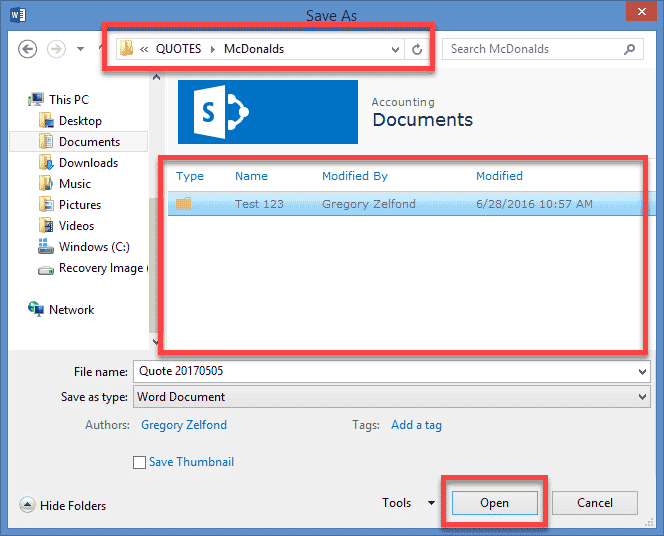
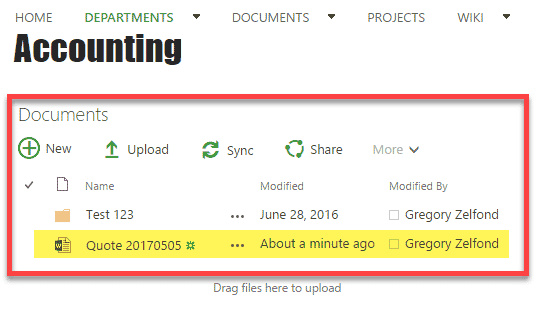
- The document is now saved directly to SharePoint


NOTE:
In Step 2 above, you could also paste the URL of a document library itself, not the whole site. However, just like described in Step 2 above, make sure to paste the URL of a library itself, do not include the path to a specific view. For example, if the full path to a library/view is https://companyname.sharepoint.com/sites/intranet/accounting/Shared%20Documents/Forms/AllItems.aspx, the path you need to paste in the address bar of the pop-up is https://companyname.sharepoint.com/sites/intranet/accounting/Shared%20Documents (without /Forms/AllItems.aspx).
Otherwise, the location will not resolve, and you will get below error message:

Method 4: Create new Office Online document
Another way to save files to SharePoint is to create them from SharePoint! :-) Instead of creating new documents in Word or Excel on your desktop, you can use the “New” drop-down button and choose the file you want to create. You can choose from Word, Excel, PowerPoint and OneNote.

The beauty of this method is that files created this way are getting automatically saved into the document library/folder where you clicked the “New” button from! Moreover, no need to be paranoid about hitting the Save button – document is auto-saved for you, courtesy of Office Online capabilities.

Method 5: Upload via Windows Explorer (File Explorer)
Another option for you to save files to SharePoint is via Windows Explorer. When you open a document library via Windows Explorer, it opens up a regular File Explorer window, and you can drag and drop your documents and folders, just like you are moving/copying files in Windows. This is not my favorite option, and I actually published a post on why you no longer need this. You might resort to this option only if you have a classical document library, run SharePoint on-premises or have non-Microsoft Office files (i.e. AutoCAD or Photoshop files). If you use modern library experience, use any of the above options instead.

Method 6: Upload via OneDrive Sync Client
Another option for you to save the files to SharePoint is by using OneDrive sync client. What that means is that you Save your files to the OneDrive sync folder on your C: drive, to a previously synchronized document library and the sync does the rest by syncing (copying) the files to SharePoint Online. To read more about this feature – click here.


Share Article