< All Articles
How to import Excel to SharePoint list
Quite often, when trying to build a list of data in SharePoint, you might not necessarily start from scratch. Whether it is a contact list, a project list, or an issues log, you might already have such data in Excel. If this is the case, you can save a ton of time by importing an existing Excel file into a SharePoint list. The benefit you get here compared to starting from scratch is that not only you get the list created, but you also get the data populated as well. Let me show you how to do this.
Step 1: Format Excel list as a table
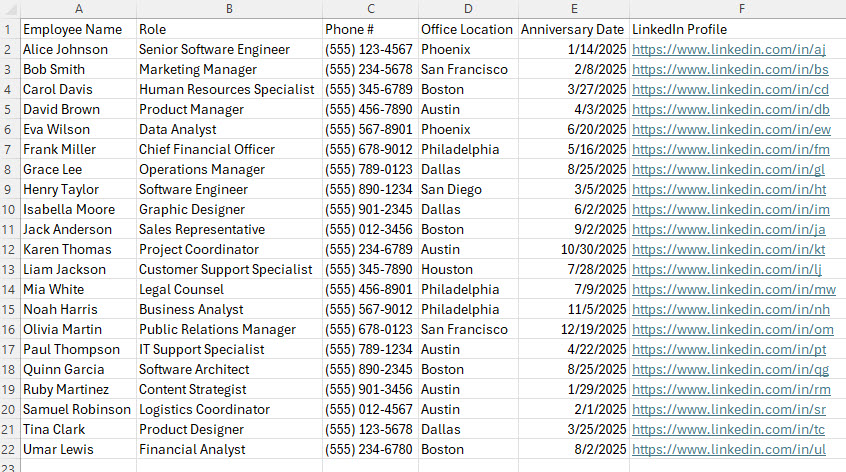
This is super important for this process to work. You can’t just take any Excel and import it – it has to be formatted as a Table. Below is an example of a Contact List I maintain in Excel and would like to import into a list.
- You need to format the spreadsheet as a Table. To do so, highlight the range first in Excel, then choose Format as Table.

- Click OK on the next screen.

- Your Excel will now be formatted as a Table and look like this.

Step 2: Import an Excel spreadsheet into a Microsoft list
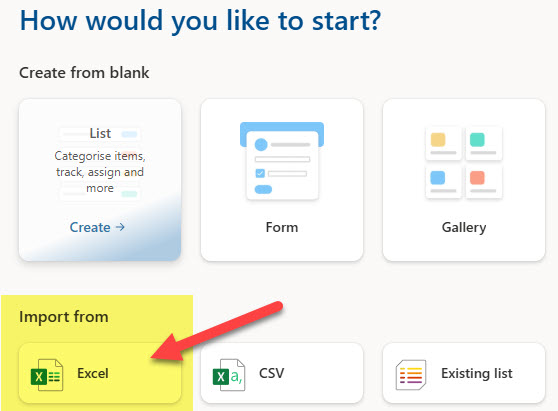
- On a SharePoint site where you want to create a list, click New > List

- You are going to see several options for creating a custom list. The one you need is called Import from Excel.
- Give the list a name and click Create.

- Next, we have to choose an Excel file. We can either upload one from the computer or select an existing one from the default document library on a site. For this article, I will upload a new one.

- After you choose the Excel file, it will perform the import, and the next screen you will see will be similar to this one. This is where you match the Excel data column to a corresponding type of column in the SharePoint List. If you are unfamiliar with the possible types of columns, check out this article. By default, most columns will import as a Single line of text, but depending on your data, you might want to switch to a different type of column (i.e., Date and Time, Currency, Choice (drop-down)). Make appropriate selections and click Create at the bottom of the screen.

- The image below demonstrates the end result. The list has been created with the proper column types, and data from the Excel file was also imported.

Nuances about Excel Import
- If you choose to upload a file from your computer, the Excel file gets uploaded to the Site Assets Document Library

- Once you create a custom list from Excel, there is no association between Excel and the custom list you created. In other words, changing either one will not change the other.
- Before importing Excel to a custom list, you must format your Excel as a Table, as stated in Step 1 above. Otherwise, you will get an error message below.

- When you map your data to the types of columns (Choice, Currency, Date and Time, etc.), one column type (the Title Column) is mandatory. You can’t have a list without a Title Column. It is a column that opens up an item when you click on it. Make sure to choose a Text column as the Title column.
- When you import an Excel spreadsheet to a SharePoint custom list, you are limited to a subset of column types (i.e., no Hyperlink, People, or Location column types are available)
- The columns will be created at the library level, so it is not possible to later use/reuse them at the site level.
- Kind of related to the above, the drop-down columns will give you a chance to default to Choice columns. If you were thinking of using the Term Store, you won’t be able to.
- Import from Excel is a one-time operation. In other words, once the Custom List is created, you cannot import additional rows of info from Excel. Your only option at that point would be to copy rows of data from Excel and paste them into the custom list using the Edit in Grid View function.
- According to this article from Microsoft, you can import an Excel table with a maximum of 5,000 rows. If you have more than 5,000 rows, you will get an error message “This table exceeds the maximum number of supported rows (5000)“


Share Article