If you are an experienced Project Manager and out of the box SharePoint Tasks Web Part is not enough for you to manage projects, you are in luck. In SharePoint Online/Office 365, you can easily sync MS Project with SharePoint Tasks Web Part. This would allow you, as a Project Manager, to enjoy all the sophisticated features of MS Project like resource management, reporting, and task management, while providing a clean and straightforward interface to tasks for your team members via SharePoint Task list. Let me explain.
How to Sync MS Project with SharePoint
Method 1: Open Task List from SharePoint using MS Project
If you already have some tasks in SharePoint Task List and want to create your MS Project Schedule using those tasks, you can open that task list in SharePoint using MS project. To do that:
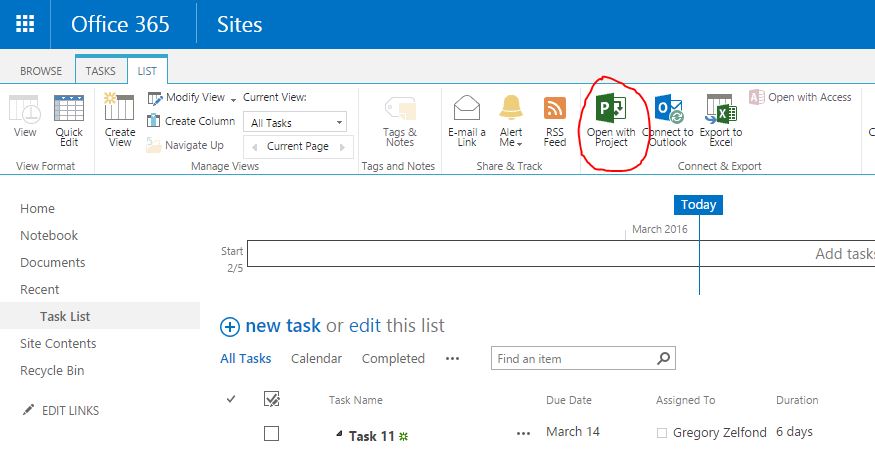
Navigate to the Tasks Web part, click on List Tab, then, Open with Project button (you need of course to have Project Professional installed on your computer for that to work)
Your SharePoint Task List will open in MS Project, where you can make further changes
If you hit a Save from within MS Project, the changes will be synchronized to the SharePoint Task List
Method 2: Sync MS Project with SharePoint Task List
If instead, you already have a project plan in MS Project and want to make it available in SharePoint, you can sync MS Project with SharePoint Task Web Part. To do that:
From MS Project, click File > Save As
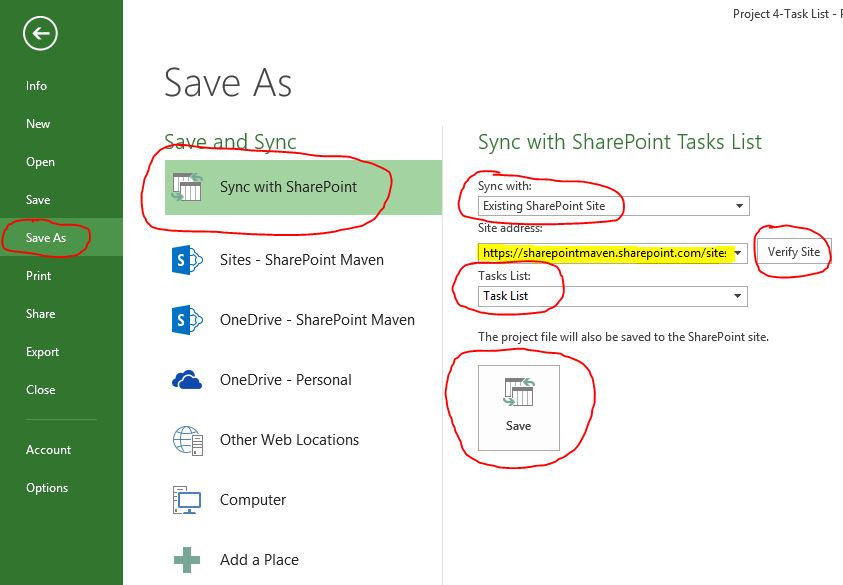
On the left panel, choose Sync with SharePoint
On the panel on the right, fill out all of the fields/drop-downs. In the first drop-down, make sure to select “Existing Site” (since you are syncing to an existing site in SharePoint and not creating a new one)
In the Site Address field, paste the URL of the SharePoint Site. It has to be a complete address, but just of the project site, not the task list
Once you paste the URL, click on Verify Site. This checks if the site exists
Once you verified site, all the available task web parts on that site will appear in the last drop-down. Choose the specific task list you will be syncing to. In most cases, there will be just one task list on a site
Click Save
Your MS Project schedule will now synchronize to SharePoint
What happens when you sync MS Project to SharePoint
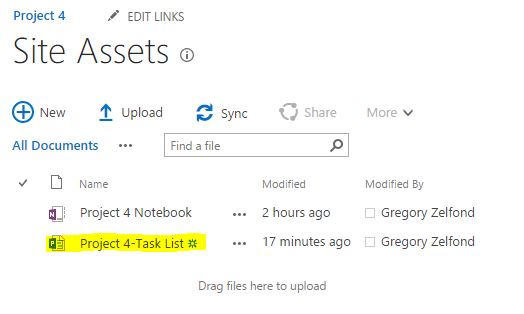
This is very important! The first time you sync MS Project with SharePoint or the first time you hit Save in MS Project (if you opened it from your Task List), it creates a .mpp file on SharePoint, in Site Assets Library. You can access the file by going to Site Contents > Site Assets
So next time you need to open the tasks in MS Project or make quick changes, you can open that file – it will automatically sync the changes from SharePoint Task List to that file.
Which method should I use?
Scenario 1: You want Project Team Members to be the primary source of updates
If you want your team members to freely update, add, delete tasks and essentially make them the ones who control the information on your schedule, then you can:
Set appropriate permissions (i.e., Contribute) for the task list for your members (so they can make changes to tasks on SharePoint)
As a Project Manager, access MS Project and make changes to it by clicking Edit button on the Project Plan stored in Site Assets library (the changes will be 2-way if you open Project Plan in that manner)
Scenario 2: You want Project Manager to be the primary source of updates
If you are a control freak like me, it is very unlikely that you, like most Project Managers, will want users to freely adjust tasks on a Master Project Schedule without appropriate approval and communication. As such, in this case, you can:
Restrict the ability to modify tasks for your users on a SharePoint Task List (i.e., Read). So essentially your team members will not be able to make any adjustments to tasks on SharePoint List
As a PM, you can utilize MS Project Schedule file located in Site Assets Library and make all your changes there (which will be automatically synchronized to SharePoint task list)
Or, you can store a copy of the Master Project Plan to your local computer, in that case, you will need to re-sync every time you make changes. Also, in this scenario, you might be seeing some warning/error messages which I will cover in the next section.
Some common warning/error messages when you try to Sync MS Project with SharePoint
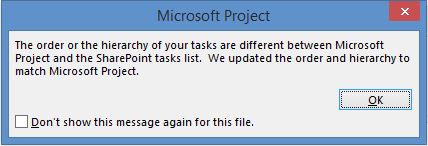
The order or the hierarchy of your tasks are different between Microsoft Project and the SharePoint Tasks list. We updated the order and hierarchy to match Microsoft Project. This error typically occurs when you try to sync MS Project file from your computer to SharePoint tasks list for the first time. The problem is that when you sync MS Project and existing task list, though to you it is the same project, both apps think they are two different ones. So once you click OK on the warning message, it will duplicate tasks in both MS Project and SharePoint and you will need to do a bit of cleanup. This error will keep re-occurring every time you open file again and try to re-sync. To prevent this, it is advised that you open the file from Site Assets Library as stated above
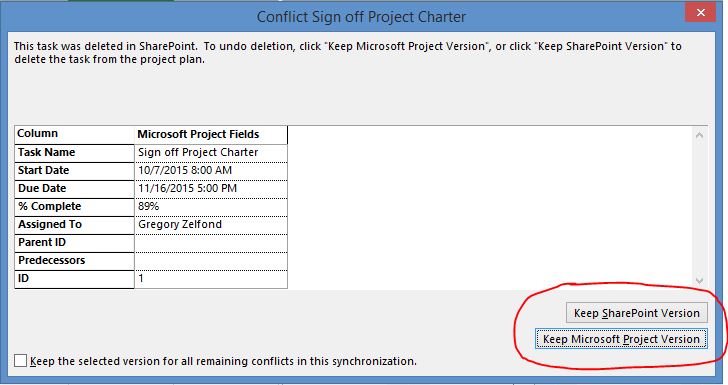
Conflict Resolution.You might get a warning message that looks like the one below in case you have MS Project Open and task is deleted in either SharePoint Task List or MS Project, and then you try to synchronize the changes. At this point, MS Project needs some guidance on which schedule (version) is primary. You can do this by clicking on either “Keep SharePoint Version” or “Keep Microsoft Project Version” buttons. This message does not appear when you do other types of changes, like task additions or modifications. Just task deletions.
We can’t sync resource to the tasks list because the resource does not exist on the SharePoint Server. This error usually happens when you define your project schedule and try to sync it with SharePoint for the first time. The reason this error occurs is that SharePoint cannot recognize your licensed users (resources) from the text that you typed in MS Project Resources field. It is usually pretty good, if you typed names exactly as they are set up in your SharePoint/Active Directory, however, in some cases or whenever name was misspelled, such error message will pop up. To mitigate this, correct the spelling to match the name of how it is set up in SharePoint. Alternatively, you can assign some tasks to those users in question from within the SharePoint Task List. Next time you open MS Project from Site Assets Library or sync it from your computer, it will get those “correct” resources into your Resource drop-down in MS Project, so you would be able to reuse them going forward.
Bonus: Map fields
If you read through this sync MS Project with SharePoint blog post and are still craving for more adventure, I have some bonus material for you. Another thing you can do with MS Project-SharePoint sync is map custom fields. For example, SharePoint list is designed to be simple, for end-users really, meant not to overwhelm them with too much detail or metadata. MS Project, on another hand, is intended to be complicated, contain lots of data/columns, etc. In case you want to surface up some of that info to your end-users via SharePoint Task list, you need to map those fields. Essentially, you need to tell which columns in SharePoint will hold MS Project information once you click the sync button. To do this, you need to:
Create a custom column in SharePoint Task List Web Part
Sync MS Project with SharePoint Task list (besides the regular exchange of info during sync, this will also “notify” MS Project about your newly created column)
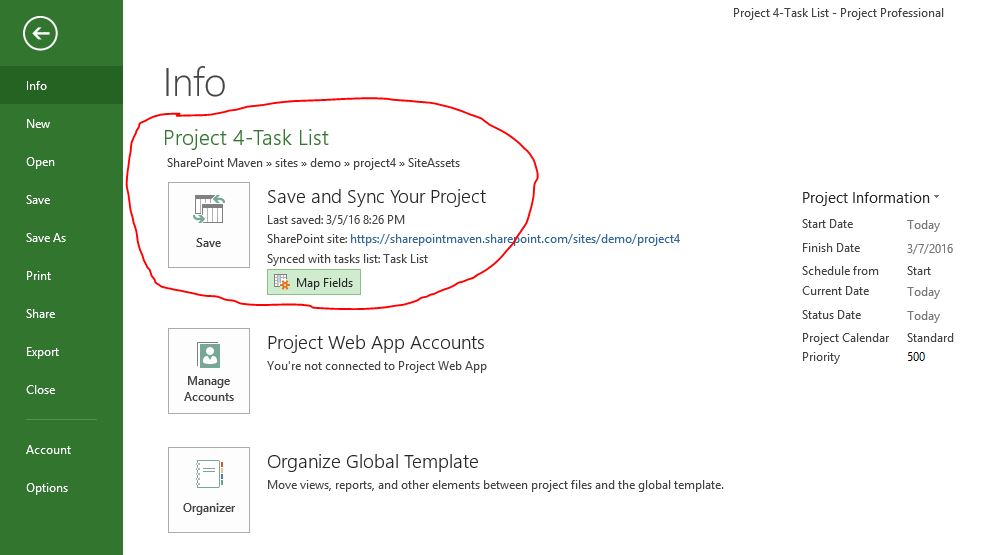
From MS Project, click File > Info, under Save, you will see Map Fields button. Click on it
On the next pop-up is where you map the fields. It is pretty straightforward. You essentially choose SharePoint column you created in Step 1 (on the right side) and on the left side choose MS Project field that will map into this column. In the example below, I created a Duration column in my SharePoint task list and mapped it to the Duration field in MS Project. Don’t forget to check the sync box to the left of the mapped fields. Click OK.
Now that fields are mapped, the next time you sync, the information will be brought over to SharePoint.
Now you can display the information from that column in your SharePoint Task list, by modifying a view and adding the column to the view. That’s it!
I blogged quite a bit about OneDrive sync in the past. It is a great option that allows you to replicate what you got in SharePoint in your Windows Explorer.…
OK, my loyal blog followers. I sinned, and I must confess in something. I should have written this post long ago, but I am only writing it now. There is…