< All Articles
How to configure SharePoint Site Footer
One area of SharePoint that probably does not get much credit is the Footer. It is not surprising since to get to it, users have to scroll all the way down to the bottom of the page. However, despite its “introverted” nature, SharePoint Site Footer can serve as a pretty practical branding element that can also contain relevant information for the employee. In this article, I would like to show you how to configure the footer and provide several use cases and examples of how I successfully used the footer on my clients’ sites.
How to configure SharePoint Site Footer
- From a Communication Site, click on Gear Icon > Change the Look
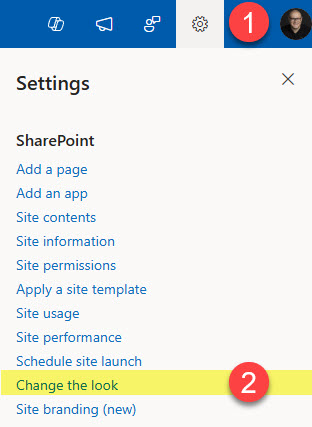
- Click on Footer
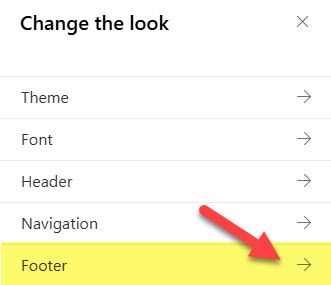
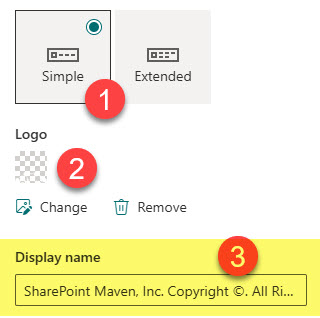
- Right away, you will notice several ways you can configure the Footer. You can enable or disable it, choose its height (Simple or Extended), upload the logo, add a name, and adjust its background color.

- Let me now share the specific details of each of the above options.
Upload the Logo and add a Name
If you upload a logo (icon) and add a display name, they will appear on the left side of the Footer.

Edit the Navigation Menu (Simple layout)
One of the benefits of the Footer is that, just like the Header, it allows you to add navigation elements (links and labels). This is great for secondary links that might not be as critical as important as those appearing in the Header (i.e., links to Privacy Policy, etc.). For this example, I am keeping a Simple (small height) layout. The Extended layout has some additional options that I will describe in the next section.
- To do so, click the Edit button in the Footer

- Add a link or label the same way you do this on the Header
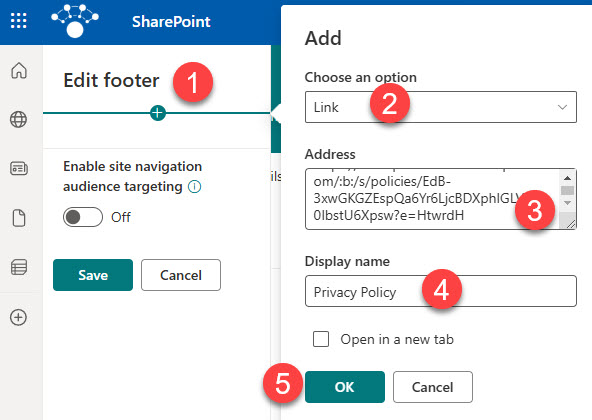
- Once you click the OK button above, this is what the navigation will look like in the Footer

Edit the Navigation Menu (Extended layout)
If you opt for the Extended layout, you’ll have much more space to add your links and labels. Most importantly, you’ll also get an additional feature. Let me explain!
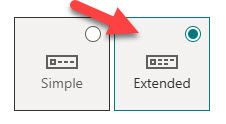
- Choose the Extended option from Change the look > Footer screen
- Add links and labels like you usually would
- Click on three dots next to a link, and you will see an extra option become available – Make sub link. It essentially allows you to organize links into submenus. I described this concept in this article.
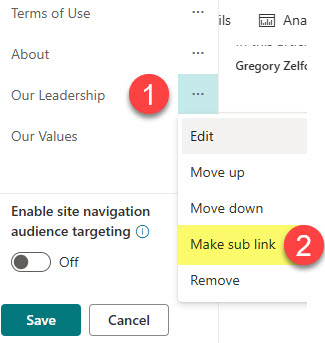
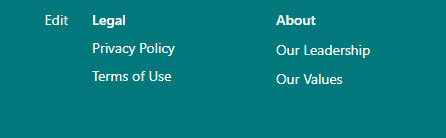
- Unlike the same option in the Header, this option does not create a drop-down navigation. Instead, it displays the links (sublinks) under the parent labels.
Important Information about the SharePoint Site Footer
- SharePoint Site Footer is only available on Communication Sites, not Team Sites
- The footer is configured on a site-by-site basis. In other words, if you configured Footer on the main Intranet Site, it will not appear on other sites within the Hub.
- Only the Extended layout allows sublinks. Simple does not.
- Just one (1) level of sublinks is allowed within the Extended Footer (in contrast to 2 levels in the Header)
- Just like with Header navigation links and labels, you can set up Audience Targeting within the Footer as well.
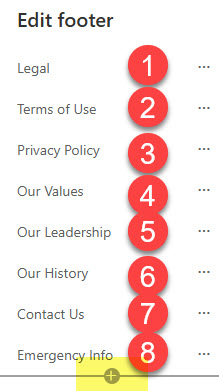
- A maximum of 8 top (parent) links or labels are allowed with either Simple or Extended Footer (Source: Microsoft). If you try to add more, the plus sign will be grayed out.

Use Cases for SharePoint Site Footer
- Links to Privacy/Terms of Use Policies
- Non-essential/secondary links, like the company Website
- Links to Company Social Media Channels
- Link to the Feedback/Suggestion Form
- Contact information for website changes/issues
- Company Address/Office Location Information (via Navigation Labels)

Share Article