How to create a Document Set in SharePoint Online
Time flies. It seemed like it was yesterday when I wrote a very detailed blog post on Document Sets (I remember that because Document Sets are one of the most sophisticated document management features in SharePoint, and creating one and especially writing a post on the topic is very time-consuming). But that was back in 2017 when we still had classic SharePoint. With the modernization of SharePoint, we also got modernization of the Document Set capability. So, I figured I would write a detailed post on creating and configuring a modern Document Set in SharePoint Online.
What is a Document Set in SharePoint Online?
A Document Set is a special type of folder in SharePoint Online that allows users to assign metadata tags to those folders. The regular yellow folders you create in SharePoint, cannot have metadata tags applied to them. I documented this limitation in this post.
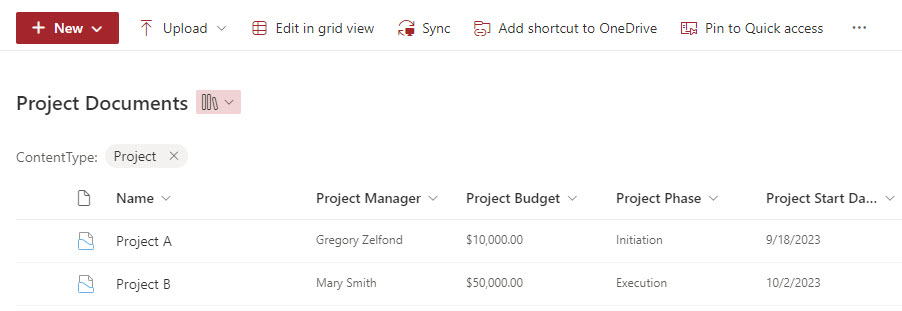
Document Set in SharePoint looks a bit different (has a different icon) than that of a regular folder. To take advantage of a document set, you have to do a bit of setup I go over below.
What are the use cases for Document Sets?
First, you might be wondering what the use cases of Document Set are. Why even bother? Document Sets are great anytime you want to tag folders with certain metadata and files inside with different metadata. For example:
- Small projects. You would tag project document sets with project-level metadata like Project Manager, Project Status, Phase, etc., and files inside would get file-level metadata like Document Type, Document Status, etc.
- Small legal cases/matters. Suppose you are a legal firm, and your cases/matters are relatively small. In that case, you can use document sets for matters and tag them with matter-level metadata like Type of matter, attorney(s) involved, matter status, etc, and files inside would get document-level metadata (document type, etc.). As a matter of fact, I documented this as one of the techniques in this article.
- Legal Contracts. I had many clients successfully use document sets to file legal contracts. The idea is to create a document set for each contract and tag it with contract-specific metadata like name of entity, amount, type of contract, and files inside once again, you will get metadata unique to files (document type, etc.)
- Many other use cases. My clients also used document sets to file Grants, Financial documents, Client Documents, Meeting materials, etc.
Long story short, Document Sets are great for something small, yet repeatable!
Advantages of using Document Sets
Document Sets have some fantastic capabilities and advantages:
- The ability to apply metadata to folders
- The ability to propagate (share) folder-level metadata to files inside of the folder (document set)
- The ability to assign unique metadata to files/documents (independent of folders)
- The ability to have Office templates built into the document sets (for consistency among document sets)
How to Create Document Set in SharePoint Online
Creating a Document set involves many, many, many steps. If, at any point while reading this post, you become lightheaded or experience high blood pressure or anxiety, I strongly suggest you just hire me to set this up for you! 😊
Step 1: Recognize that a Document Set is a Content Type
The most important thing to remember is that Document Set is a special type of Content Type. If you are unfamiliar with a Content Type, I suggest you check out this post. So many steps for Document Set creation will resemble that of a regular content type. With that being said, Document Set Content Type does have some unique settings as well.
Step 2: Define Folder-Level (Document Set) and File-Level metadata
Next, define both folder-level and file-level metadata. I am a very punctual and organized kind of guy, so I always like to be prepared for the next steps. As stated above, folders (document sets) can have unique metadata, and files inside those folders can also have unique metadata.
For the purpose of this article, I would like to use document sets for small projects, creating a document set folder for each project. So, for our example, I came up with the following metadata:
- Project-Level: Project Manager, Project Budget, Project Start Date, Project Phase
- File-Level: Document Type, Document Status
Step 3: Enable Document Set Feature on a Site
The next step you must perform is to enable the Document Set feature on a Site. This step had to be performed from the classic SharePoint days, and though the Document Sets have been modernized, this classic feature setting is still there and must be enabled on every site where you create document sets. While regular metadata and content types can be created on the fly, the Document Set content type must be enabled explicitly on a site. Otherwise, you will not be able to proceed with the setup.
To enable the Document Set feature on a site:
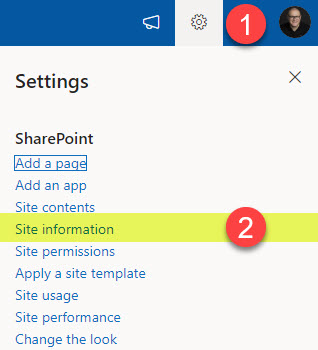
- From a SharePoint site, click Gear Icon > Site Information.
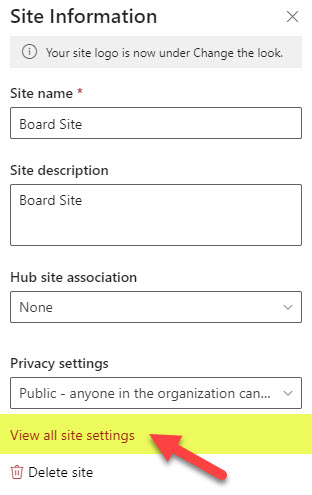
- Click View all site settings.
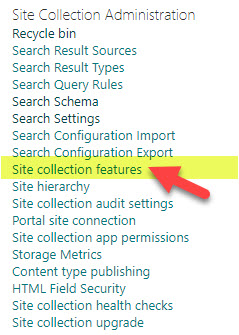
- Then, you will see a screen that looks a bit outdated. As of writing of this post, this is what it looks like, but hopefully, with time, Microsoft will modernize it, just as they did to other pages in SharePoint. This page displays various Admin Site Settings available in SharePoint at the site level. Most are legacy settings from SharePoint’s classic days. Click Site Collection features under Site Collection Administration.
- You will then see various classic features we used to enable in the classic SharePoint days. Most are no longer relevant anymore in modern SharePoint. But Document Set one still is. To activate it, click the Activate button next to Document Sets.
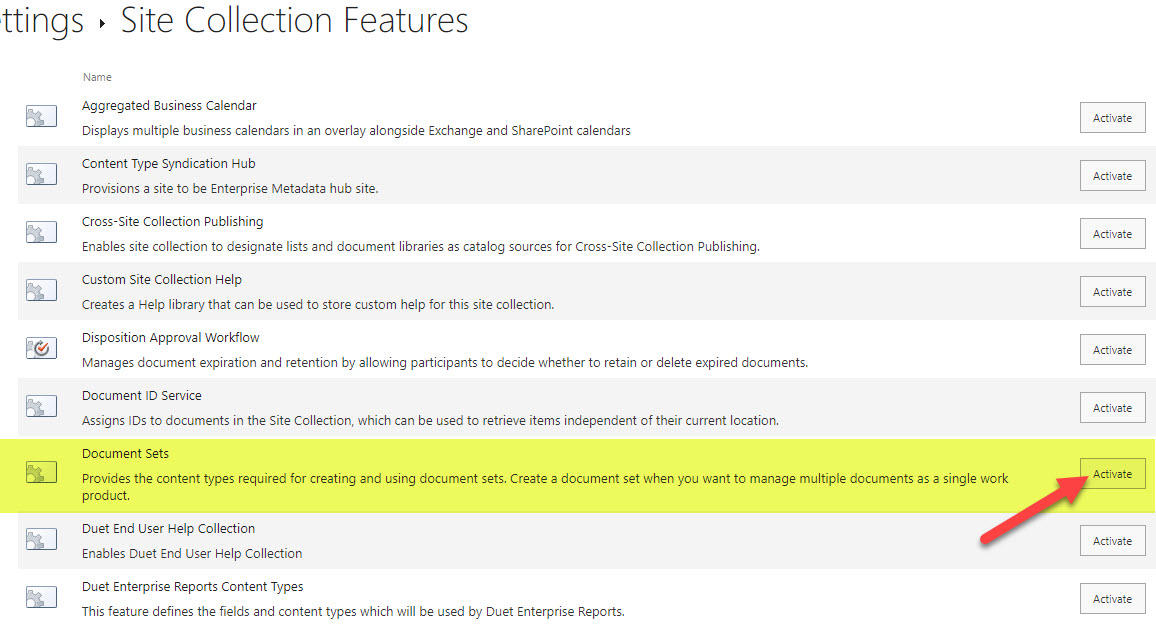
- You will then see the Document Set feature activated.

Step 4: Create Document Set and file-level metadata at a Site-level
The next step in our process is to create all those site-level columns that we will later use at the document set (folder level) and file level. Just to remind you, the reason, why we are creating those at a site level, is because content type is a site-level feature, and we will later need to add those columns to the content types. Below are instructions on how to create a single Site Level column. You will just need to repeat the steps for other site columns as well.
- From a SharePoint site, click Gear Icon > Site Information
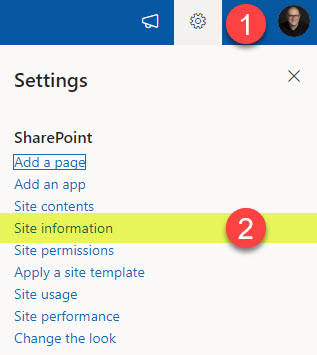
- On the next pop-up, click View all site settings
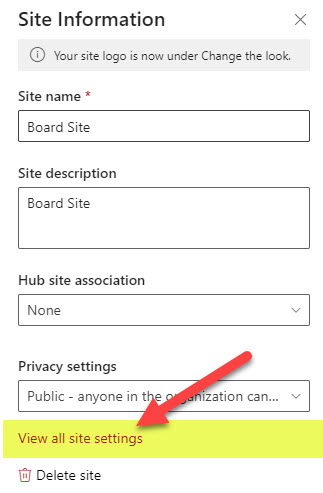
- Since we will create site columns, you must click on Site columns under Web Designer Galleries.
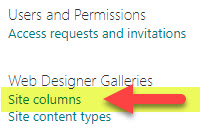
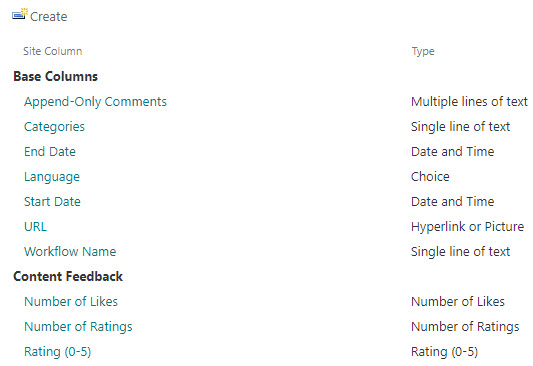
- Then, you will get to see all the out-of-the-box columns that exist in SharePoint. We should not touch any of them, as we might break OOTB functionality. Instead, we will create our own columns.
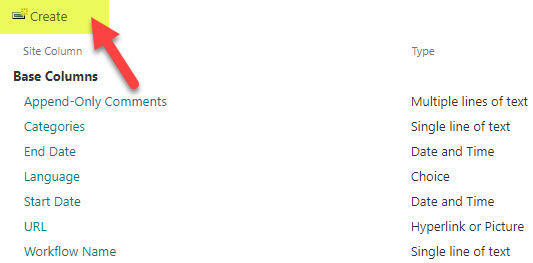
- To create a site column, click Create.
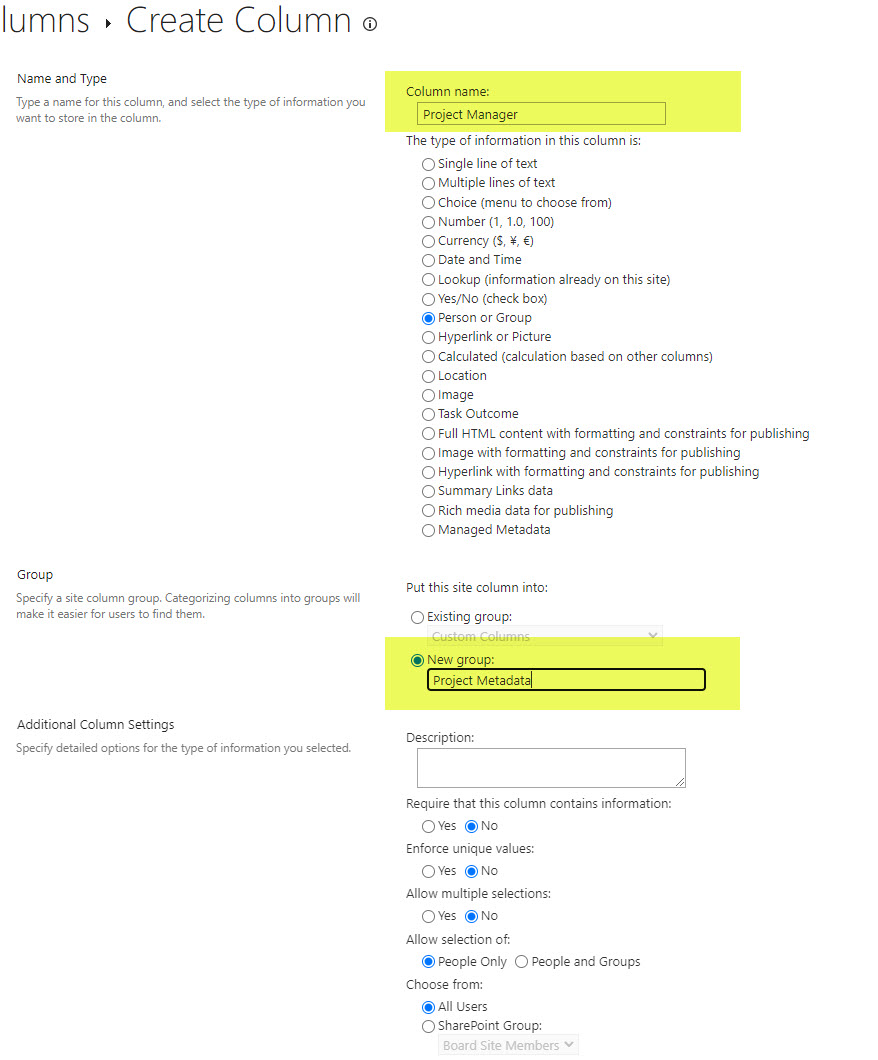
- We have a few columns to create, I will just create one, called Project Manager. Make sure to choose the proper column type (in this case, People). By the way, if you want to learn more about the various types of columns that exist in SharePoint, check out this article. I also like to create my own grouping for custom columns I create; this will become handy when we add them to content types later on. I created a new Group called Project Metadata. You only need to create a new group when you create your first column. For all subsequent columns, you will just choose the Existing group radio button. Click Create at the bottom of the page to create a column.
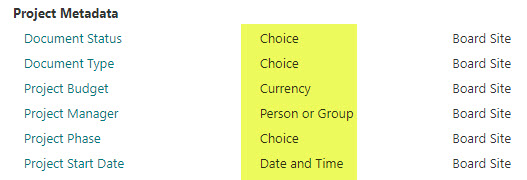
- Repeat the above step for all the other folder and file-level columns. This is how it should look when it is all set and done.
Step 5: Create Document Content Type
Now that we have created all the site columns, we need to start creating content types. We need to create two content types:
- File-level content type. (that will unite all file-level columns like Document Type and Document Status)
- Document Set (project level) content type. This will unite all project-level metadata like Project Manager, Project Budget, etc.
Starting with the file-level content type is essential since we will need it as a pre-requisite in the next step. So, for now, we just focus on the File-level Content Type. To create file-level content type:
- From a SharePoint site, click Gear Icon > Site Information.
- Click View all site settings.
- Under Web Designer Galleries, click Site content types
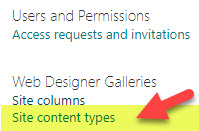
- Just like with Site Columns, you will see a list of default, out-of-the-box content types that exist in SharePoint. Again, we should not touch any of them. Instead, we will create our own. By the way, you will notice that the Content Types page looks modern, unlike Site Columns. So, hopefully, the Site Columns page will also be modernized sometime.
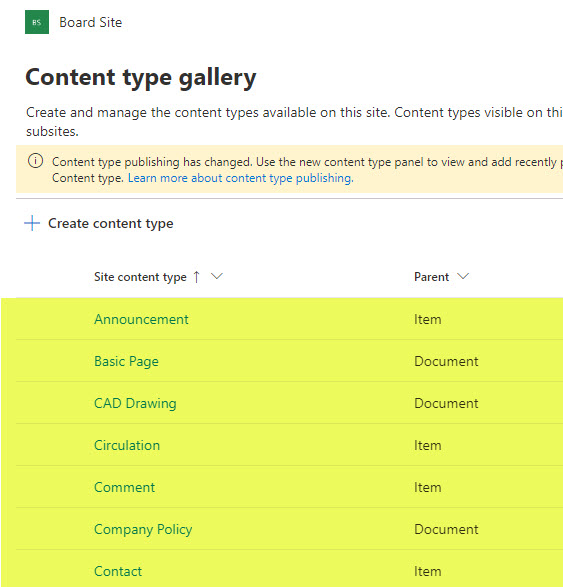
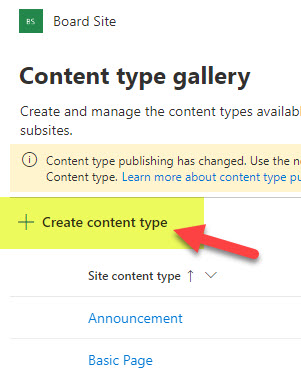
- Click Create content type
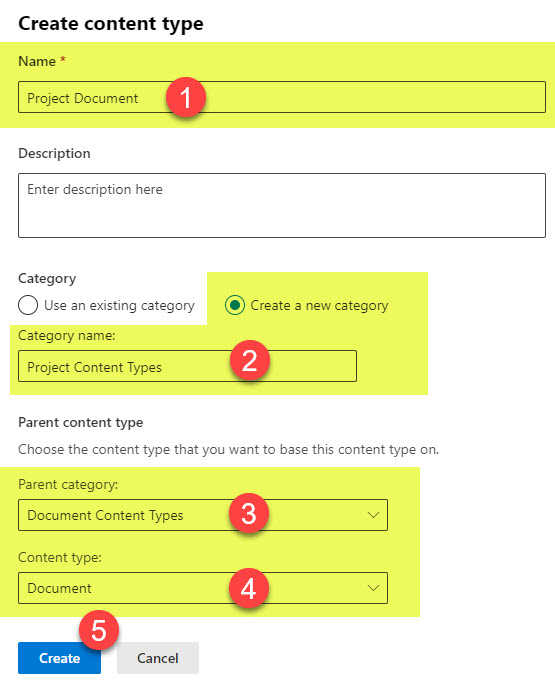
- On the next pop-up, we shall provide core information about the Content Type we are about to create. Give it a name. Then, just like with Site Columns, we can organize the content types we create into custom groups/categories. I decided to create my own called Project Content Types. Under Parent Content Type, select Document Content Types, then Document under Content Type. Now, this is probably a subject for another blog post, as this gets into a topic of parent-child content type inheritance. Still, for this exercise, we are just telling SharePoint that we will use our Content Type in the context of document management.
- The Content Type has been created but lacks the columns it needs. It just has default File Name and Title columns that are part of every content type.
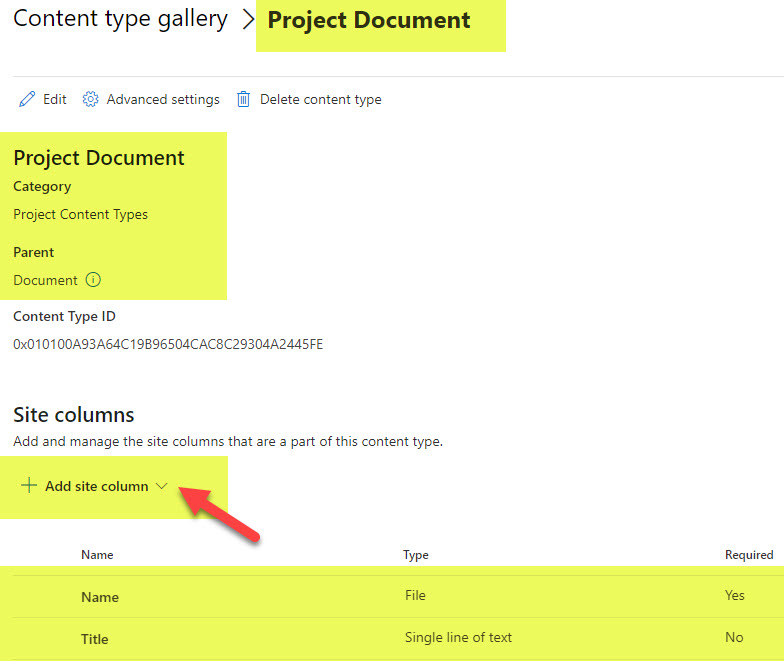
- To associate the site columns to this content type, click the Add site column drop-down, then Add from existing site columns.
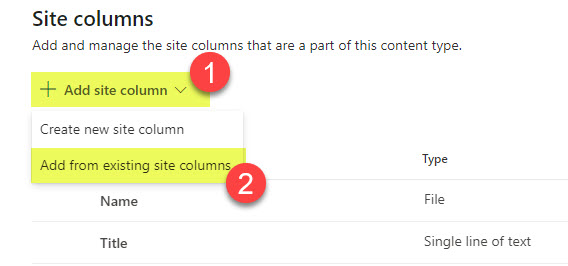
- On the next screen, it gives us a list of all the columns we can add to the Content Type, most of these columns are out-of-the-box columns you saw that exist out of the box.
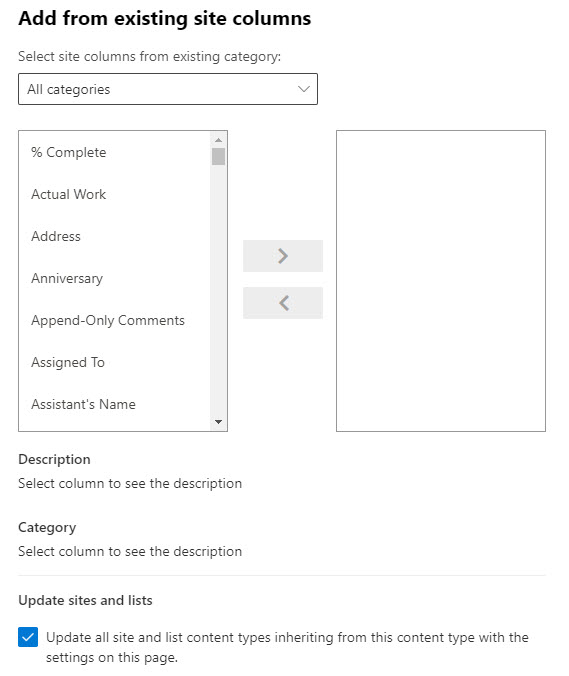
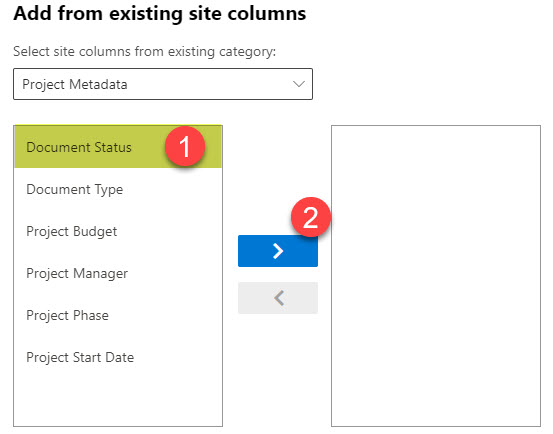
- Luckily, we do not need to go through a long list of columns. Remember in Step 4 above, we created a custom group called Project Metadata? This is where it becomes handy. Just choose it in the drop-down.
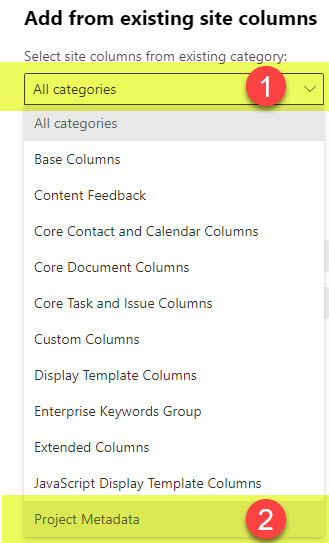
- You will now get a filtered list of columns that belong only to this group. It’s much easier to read and choose columns from! In our case, we just select the Document Status and Document Type columns and add them using the arrows.
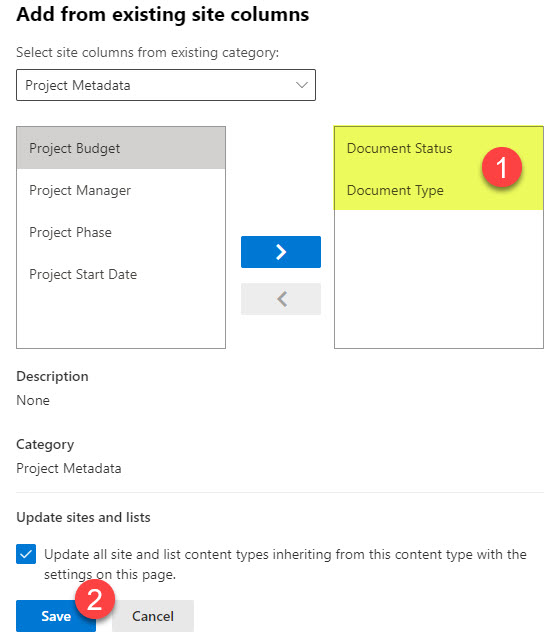
- Once added, click Save at the bottom of the page.
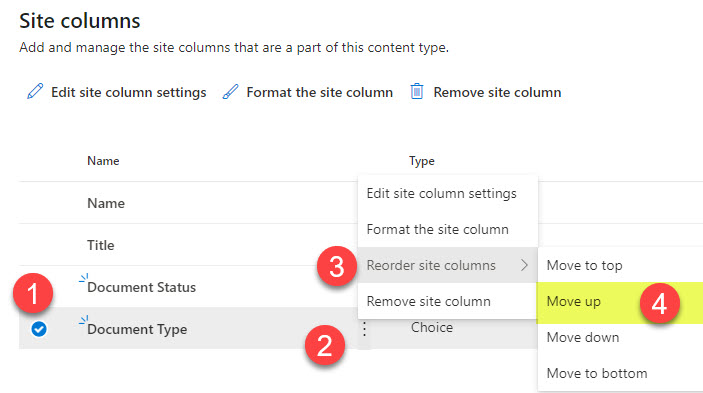
- The columns are now added to the content type. By the way, you can also change their order if you wish.
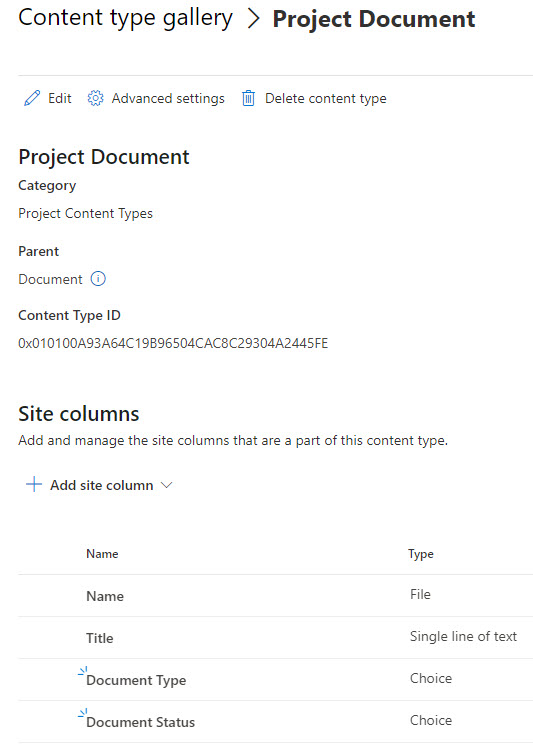
- Our File-Level Content Type has been created, and we are now ready to proceed to the next step!
Step 6: Create Document Set Content Type
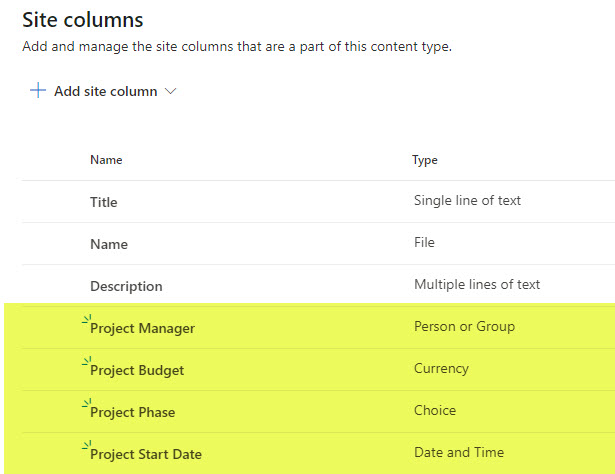
The next step is to create a project-level (document set level) content type. This content type will unite all project-level metadata (Project Manager, Budget, Start Date, Project Phase) as well as include the file-level content type we defined in the previous step.
Follow the instructions below to create a project-level (document set) content type.
- From a SharePoint site, click Gear Icon > Site Information.
- Click View all site settings.
- Under Web Designer Galleries, click Site content types
- Click Create content type
- Give the Content Type a name (in my case, Project), then click the “Use the existing category” radio button and choose the Content Type category you created when you created Document-Level Content Type in Step 5. This will keep all the custom content types organized. Next, under Parent Category, select Document Set Content Types, then under Content Type, choose Document Set (the only option). By the way, if you do not see these last two options, that means you did not enable the Document Set Feature in Step 3. So, if it is missing, return to Step 3 and enable it!!! Click the Create button to create the content type.
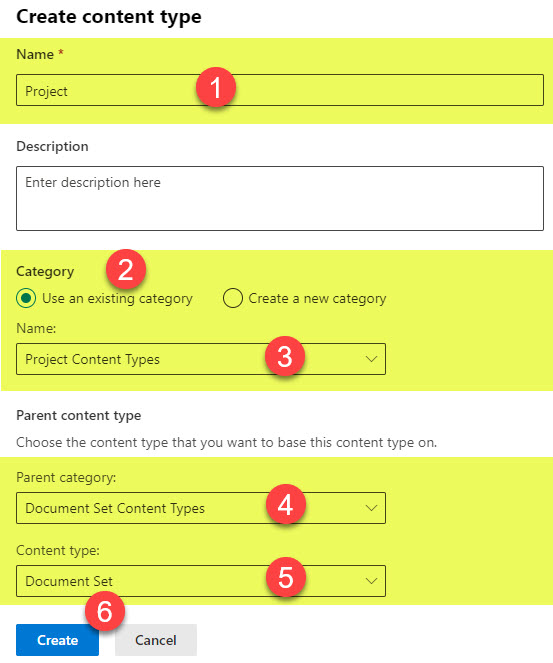
- You will now see the content type created.
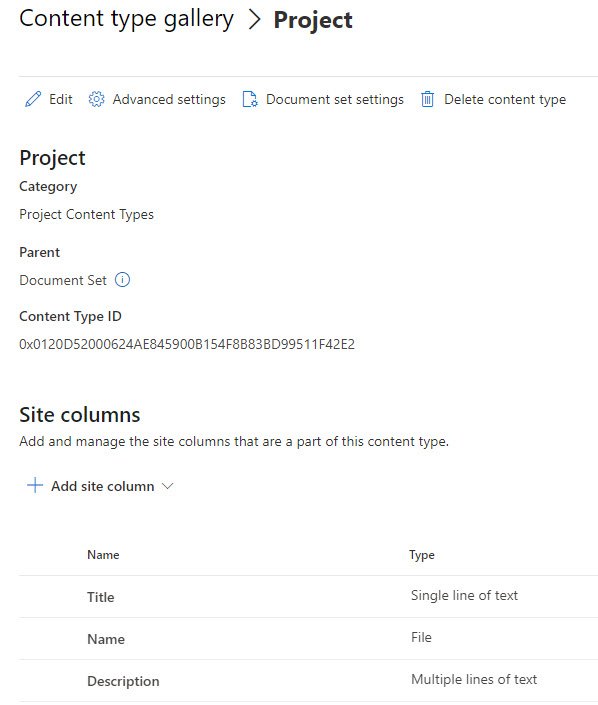
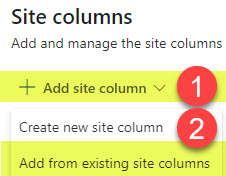
- Just like before, we are not done yet. We must now add appropriate Site Columns to the Document Set Content type. To do so, click the Add site column drop-down and choose Add from existing site columns.
- Once again, our Custom category is to the rescue! Choose the category you created previously, then add all appropriate site columns to the right side panel.
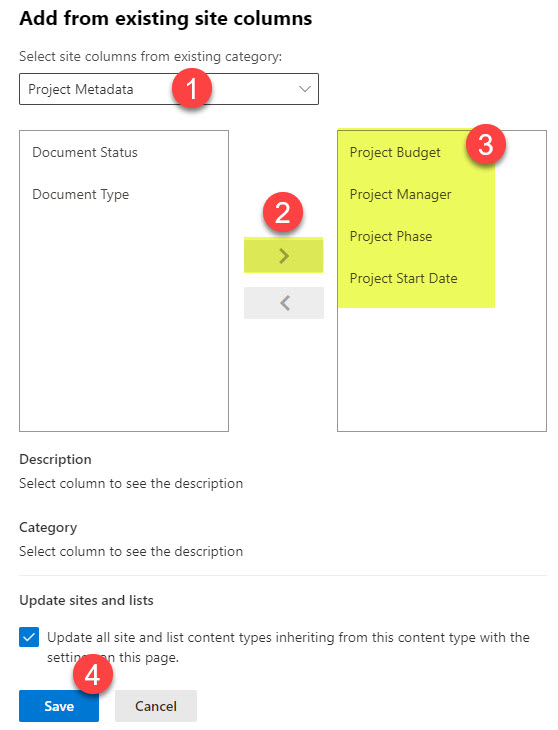
- At this point, all the site columns have been added to the Document Set Content Type!
Step 7: Configure Document Set Settings
If you think we are done, think again. We are not even halfway yet. I told you just to hire me to do the whole thing. 😊.
A critical aspect of Document Set content type is additional settings that are only present on document set content types. Those are not available on the regular content types. These additional settings control the behavior of the content type within a document library. Let me explain those additional settings to you below.
- From the Document Set content type, click Document set settings
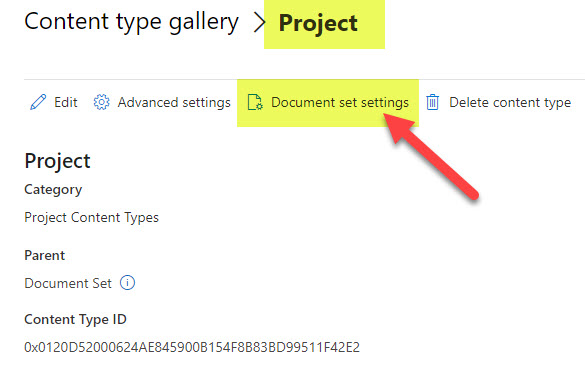
- You will see a long page with various settings you can configure there. Let me walk you through those. The first one, called “Allowed content types”, shows the content types allowed inside of our Document Set. By default, it allows for Document Content type, which is essentially a generic document with no metadata. If we did not create a Document-Level content type, we could use it and would leave this section alone.
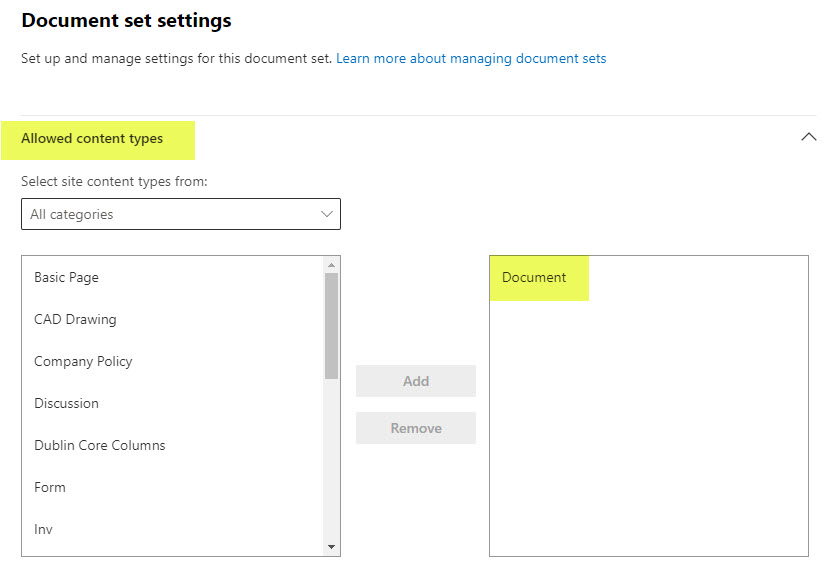
- However, in our case, we did define Document Level Content Type in Step 5 (called Project Document). So, we need to remove the default Content Type. To do so, click on it and click Remove.
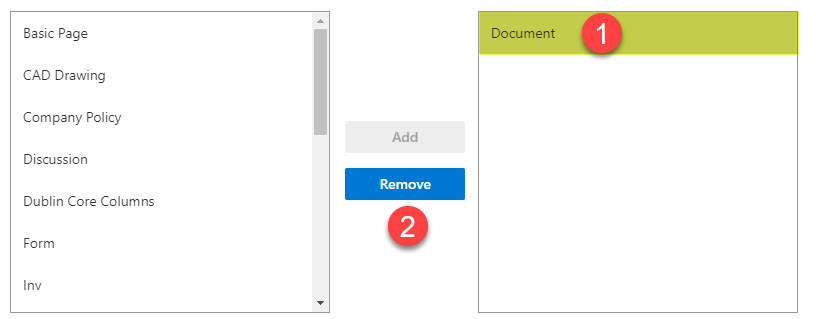
- Instead, we need to add the one we created. Again. Content Type Category to the rescue! Just choose it from the drop-down list, then choose the Document-level Content Type (Project Document in our case) and click Add.
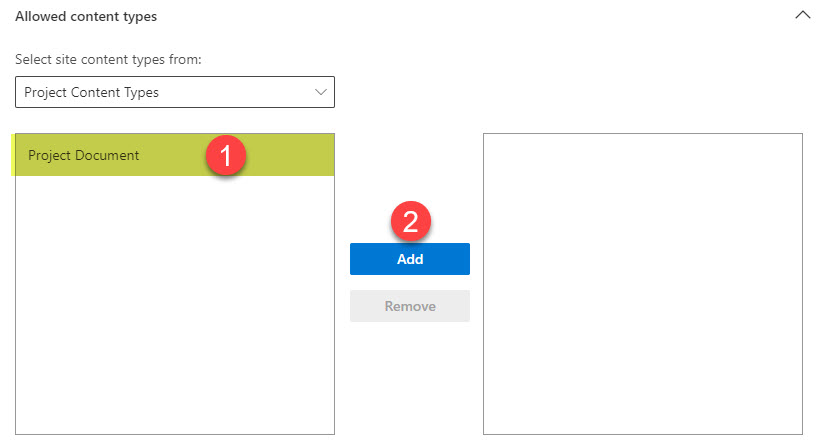
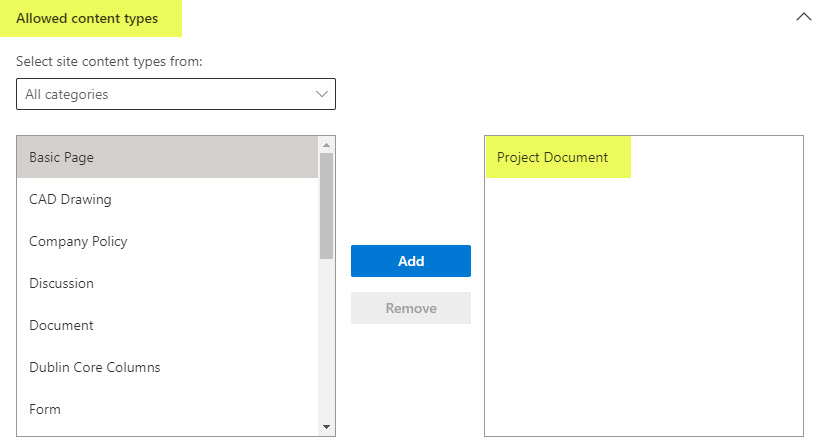
- It will now be added to the right side panel. If we were to create multiple file-level content types, we could add multiple ones here.
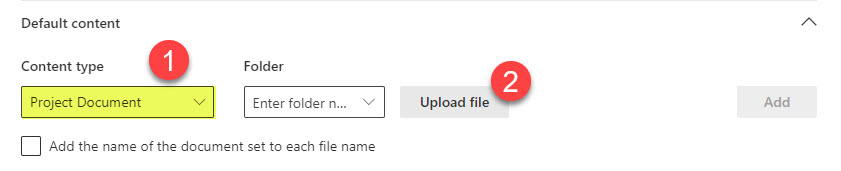
- The following section (Default content) is optional. This is where you can specify files that will be automatically populated into new document sets. Kind of like templates. For example, for every new document set (project) you create, you want a template budget document to be part of it. This is where you can add the template! To do so, choose the content type from the drop-down, then click Upload file.
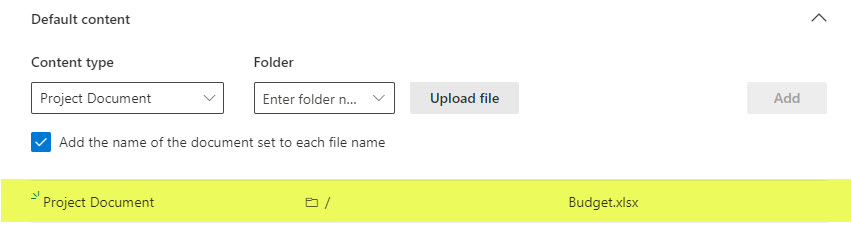
- Browse for the file on your computer; in my case, I chose Budget.xlsx. You can also check the box next to “Add the name of the document set for each file name.” This will create a unique name for the file when you create a document set. Click Add.

- The above step will add a template to the document set. You can add multiple templates if you wish.
- Under Shared Columns, we can specify columns we would like to propagate from folders to files. At the beginning of this post, under the Advantages of Document sets section, I listed the ability to propagate metadata from folders to files. This is the setting that controls it. By default, no metadata is shared/propagated. However, with a click of a checkbox, we can let SharePoint know which metadata we would like to share.
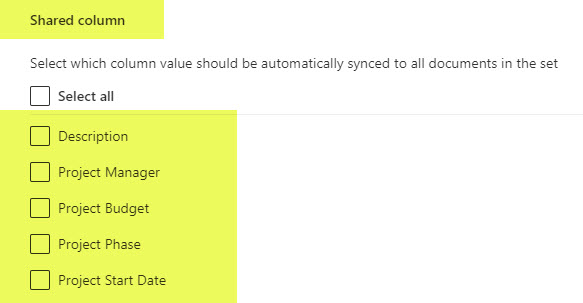
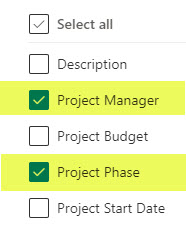
- In my case, I would like to share just two columns: Project Manager and Project Phase. So essentially, this metadata will also be attached to every file inside the document set!
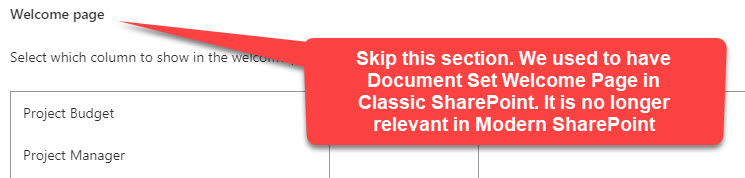
- The following sections shall be skipped. It is called the Welcome page. With Classic SharePoint, we used to have a pretty page for each document set called the Welcome page that displayed the metadata and documents.
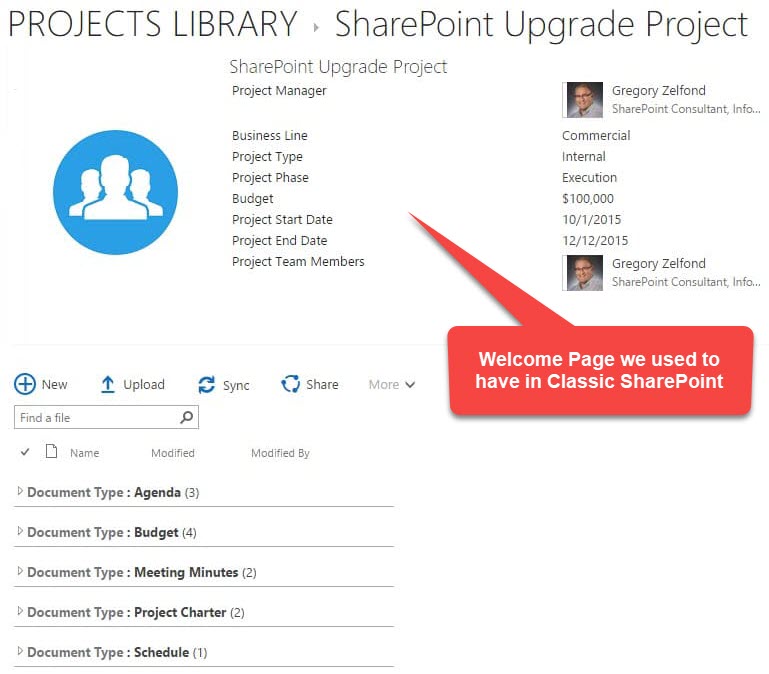
- We no longer have a Welcome Page in modern SharePoint, so just scroll down!
- Click Save at the bottom of the page to save all your changes to Document Set Settings!

Step 8: Create a New Document Library
OK, now that we have done the hard work, it is time to see the fruits of our setup. We are now ready to add the document set content type to our document library. First, we must create a brand new document library.
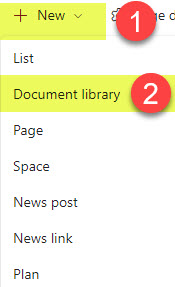
- On a SharePoint Site, click New > Document Library
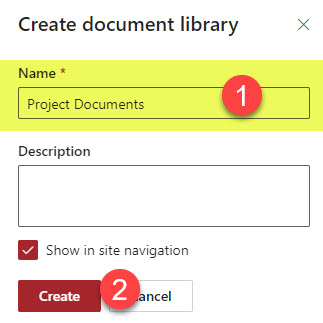
- Give your library a name and click Create
Step 9: Add a Document Set Content Type to the Document Library
Once the document library is created, we can now add the Document Set Content Type.
- On a Document Library, click +Add column, scroll down, then choose Add a content type
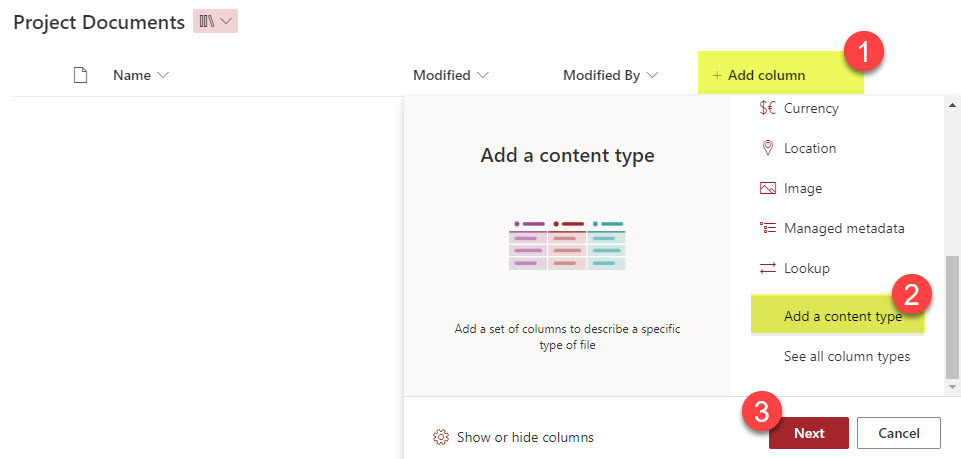
- You will see a list of all available custom Content Types you can add to your document library. Some could be created/exist at the site level; some could be pushed by your organization via the Content Type Gallery. Click the checkbox next to the Document Set Content Type. It is important to note that you only need to add a document set content type to the library; there is no need to bring in file-level content type. Since we embedded file-level content type inside the document set content type, it will be carried over automatically. Click Apply.
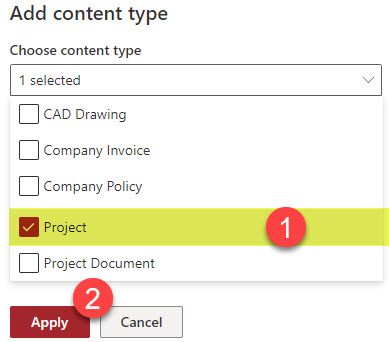
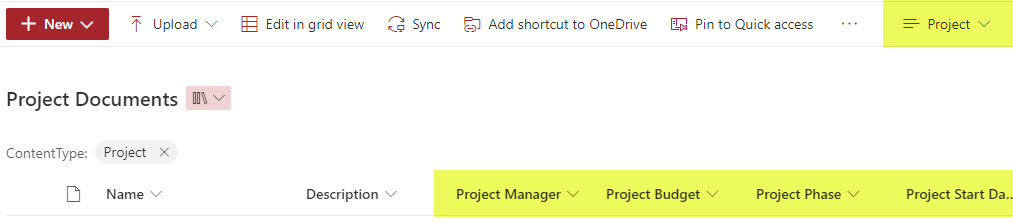
- It might seem like nothing has happened, but once you switch over to the Document Set view created for you automatically, you will see all the document set columns brought over into the view.
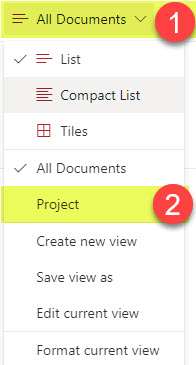
- This is what that view looks like
Step 10: Configure Document Set View
Though the view above is automatically created for you when you add a Document Set Content Type to the document library, you might want to change it. For example, you might want to reorder the columns or hide certain columns altogether. In my case, I will hide the Description Column that was added by default.
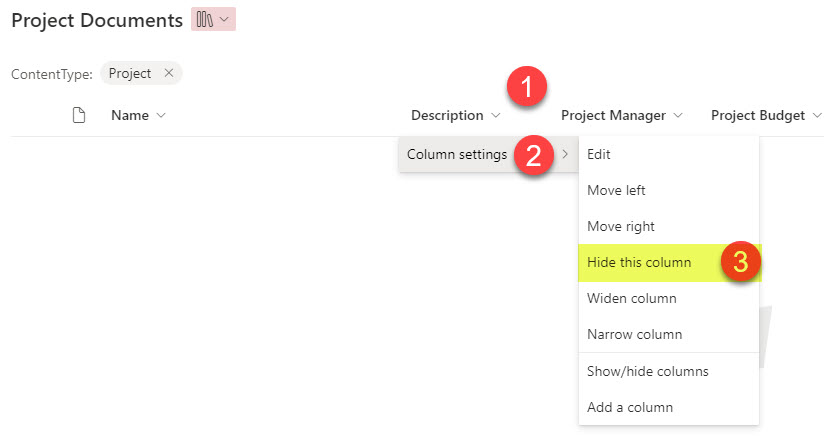
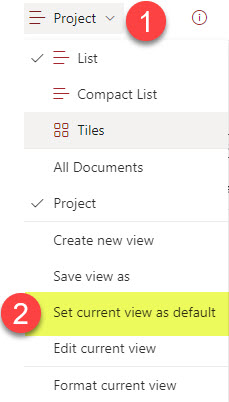
Additionally, I would like to make the Project (Document Set) View the default view, so it loads automatically when I access the Project Document Library (and not the All Documents View)
Step 11: Delete default Document Content Type
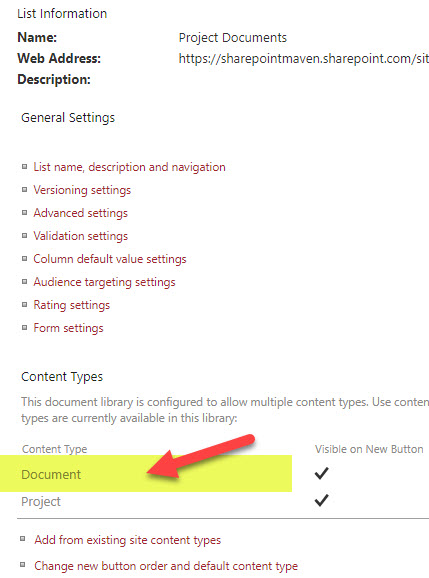
OK, this is just a bit of a necessary cleanup exercise we need to do. Since we created custom content types, we need to delete the default Document Content Type that exists at the Document Library level. If we do not do that, uploaded files will default to this default Document content type instead of the one we created. To do so:
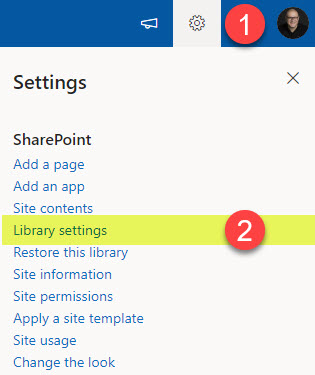
- From the document library, click Gear Icon > Library settings
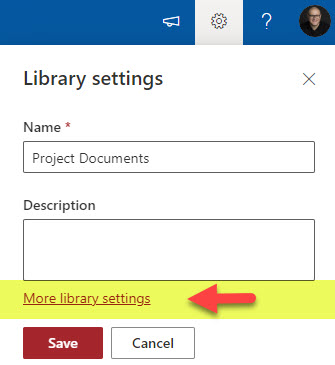
- Click More library settings
- You will see the default Document Content Type appear in the list. Click on it.
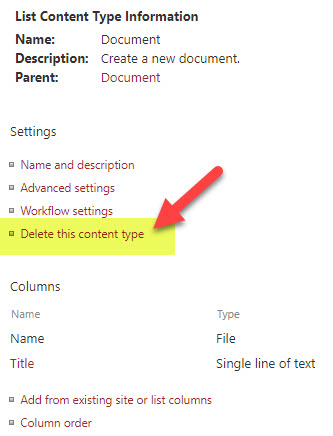
- Click Delete this content type
- In the confirmation message, click OK

Step 12: Create a Project (Document Set) folder
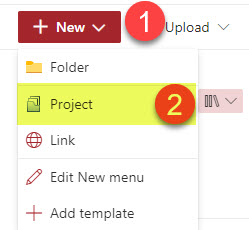
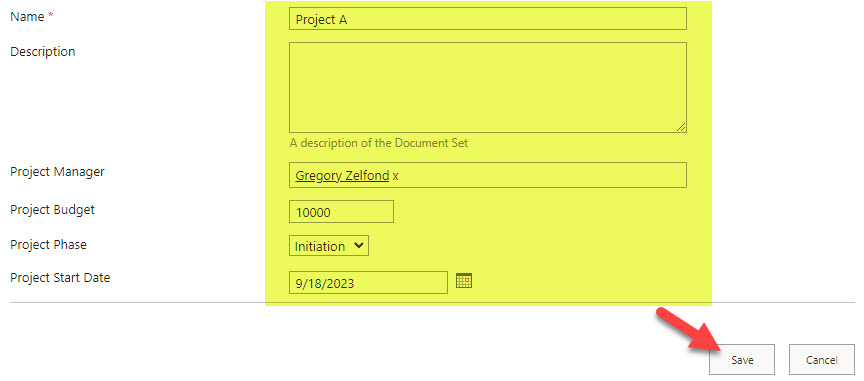

Step 13: Create and Configure File-Level View
The above step also did something really important. It added a file-level Content Type to the library. Since File-Level Content Type is part of the Project Level Document Set, it brought it over the minute we created a sample Document Set folder.
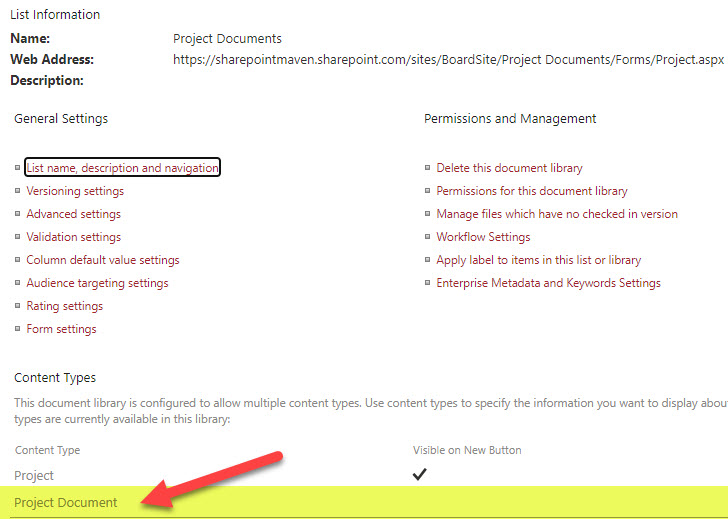
So, what that means is that we can now create the file-level view. This will be the view users get to see when they click inside a given project folder (Document Set). Once I am inside a given project folder, I want to see file-level metadata, not project-level one. The file-level view will display file-level metadata like Document Type, and Document Status. This will allow me to see and filter the documents inside the given project folder.
To create that view, follow these instructions:
- Navigate to the existing Project View and Save it as a new view. In theory, we could create a brand new view, but this step would give us an important baseline that will become more apparent a bit later.
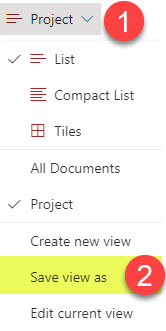
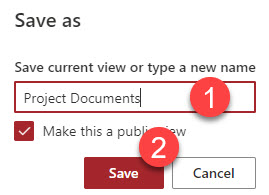
- Make sure to give your view a new name (i.e., Project Documents). Click Save.
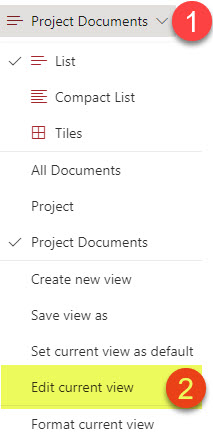
- The new view will now appear in the list of views. Click Edit current view.
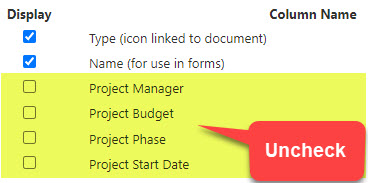
- It will open up a classic page like the one below. This is where we can configure the view columns and filtering. In our case, we want to uncheck the Project level columns (since we are creating a file-level view).
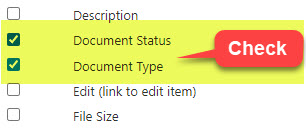
- Scroll down. Check the columns you do want displayed in the file-level view. In our case, they are Document Status and Document Type.
- Scroll down a bit more to the Filter section. This is a super-important section, and this is why I made you create a copy of the view earlier instead of creating a brand-new view. This is where we are telling the view of which content types to filter for display. Since we copied this view from the project-level view, it filters for Project Content Type. In our case, we want to display just files/documents, so make sure to type in the name of the Document Content Type. In our case, it is a Project Document.
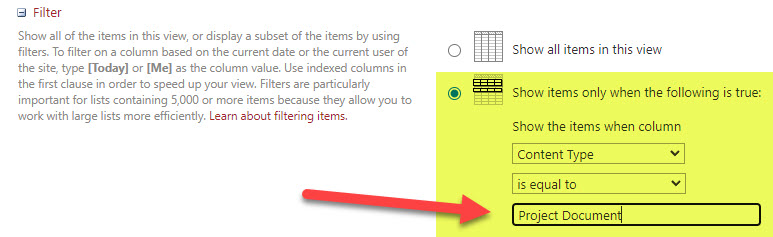
- Scroll down and click Save to save the view.
- This is what the view will look like when all is set and done.
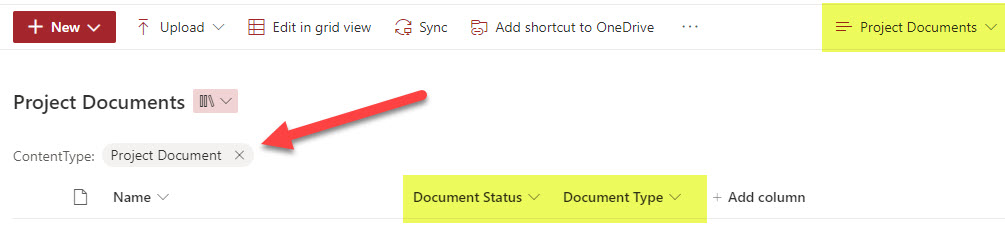
Step 14: Upload and Tag Project Documents
Next, let’s go ahead and upload some documents into one of the project folders (document sets)
- First of all, once you create a new Project (Document Set), you will notice that there is already a file that appears inside. That is the template file we configured in every document set in Step 7 above.
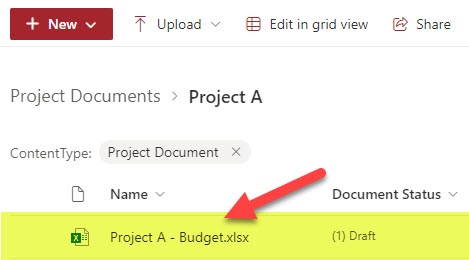
- To tag a document, click on the checkbox and side panel and apply the appropriate tags.
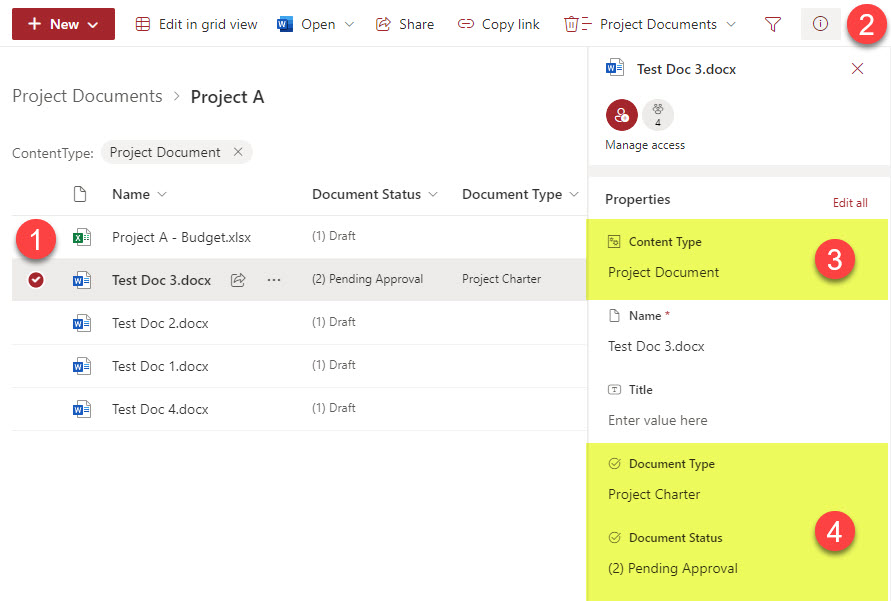
- You can also apply tags in bulk via the Grid View.
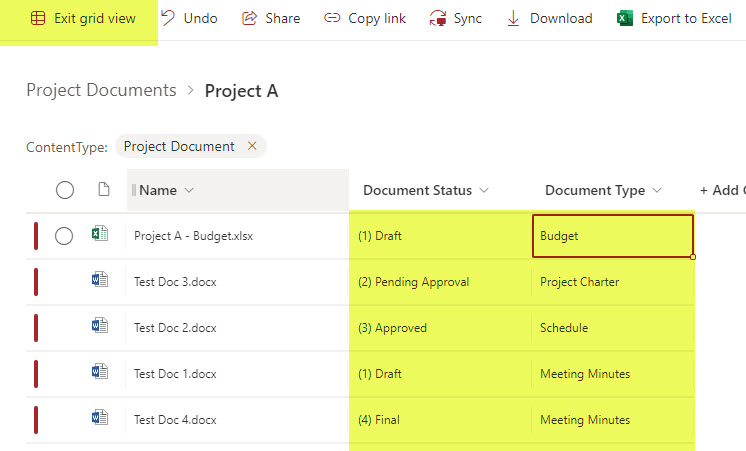
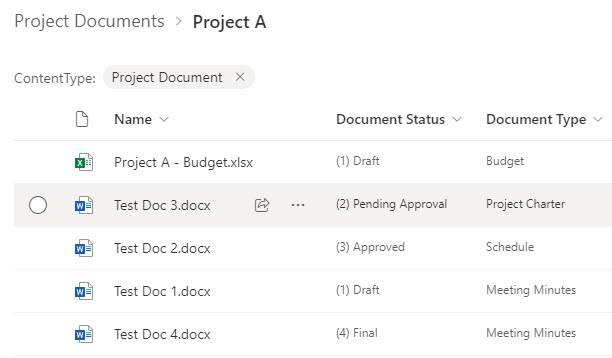
- Once all the documents are tagged, this is what it will look like inside the folder.
Step 15: Configure File-Level View inside Document Set Settings
There is a dilemma now that we have created both the document set (project) and file-level views. When I am at the project level (folder level), I can see my document sets (project folders) with its respective metadata.
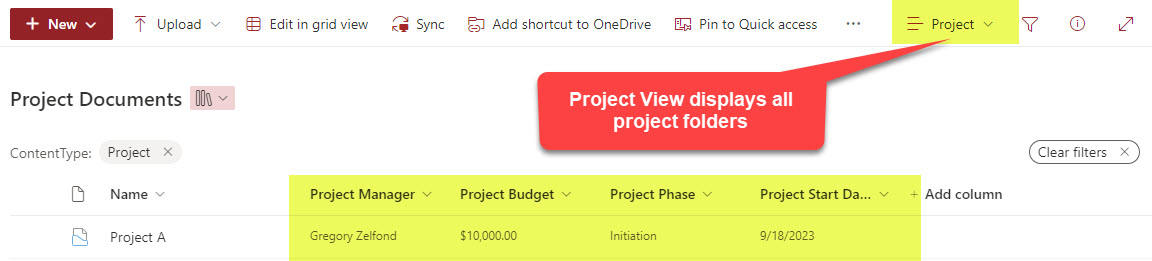
However, when I am inside the given project folder, it still displays the project (folder) metadata.
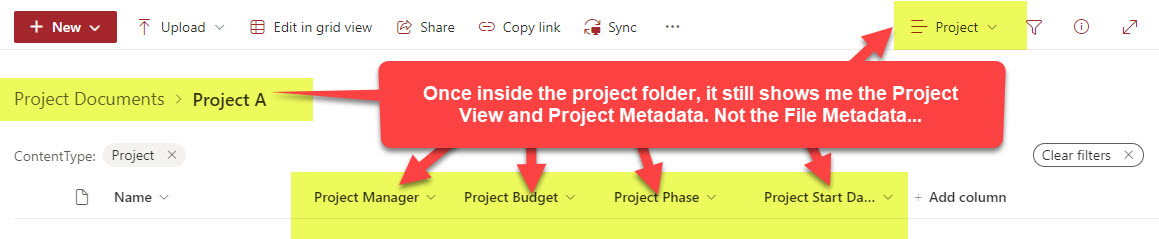
To see file-level metadata, I need to switch the view manually.
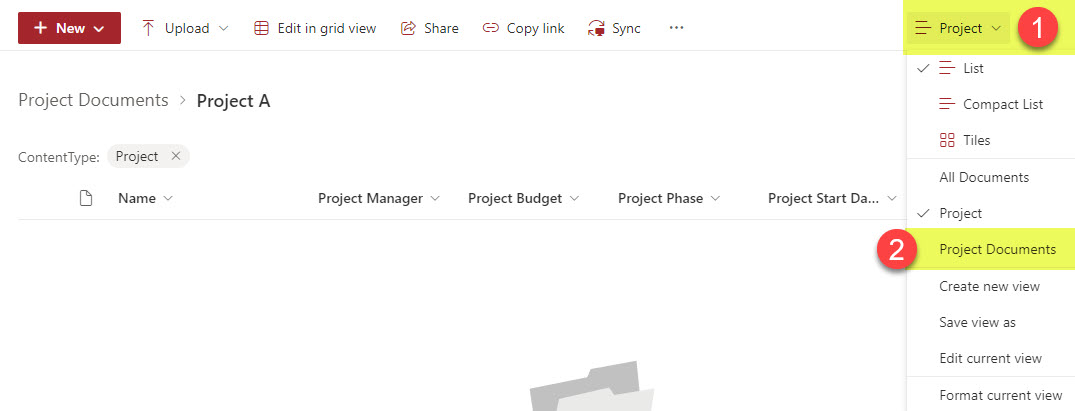
Only after I manually switch the view, it displays the contents of a folder with files and appropriate file-level metadata.
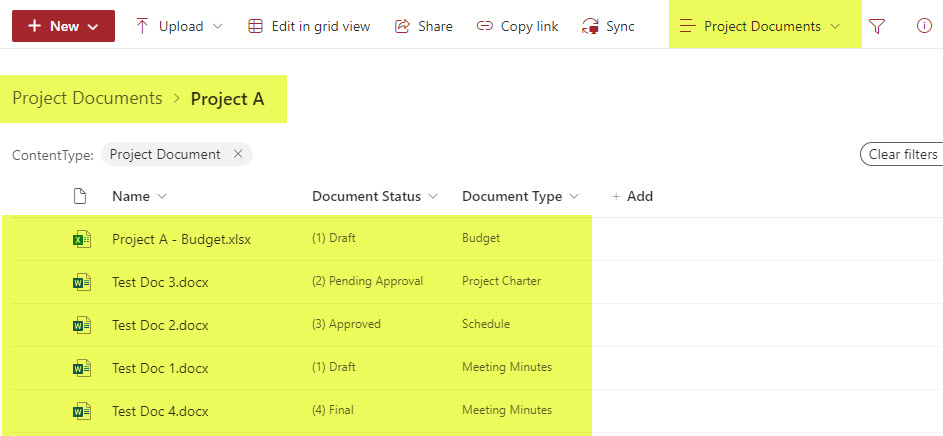
But the above is a manual step, and users will unlikely remember to do this all the time. Luckily, a setting within document sets allows us to switch to this view automatically. We would need to configure Document Set settings at the library level and not at the site level, as we did with Step 7.
To set up this “automatic view switch,” follow these instructions.
- At the library level, click Gear Icon > Library settings
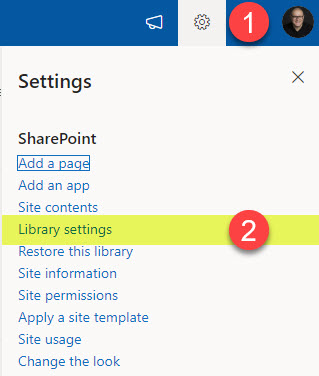
- Click More library settings
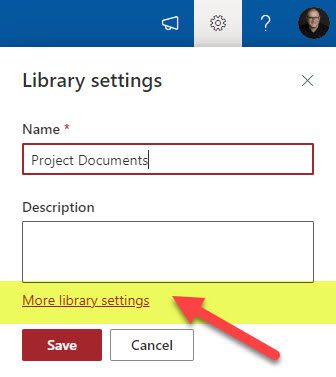
- Click on Document Set Content Type (in my case, it is Project)
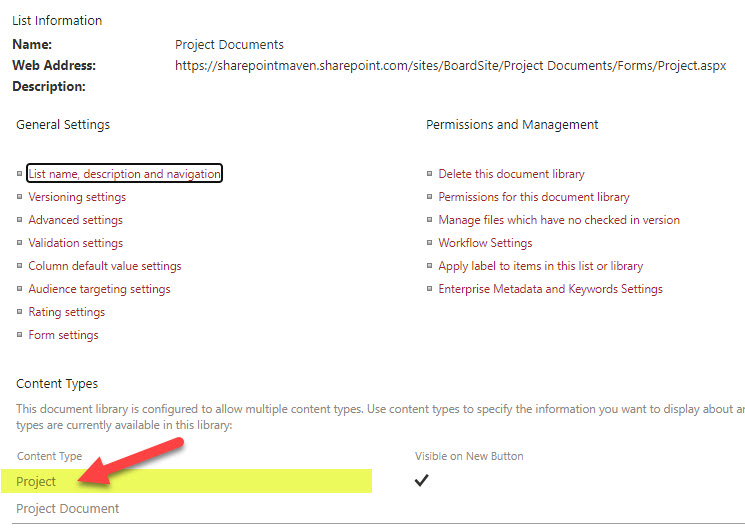
- Click on Document Set settings
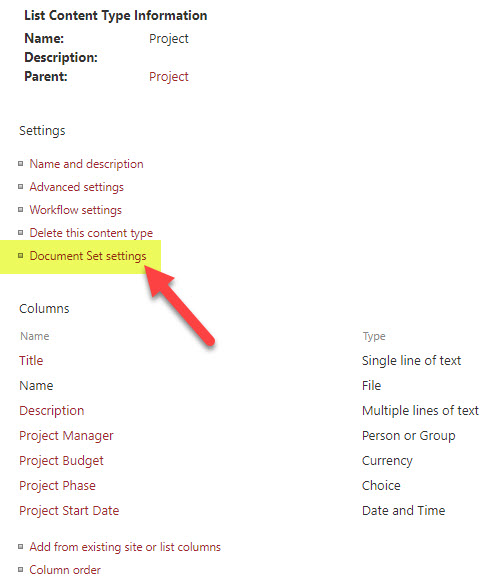
- Scroll down to the Welcome Page View section. As stated in the above steps. The Welcome Page does not really exist anymore. However, the drop-down there allows you to choose alternate views.
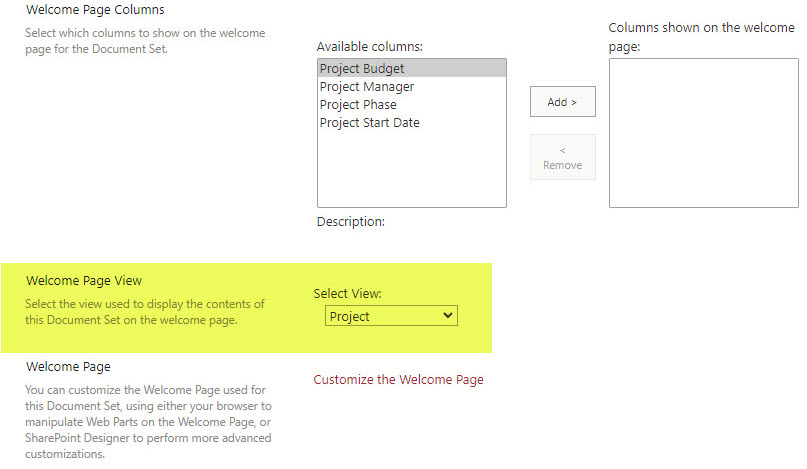
- Essentially, the Welcome Page View is the view that displays the contents of the Document Set. In our case, it is the Project Documents View we created in Step 13. Choose that view and click OK to save the changes.
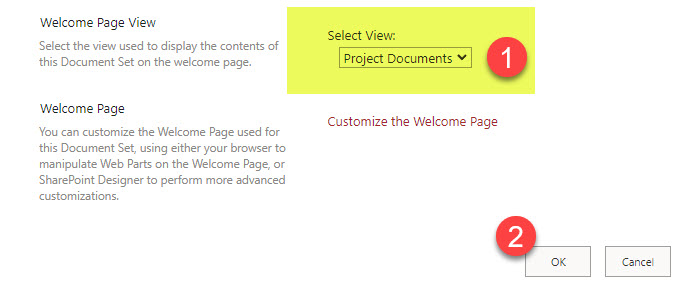
- That’s all. As you click on the Document Set folder, the view will automatically switch to the Project Documents (file-level view).
Step 16: Configure the “Search documents only” view
Believe it or not, we need to create another view. This is optional, but handy if you want to search for files across the whole library (across all document sets). By default, executing a search using the search box will surface all the content (document set folders, files), and it won’t be very user-friendly and intuitive. So creating this “Search documents only” view or whatever you want to call it is handy. Here are instructions on how to create this view:
-
- As an example, I have a few document sets created within the document library.
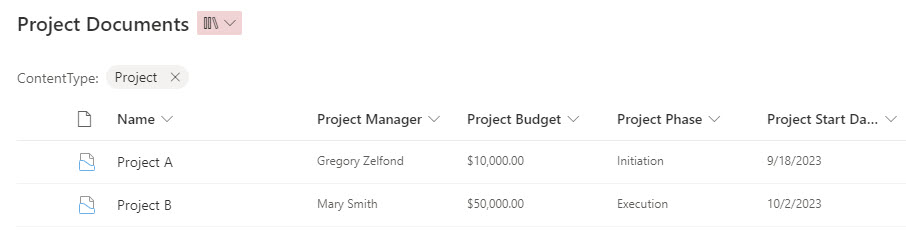
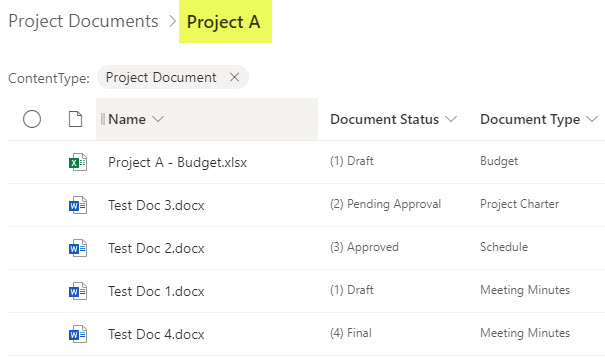
- Project A Document set has some files inside.
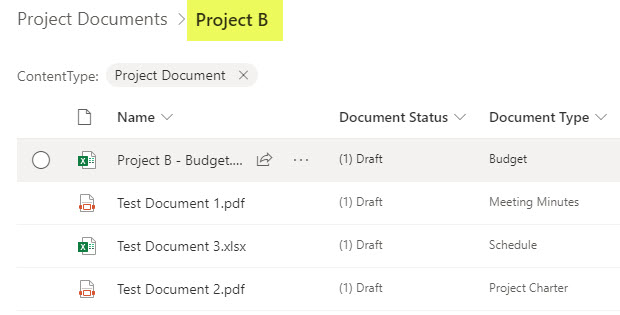
- And so does the Project B Document set
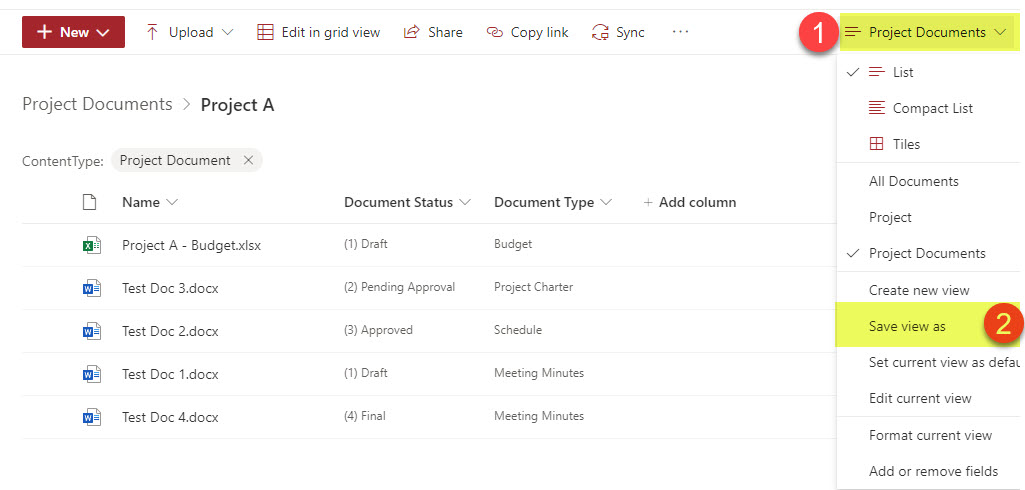
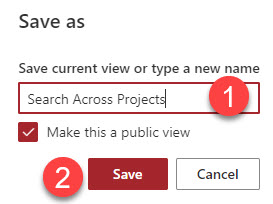
- To create a Search Documents View, click on Views Drop-down > Save view as.
- Give your new view a name and click Save.
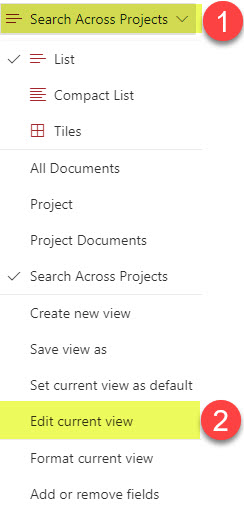
- Edit the view you just created (Views drop-down > Edit current view).
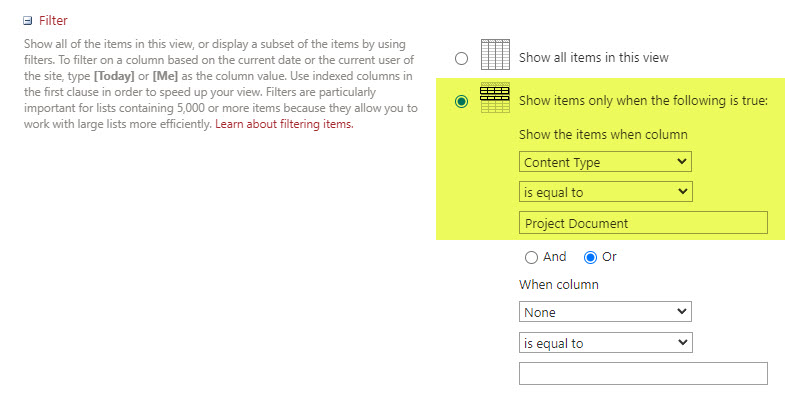
- Scroll down to the Filter section, and filter for Content Type = Project Document (File-level content type). With this filter, we are filtering out document sets (folders) themselves.
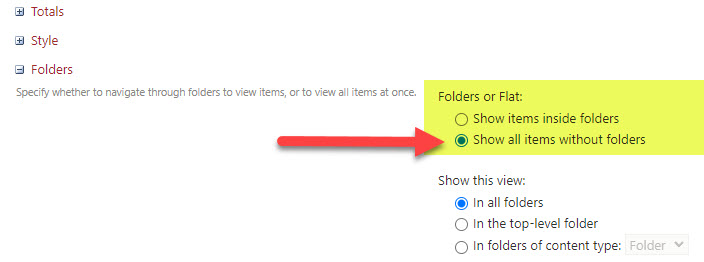
- Scroll down to the Folders section. Click Show items without folders radio button. With this option, we are suppressing the folders/hiding them, so we just have file-level results.
- Click OK to save the changes.

- You will now see the view created – all files from inside the folders (document sets) with document sets/folders suppressed.
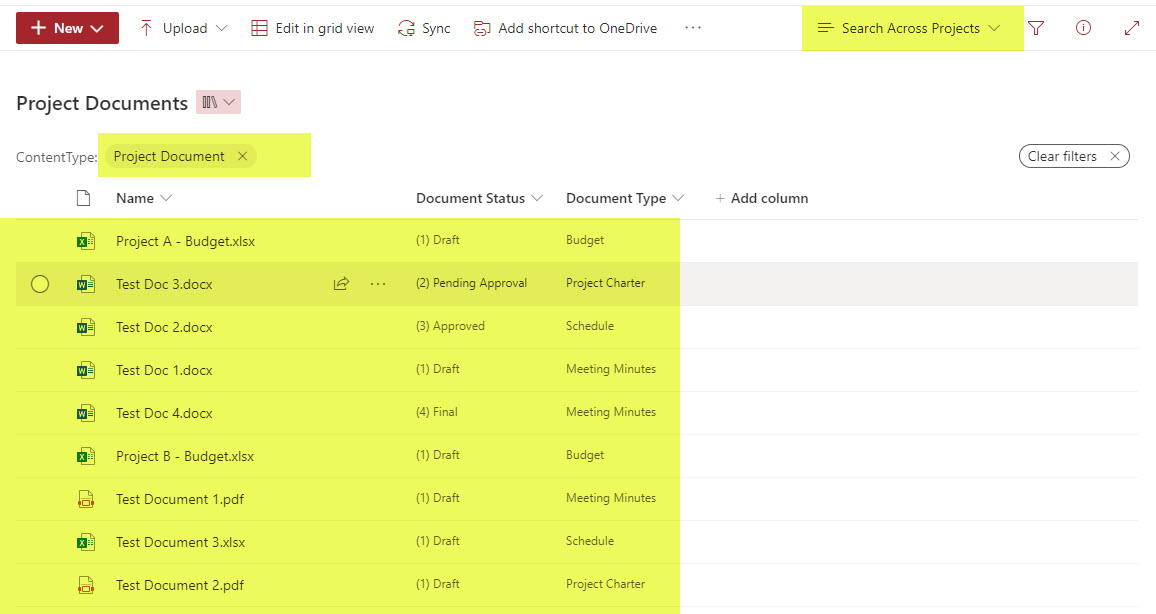
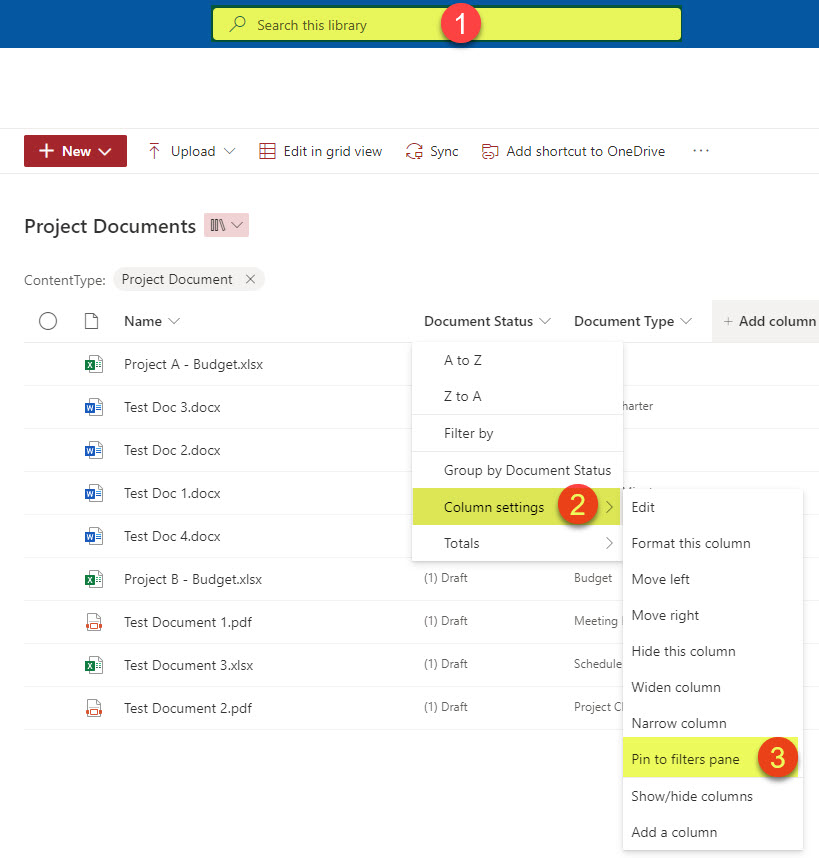
- You can now use the search box to search the files across all folders/document sets. You can also pin the columns to the filters pane if you want to filter results via file-level metadata.
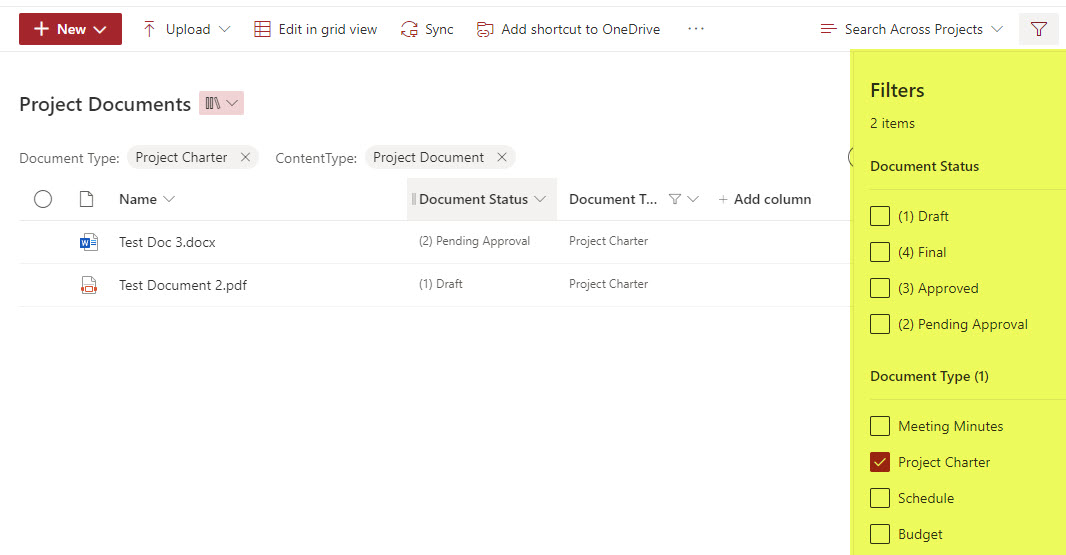
- Here is how it looks when you filter the view via metadata.
- So, choose this view whenever you want to search for documents only, then use the search box and metadata filters.
- As an example, I have a few document sets created within the document library.
Step 17: Drink some alcohol!
You are my hero if you made it this far and completed all the steps! You deserve a drink, just like I do. Lehaim!
Other ways to take advantage of Document Sets
In this section, I would like to highlight a few other ways to take advantage of document sets.
Content Type Gallery publishing
The instructions above explain creating a document set content type at the site level. However, you must rely on Content Type Gallery to create a document set and have it available on multiple sites. Essentially, the instructions would be the same, except you would need to create site columns and document set itself on that content type gallery located at the tenant level. Once created, you must publish that document set content type to other sites from the Content Type gallery. I explained how to do all this here in this detailed article.

Replacement for lookups between lists and libraries
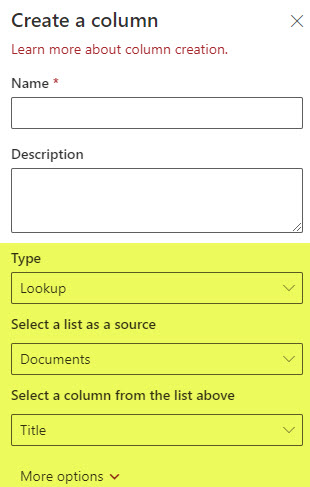
Since regular yellow folders do not allow metadata tags, I have seen many of my clients create a folder-based document library and a lookup column to a list that captures related metadata. Well, guess what? This is no longer necessary, thanks to the Document Set content type, which mitigates the above scenario and pretty much allows you to get rid of a separate list and have it all in one document library!
Replacement for folder tagging via Edit in Grid View
Another limitation that Document Sets help resolve is folder tagging via Edit in Grid View. As stated in this post, folders do not allow tags to be applied to them, so the only workaround is to Edit in Grid View. However, this is just “fake folder tagging,” as those tags do not propagate to the files underneath. Once again, Document Sets help resolve this.

Capture Version of a Document Set
There is a feature that is unique to document sets, and something I really like is the ability to capture a version of a Document Set. Essentially, it is like capturing the document set at a given point in time. I wrote a separate post on the topic a while back. Check it out and take advantage of it.

Document Set Limitations
Nobody is perfect, except for me, of course, 😊 and despite all the benefits of document sets, there are a few significant limitations to be aware of.
It is all about documents only
It is a limitation by default. Once you commit to creating document sets and not sites for projects, you have to stick to documents only. If you then want to add a calendar to each project or a task list, it would be challenging. So, if you need to organize other non-document info for each project, perhaps creating a site for each makes sense.
Document Library can get really large
Remember when I said at the beginning of this post that Document Sets are excellent for something small, yet repeatable? Even if you have a small number of document sets and documents inside, the library can grow significantly with time. We try to stay below the 100K limit per document library. So, I suggest you do some math before committing to document sets to see when you will hit that threshold.
No Metadata sync
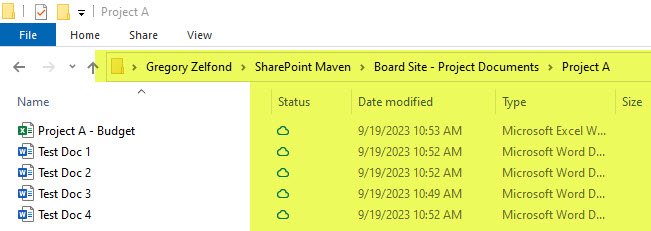
If you decide to sync the document library with document sets to your computer and access files via Windows Explorer – you will lose the metadata when you try to access the files on your PC. You will still see the project folder names, but the metadata attached to document sets and files will not make it to your computer. This is by design, and we have the same limitation whenever we use metadata in document libraries. So, if you have users who prefer to work out of Windows Explorer, you need to think this through.

Share Article