All the ways to migrate the files to SharePoint Online
So you created your sites and document libraries in SharePoint, set up proper security and navigation, trained your staff, and now it is time to do the heavy lifting – migrate the files to SharePoint Online! What are the options when it comes to migrating documents to SharePoint? In this post, I would like to summarize all the available options. For each, I also provide pros and cons to be aware of.
Option 1: Drag and Drop
The first option is pretty primitive in nature. Essentially allow your users to migrate the files themselves. They can easily upload the documents themselves or just literally drag and drop files and folders they need to SharePoint Online. I know what you are thinking – rely on users to migrate? Yes, exactly! I always advise my clients to consider this option first. Nobody knows the data better than users using it day in and day out. When you engage a 3rd party consultant to do the migration, they would not know or understand the value of certain file shares or which content is outdated and should not even be moved. So that’s why I recommend this option first.
How to:
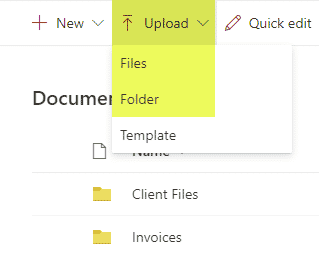
To upload documents from your computer or network drive, you can just use the Upload button, where you can upload the file(s) as well as a complete folder and all its contents.

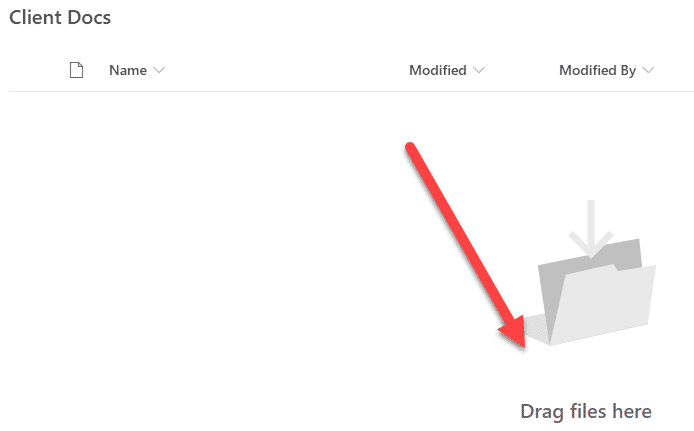
Alternatively, you can just drag and drop files/folders from your source into a library.

Pros:
- Easy to use, little training required
- Does not require a financial investment
- Allows for manual analysis/evaluation of data as it is moved over to SharePoint
Cons:
- Not suitable for very large movements of data
- The user needs to keep a browser window open while the upload is taking place
- Does not keep metadata (i.e., last modified date will default to date uploaded to SharePoint)
- Might need to be used in conjunction with other techniques listed in this article
Option 2: OneDrive Sync
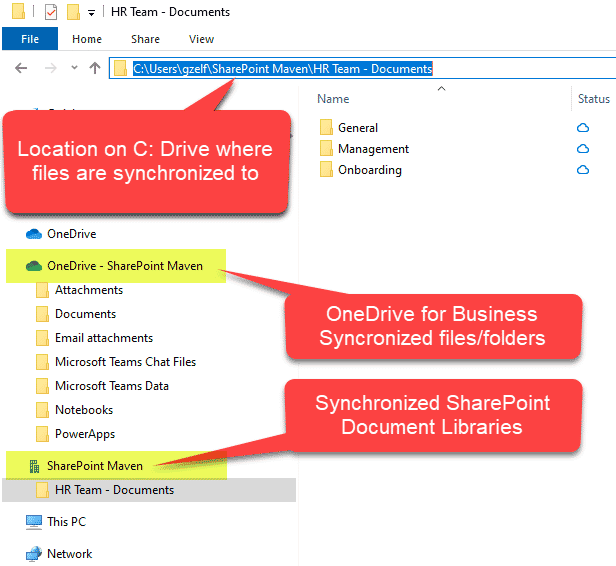
The second option also relies on the user for the data upload, however, it allows to “automate” it somewhat, by doing the heavy lifting. This option relies on the user syncing the destination document library first and then just copying the content into a synchronized library folder in Windows Explorer and letting OneDrive do its job and sync everything to the cloud (SharePoint Online).

How to use OneDrive Sync:
I describe how to install and configure OneDrive Sync in this article.
Pros:
- Easy to use, little training required
- Does not require a financial investment
- Allows for manual analysis/evaluation of data as it is moved over to SharePoint
- Keeps metadata intact (i.e., last modified date will be kept and won’t default to date uploaded to SharePoint)
Cons:
- Not suitable for very large movements of data
- Subject to 300,000 sync limit across all document libraries
- Might need to be used in conjunction with other techniques listed in this article
Option 3: SharePoint Migration Tool
In case you are migrating from file shares or older versions of SharePoint, you will want to use this option. It relies on the use of the Free SharePoint Migration Tool that is available. Though the tool can be used by the end users as well, it is assumed that it will be used by IT staff/SharePoint Admins.

How to use the SharePoint Migration Tool:
I have written a separate post on the SharePoint Migration tool here.
Pros:
- Allows to migrate large volumes of content
- Easy to use, compared to more sophisticated tools
- Free, does not require a financial investment
Cons:
- Does not allow to convert folders to metadata upon migration
- Limited reporting available
Option 4: Mover Migration Tool
If you are migrating from other cloud providers, like Dropbox, Box, Google Drive, then you will need to use the Mover Tool. It is a tool, owned by Microsoft that allows cloud-to-cloud migrations.

How to use the Mover Migration Tool:
I documented how to access and use the tool here:
Pros:
- Allows to migrate from other cloud providers without downloading content locally
- Free, does not require a financial investment
Cons:
- Not easy to use, confusing user interface
Option 5: 3rd party migration tools
Lastly, there are always 3rd party migration options available if you need to migrate the files to SharePoint Online. These tools usually have sophisticated capabilities, like advanced reporting, pre-migration checks, the ability to convert folders to metadata, and many others.
Pros:
- Sophisticated reporting and capabilities
Cons:
- Requires a financial investment


