How to Prevent Oversharing with Site-Level Access Restriction
Oversharing in SharePoint has always been a hot topic of debate and frustration for IT teams, Security, and Compliance managers. While certain capabilities to minimize oversharing do exist, they often rely on the Site Owners themselves. Other options rely on Sensitivity labels, which require a bit of setup and know-how of Microsoft Purview (not to mention extra licenses). However, we now have a new feature in the SharePoint Admin Center that allows the IT team to prevent and mitigate oversharing with a single click. Let me explain.
What is Site-Level Access Restriction?
The feature I am talking about is called Site-Level Access Restriction. It is available as part of the Advanced Management add-on license, which includes several other governance features and reports. Once enabled, SharePoint Administrators can designate security groups that will have access to a given site. No matter what site owners set up at the site level in terms of permissions, and no matter with whom site members share individual files and folders, the security of the site’s content will be bound by those security groups. In other words, those security groups have the final say on who can access the content.
How to enable Site-Level Access Restriction
- We first must navigate to the SharePoint Admin Center. To do so, click on Microsoft 365 App Launcher > Admin.
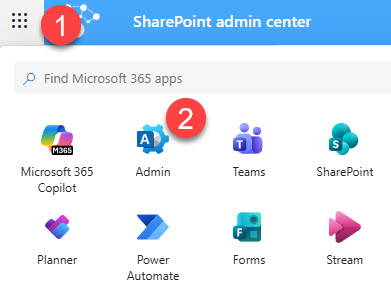
- Under Admin centers, click on SharePoint

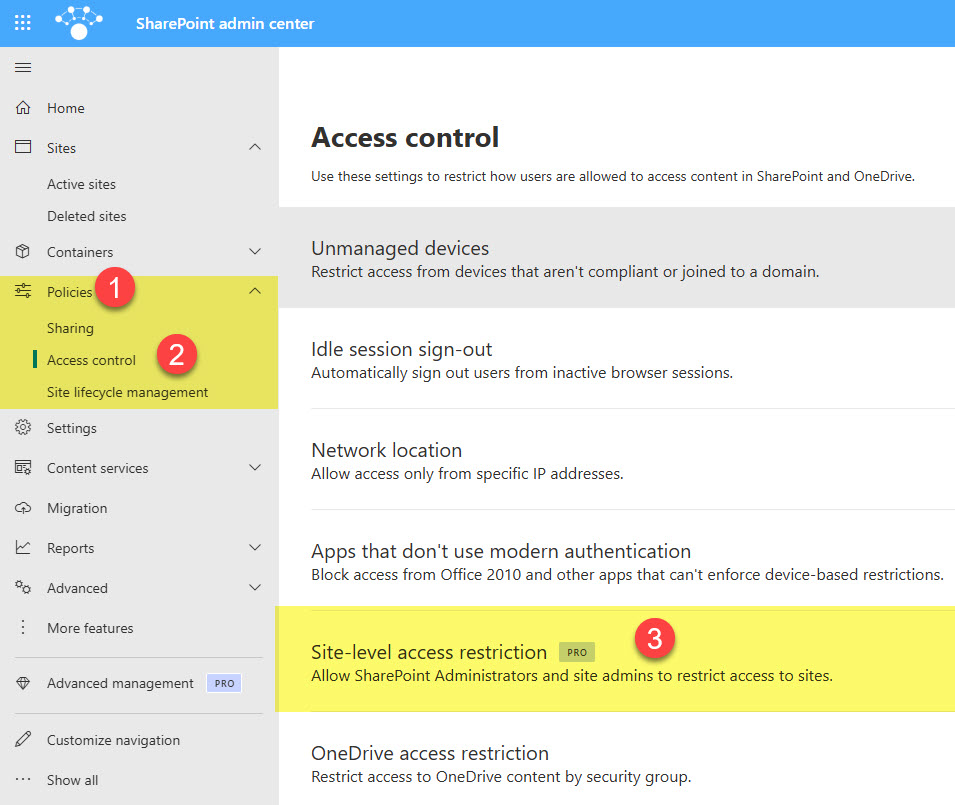
- Once in the SharePoint Admin Center, under Policies > Access Control, click on Site-level access restriction
- You will then need to check the box next to: Enable site access restriction. Click Save.

- You will then receive a confirmation message. It might take a few minutes for the change to propagate.

How to assign a Site-Level Access Restriction to a SharePoint site
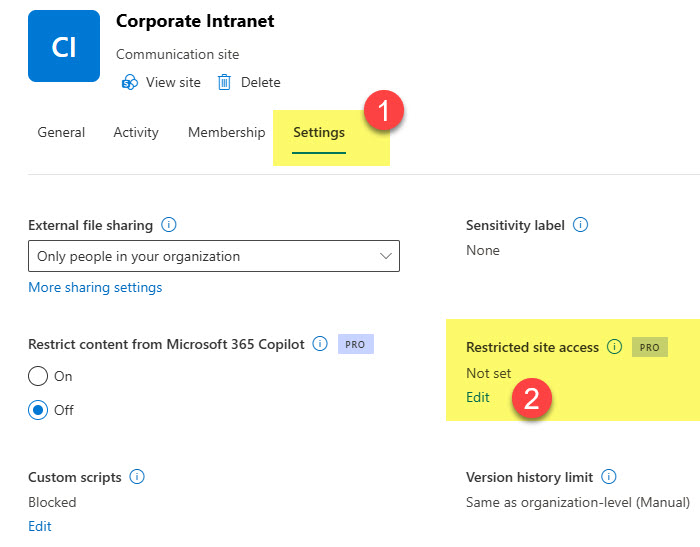
- Once enabled, we can not assign security groups to sites. From the SharePoint Admin Center, under Active Sites, click on the Site Name

- Click on the Settings tab, and then Edit under Restricted site access
- Check the box next to Restrict SharePoint site access only to users in specified groups. Then specify the security group(s) that the site will be restricted to. Click Save.

- You will get a confirmation/warning message. Click on the Restrict access button.

User Experience once Site-Level Access Restriction is enabled
- Once Site-Level Access Restriction is enabled, when Site Owners or Members click on Site access or Gear Icon > Site permissions, they will be greeted with the following warning:


- No matter who users invite to the site, they must be part of the security group(s) specified above to access the site’s content.
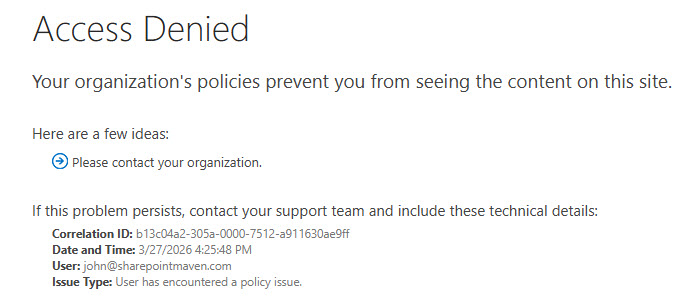
- If users try to access content on the site by clicking on the site URL or file/folder URL shared with them, they will receive the following message.
How to Delegate Site-Level Access Restriction to Site Owners
One cool capability of the Site-Level Access Restriction is that SharePoint Administrators can delegate the decision of who can be granted access to the site to the Site Owners themselves.
- When you enable Site-Level Access Restriction in the SharePoint Admin Center, make sure to click the check box next to Delegate site access restriction control to site administrators.

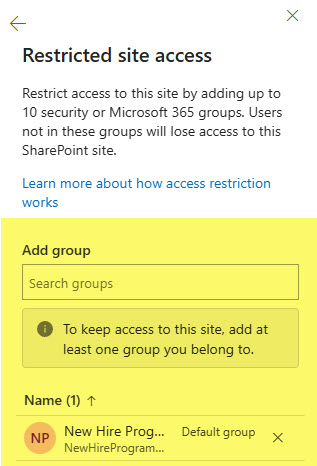
- At this point, Site Owners can decide whether to restrict access at the site level. For example, here is the experience Site Owners will encounter when they click on the Site Information panel on their site.

- They (Site Owners) can then decide whether to leave the checkbox checked or not, and which groups to add/remove.
- If Site Owners change a site’s Site-Level Access Restriction (e.g., change groups, add or remove the restriction), they will need to provide justification via a pop-up message.
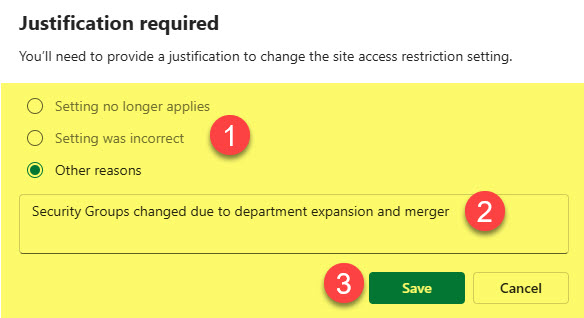
- All the changes and justifications by Site Owners are recorded in the Audit Log within Microsoft Purview.
Nuances about Site-Level Access Restriction
- Both Microsoft 365 Groups and Entra ID Groups (regular and mail-enabled) are supported
- Up to 10 security groups or Microsoft 365 groups can be added when specifying Site-Level Access Restriction for a site
- Nested security groups are supported
- Additional licensing is required to use and enable this feature. Check out this post from Microsoft to learn more.
- Once Site-Level Access Restriction is enabled, users can still share sites, files, and folders; however, unless recipients are part of the specified security groups, they won’t have access to the shared content and will receive an Access Denied message.
- Those who had access to the content (site, file, or folder) before enabling Site-Level Access restriction will lose it.
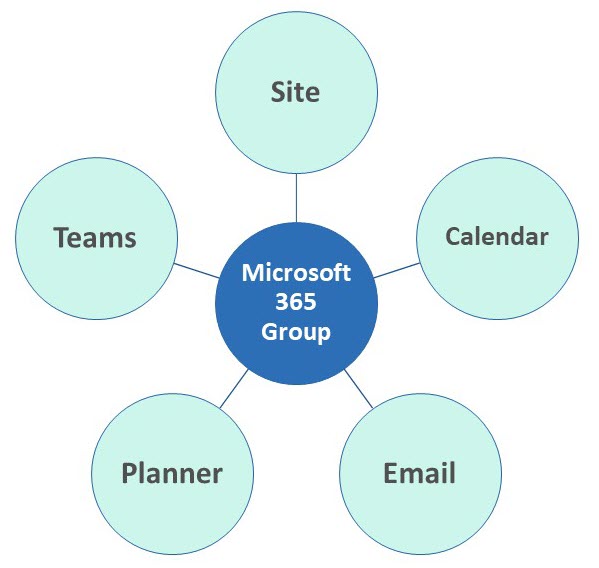
- When you enable Site-Level Access Restriction on the Team Sites connected to a Microsoft 365 Group, it will, by default, add the Site’s Microsoft 365 Group as the default group. This will ensure that the site’s content can’t be shared outside the group. You will be able to remove that group and add your own.


Share Article