How to create a Knowledge Base in SharePoint
One of the common requests for SharePoint Intranet is the ability to create and organize some sort of Knowledge Base. There are several ways to create a Knowledge base in SharePoint and I documented all the options in the past here. The option you might choose will depend on the type of content you have and how you want it presented. One of the most popular options for the Knowledge Base in SharePoint is via the SharePoint pages. The last time I documented the instructions for those was in 2019. However, a lot has changed since then, from the additional functionalities to the new look and feel options. So I thought of writing a brand new article on the topic. Enjoy!
Step 1: Understand the approach of using SharePoint Pages
As mentioned above, there are several ways to create a Wiki/Knowledge Base in SharePoint. You can create a Library with documents and metadata or lists with information. This particular method relies on SharePoint pages. I find this method attractive for my clients migrating from Confluence, who found this option comparable to that software.
Step 2: Decide on a New vs. Existing SharePoint site
The first and probably most crucial step is to create a dedicated SharePoint site for your Wiki or Knowledge Base. You probably do not want to mix up the content of your Knowledge Base with other content you might have on an existing IT or HR site (documents, pages, lists, etc.) Besides, you might also have unique security and content owners for your Wiki/Knowledge Base anyway. So, the bottom line is we made a decision, and we have to create a new site.
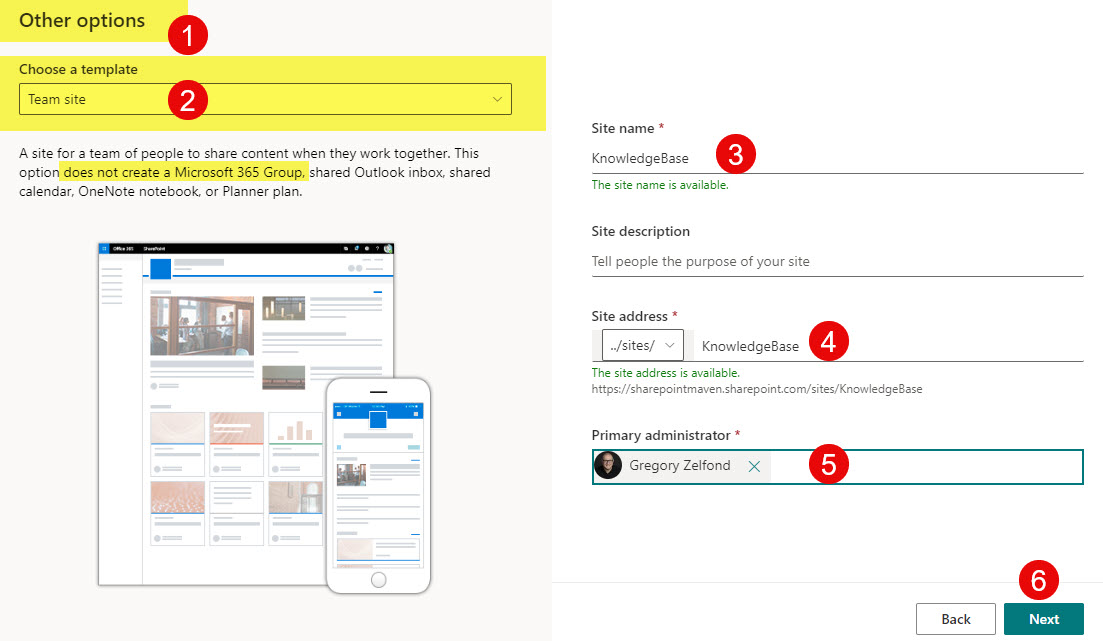
Step 3: Decide on a Site Template
The next important decision to make is to choose the proper site template. We only have three choices in SharePoint online.
- Team site without a Microsoft 365 Group
- Team site with a Microsoft 365 Group
- Communication site
In my experience, due to the nature of what we are building, we must choose between a Team site without a Microsoft 365 Group and a Communication site. While it might be a matter of personal preference, I found a Team site without a Microsoft 365 Group to be the most practical option. This is because it allows you to have left-hand side navigation, which many users are used to seeing with SharePoint and other applications where they might be migrating their Wikis from (i.e., Confluence).
So we made a decision: a Team site without a Microsoft 365 Group.
To create a Team Site without a Microsoft 365 Group, you would need someone from IT to do this for you. I documented the instructions in this article.
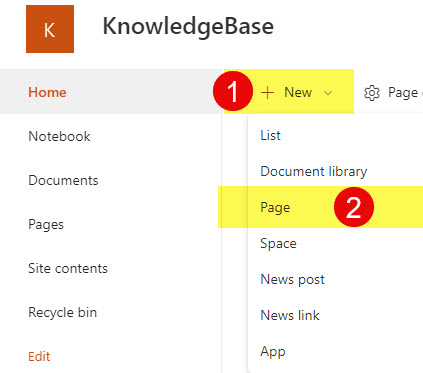
Step 4: Create a page
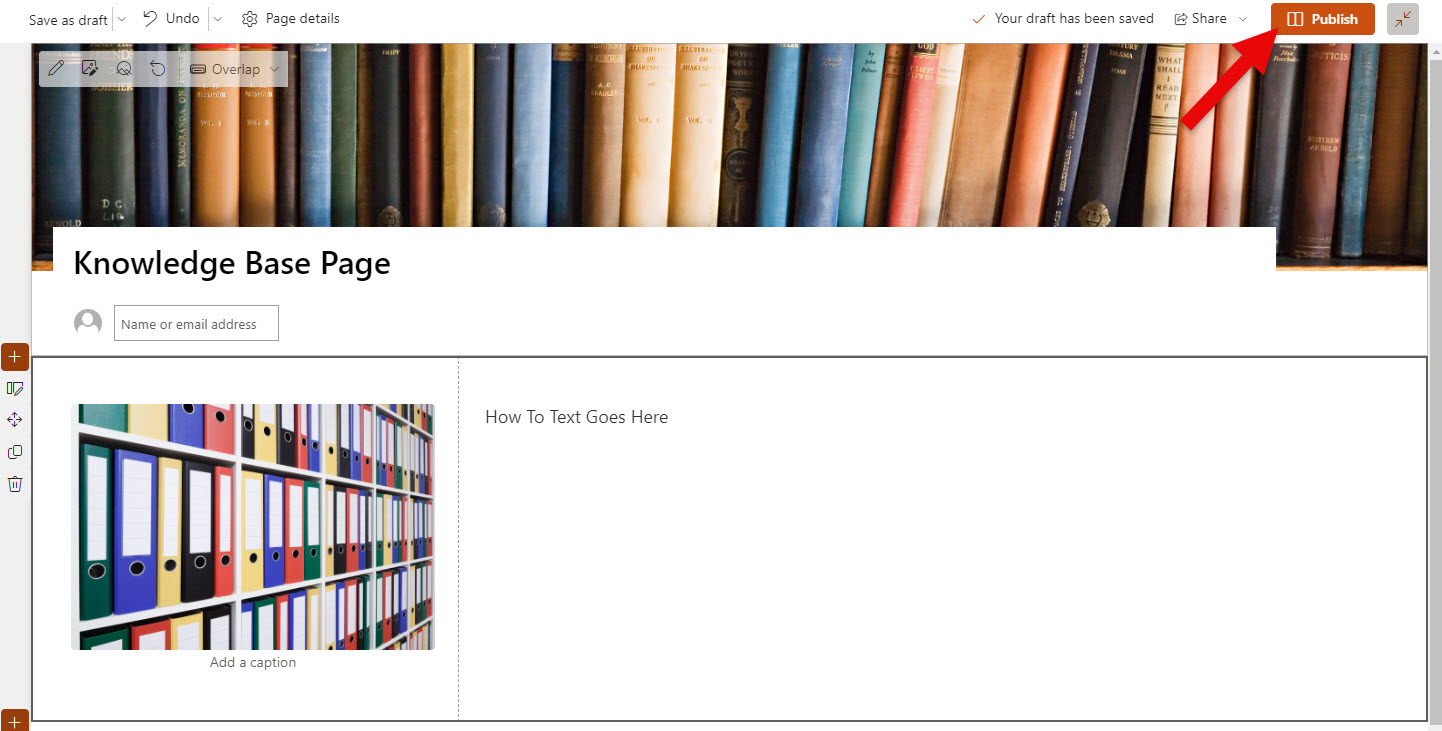
The next step is to create a page that will later be converted into the template. You might want to choose a specific layout. For this article, I will go with a simple two-column design. This is where you can create placeholders for text and images of future articles.
- From the Main site, click New > Page
- Edit the Page as necessary and click Publish.
Step 5: Create a Page Template
Next, we need to create a page template. This will ensure that all the pages/sections of the manual or handbook will look the same. I explained how to create a page template in this post, so check it out.
- On the page you created above, click Promote, then Save as page template
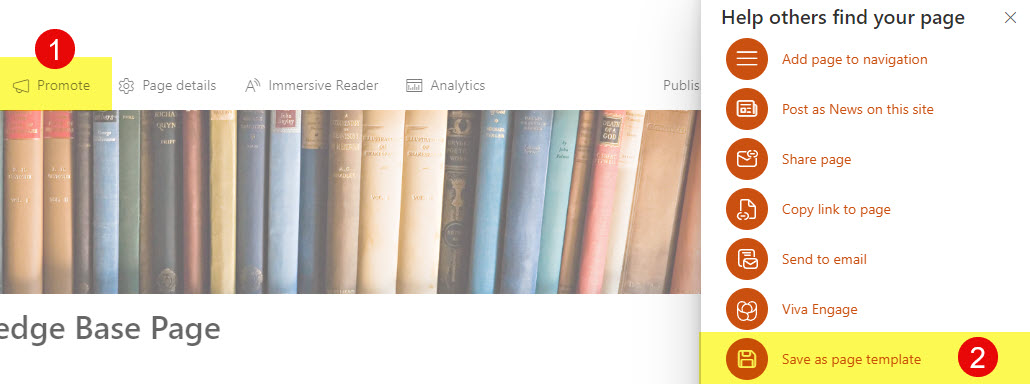
- Next, click the Save page template button.
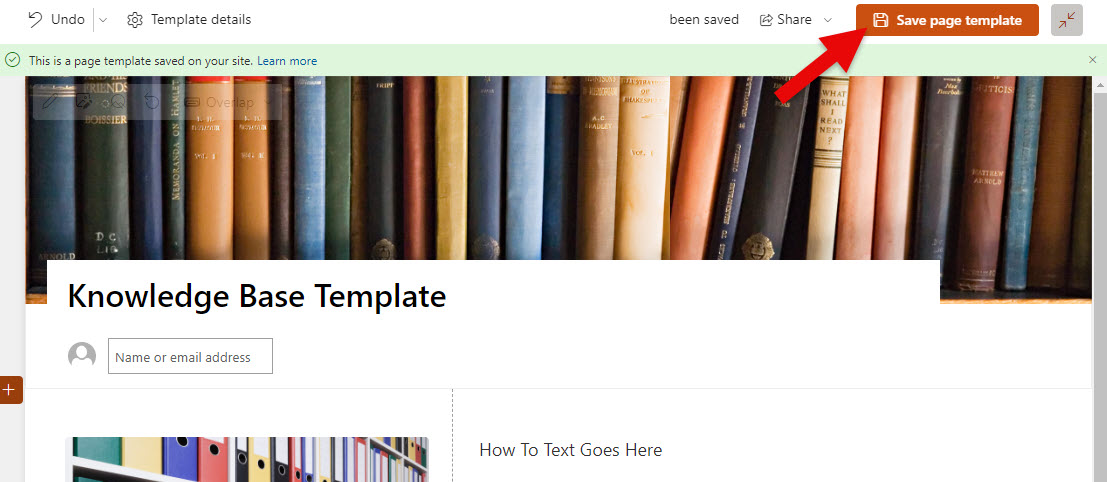
- The Template has been saved on a site (inside the Site Pages Library).
Step 6: Create Knowledge base articles (pages) from the template
Now that we have built the framework, we must roll up our sleeves and create the actual Knowledge Base Articles. The process will probably be manual mostly; this is where we rely on the template we created in Step 4.
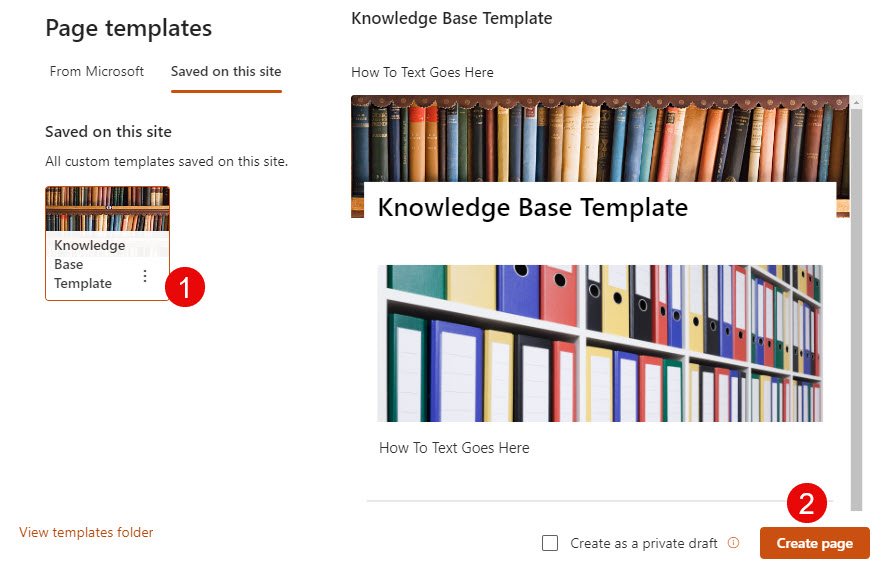
When you create a new Page (Wiki Article), make sure to choose Saved on this site tab and choose the template created. You can also make it a default. I explained how to do this here.
Step 7: Build out the Main Knowledge Base Page
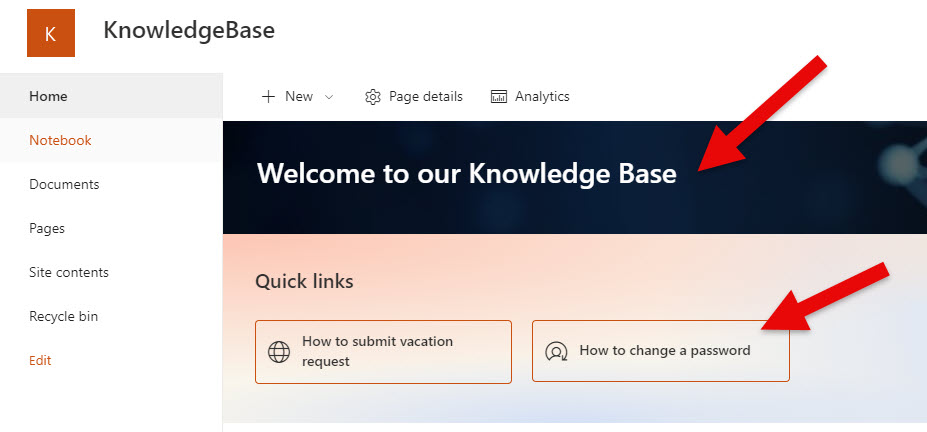
Next, you can customize the Main Knowledge Base Page by editing it and adding appropriate content and links.
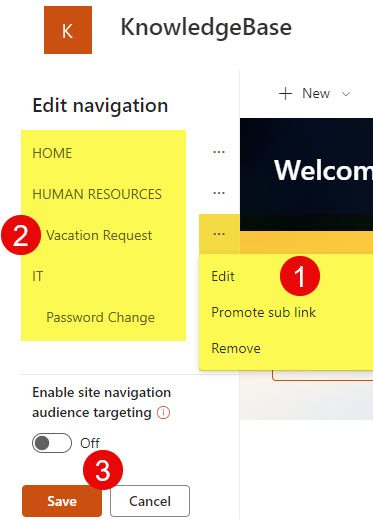
Step 8: Build the drop-down Navigation
You can also link to the pages from the left-hand navigation. This, by the way, was another reason for choosing the Team site without a Microsoft 365 group site template.
Bonus: Optional Enhancements
Mazel Tov! We are done with the basic setup of the Knowledge Base in SharePoint. That said, when I configure Intranet portals for my clients, I also proceed with more advanced setup options, which I summarize below.
Create Site Pages Library Metadata
The idea of creating SharePoint pages above is that all the pages’ content/keywords will be searchable via the regular search box. However, we can also rely on good old metadata. Just like we can add metadata to a document library, we can also do the same on the Site Pages library. This will allow users to filter for specific keywords and find just the pages they need. I explained all the types of metadata columns that exist in this article.

Create Search Verticals
Another thing I like to do on the Wiki sites is create SharePoint Search Verticals. I described what they are and how to set them up here. This is optional but improves user experience tremendously. Let me explain.
By default, when the user executes a search for keywords using the site search box, they get all the results of all content types that match the keyword. This includes files and folders, list items, and, of course, pages. However, sometimes you just want to turn up results from the content pages without the other content, like files, getting in the way. If you think about it, this makes sense. If you just want to search employee handbook pages themselves and not any supporting documents.
Out of the box, there is no search vertical that automatically filters out other content and displays page content only. So we have to create it. To do so, follow the instructions for Verticals creation in this article. Add the following KQL query in the Query section: filetype:aspx. This will filter out all the content other than the pages (which have an aspx extension)
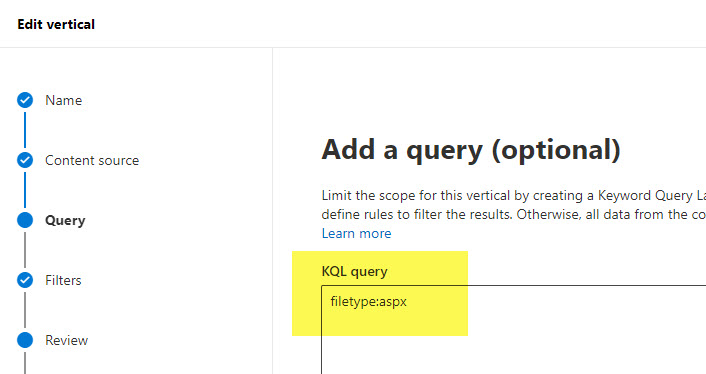
Example of the KQL Query for SharePoint Page filtering
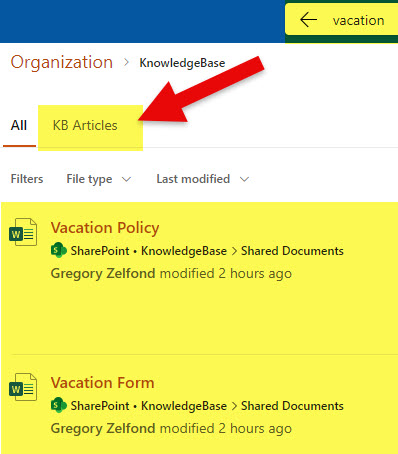
Example of the Knowledge Base Vertical in SharePoint Search Results
Set Audience Targeting
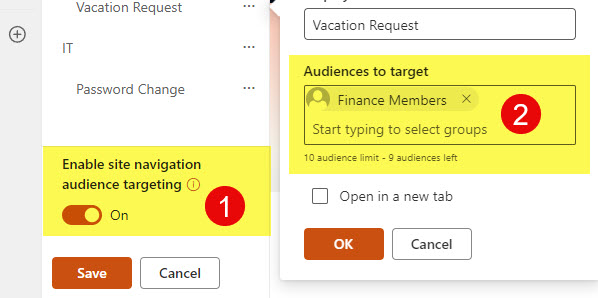
You can also enable Audience Targeting on both Quick Links and Left-hand-side navigation. This will allow you to target content from Knowledge Base Articles to different audiences within your organizations. I explained various ways to enable audience targeting in this article.
Change Site Logo
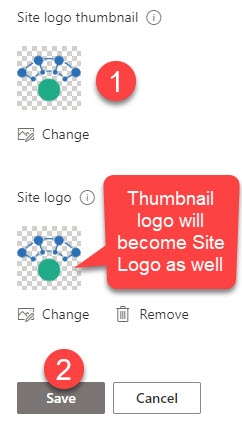
Finally, we also need to make our site pretty by uploading a logo or the image in the upper-left-hand corner. Sorry, I am a perfectionist 😊. I explained how to achieve this in this post.

Share Article