< All Articles

How to approve documents without building a workflow

Posted on April 19, 2017
Power Automate

Quite often, my clients are asking me to build an approval workflow for them. For some complicated parallel or serial approvals, you have to either use SharePoint Designer or Microsoft Flow or some 3rd party workflow tool. However, most just require a simple approval process for documentation. The scenario I am talking about here is users uploading documents to a document library and certain individuals approving or rejecting them. If this is the case, you are in luck, since there is a cool Out of the Box (OOTB) feature that allows you to do just that. By enabling this feature, you will be able to approve documents without building a workflow. Let me explain how it works.

Before we go into the details, it is important to note that the approval process we have here is pretty simple in nature. Document uploaded/submitted by one user and then either approved or rejected by another.

  • Step 1: Document uploaded/submitted by one user
  • Step 2: Document approved or rejected by another user

If you need a multi-step serial or parallel approval, or if you need the approval to go to different individuals based on the type of document – you might need to look for alternate workflow options (SharePoint Designer, Microsoft Flow, 3rd party tools).

To make this simple workflow work, we will rely on two out-of-the-box functionalities of SharePoint:

  1. Content Approval feature on a document library
  2. Alerts on SharePoint lists and libraries

Content Approval feature will be used to allow approvers (certain users) to either approve or reject a document. Alerts will be used for email notification to notify managers (approvers) when items are uploaded so they can go ahead and either approve or reject a document. Alerts can also be used to notify the submitter when the document has been either approved or rejected so they can proceed accordingly. Let’s begin and set this up; it won’t take long!

Step 1: Enable Content Approval feature on a document library

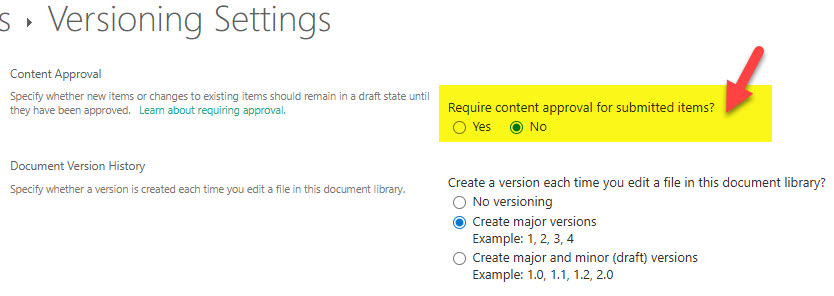
  1. Library Settings > Versioning Settings Contentapproval1
  2. Enable Content Approval feature by selecting “Yes” under Require content approval for submitted items? Contentapproval12
  3. Once you check “Yes” radio button above, you also will have a chance to set some other options, like Major or Minor versioning and Draft Item Security. Let’s leave Major Versioning on for now (no minor versions). I will explain how you can use the minor version later in this post. The most important setting here is  Only users who can approve items (and the author of the item). It is set for you by default. That means that documents that are in Pending or Rejected state will only be seen by those who uploaded them, and those are the approvers. Once approved, they will be seen by everyone. That is usually the scenario you want anyway.
  4. Click OK at the bottom of the screen
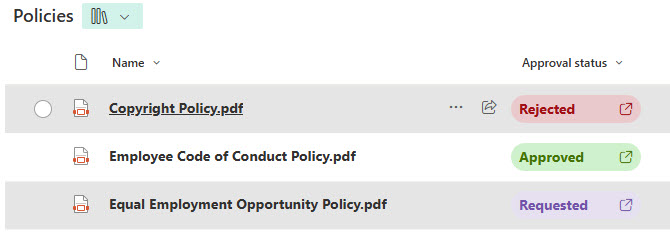
  5. Come back to the library. You will see that there has been a new column added to the library called Approval Status approve documents without building a workflow
  6. There is actually another column that has been added as a result of Content Approval feature. It is just it is not displayed. The column is called Approver Comments. It is hidden in the All Documents View. By the way, you also now have additional views as well, which you can see from Views drop-down. Two views have been added: Approve/reject Items and My submissions. Check both of them out, they are pretty self-explanatory. Both display that Approver Comments column. approve documents without building a workflow

Step 2: Set up alerts

While now we have an approval mechanism, we do not have anything to send email notifications when documents are uploaded for approval. This is pretty much a self-serve feature. For example, a manager can go in and set up an alert to be notified when items are added or modified, so he or she can get timely notifications about new files uploaded. The submitter can also set his/her alerts as well. I have provided step-by-step instructions on how to set up alerts here, so please check out that post. It is very easy!

How Content Approval Feature works

Let’s go ahead and upload a document for approval.

  1. Drag and drop a document or upload a new document into the library (you can have another user do this so you can test the true “workflow” functionality).
  2. Notice how it will default the Status to Pending Contentapproval5
  3. So at the moment the document can only be seen by the submitter and approvers, nobody else (because of Pending Status)
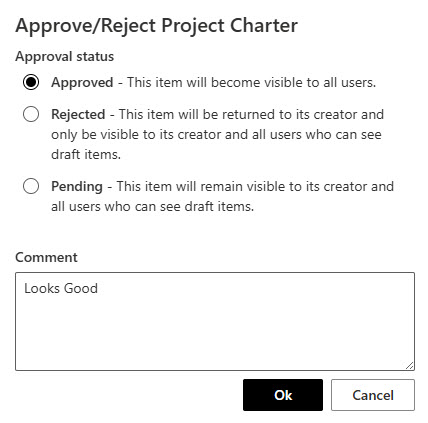
  4. Let’s go ahead and Reject this document. Right-click or click on ellipsis (3 dots) > More > Approve/Reject.
    Contentapproval6
  5. On the next screen, choose Rejected radio button, provide rejection comments and click OK Contentapproval7
  6. The document status has been switched to Rejected. If the submitter goes into the library and chooses My Submissions view, the document will be right there with Rejected status and rejection comments. Once again, since the document is not approved, it is only visible to submitter and approver at the moment.
    Contentapproval8
  7. At this point, the submitter can make changes, upload a different version of the document. Every time a new version of the document is uploaded or document is edited in SharePoint, the status changes back to Pending and document can once again be approved by the Approver. This is important to understand!
  8. So let’s say the document has been edited or re-uploaded. It goes back to Pending status. Contentapproval9
  9. This time the approver is kind enough to approve the document Contentapproval10
  10. At this point, the status changes to Approved and document can finally be seen by everyone having access to the library. By the way, you can also view the Version History and see the whole history of changes as well. Contentapproval11

 Who will see documents

It depends on how you set Draft Item Security.

Contentapproval19

If you keep the default option above (recommended), up until the document is Approved, it can only be seen by Submitter and those who have Approval capabilities. More on this below.

Who can approve documents

In order to Approve documents, you need to have special Approval powers. This can be done in 1 of the 2 ways:

  • If your site collection does not have Publishing features enabled, assign Design permission level to the approvers (Design permission level has Approve capabilities, Contribute/Edit do not)
  • If your site collection has publishing features enabled, you should have special Approvers group created for you which has Approval capabilities. Make sure to add this group to your site and add approvers into the group Contentapproval13

Bonus: Advanced Configuration Options

We can also take advantage of minor versioning and create a truly great publishing experience, often needed for the Approvals. Remember, how above I mentioned that once rejected, submitter can make changes to the document? However, every time I make a change, the document Status goes back to Pending.  This might not be desired. Say, I make some changes to the document (because my @#$% boss rejected it), but I am not ready to re-submit for the approval just yet. I really want to re-submit when I am ready to do so (hey, I ain’t going to have it rejected again!). For this to work, we will need to enable minor versioning.

  1. Go back to Library Settings and enable minor versioning Contentapproval14
  2. Go ahead and upload a document again. Notice how the Status of the document says Draft (instead of Pending). Draft means the document is not published just yet. At the moment, the document is only visible to the Submitter and the Approver. However, it can’t be approved or rejected because it is still in Draft. Contentapproval15
  3. If you lookup the version, it will be 0.1 instead of 1.0 Contentapproval16
  4. When the user is ready to submit, user can publish it Contentapproval17
  5. You can even supply the comments to advise on the changes made, so the approver knows what has changed. Contentapproval18
  6. Once published, the Status changes from Draft to Pending and can now be approved by the Approver.

About Me

I’m Greg Zelfond, a U.S. based SharePoint consultant, and I provide affordable out-of-the-box SharePoint consulting, training, and configuration assistance to small and medium-sized businesses all over the world.

Need help?