How to use Quick Steps in SharePoint Lists & Libraries
SharePoint Lists and Document Libraries are always getting some new features, capabilities, and buttons. One such feature that was recently added to its massive menu of choices and functionalities is the feature called Quick Steps. In this article, I would like to introduce you to it, show you how to use it, and explain its potential benefits and use cases.
What are Lists and Library Quick Steps?
Quick Steps allows you to perform a specific action for a selected file (within a document library) or a list item (within a list). We already had some capability in the form of Power Automate workflows. For example, we could set up a reminder workflow or get an approval for a selected document. I explained those possibilities in this post. Quick Steps is almost an extension of this, where you can configure some additional actions for a selected file or item without building a custom workflow or fancy functionality. In other words, Quick Steps allow you to achieve what would typically take a few clicks with just one click.
How to configure List and Library Quick Steps
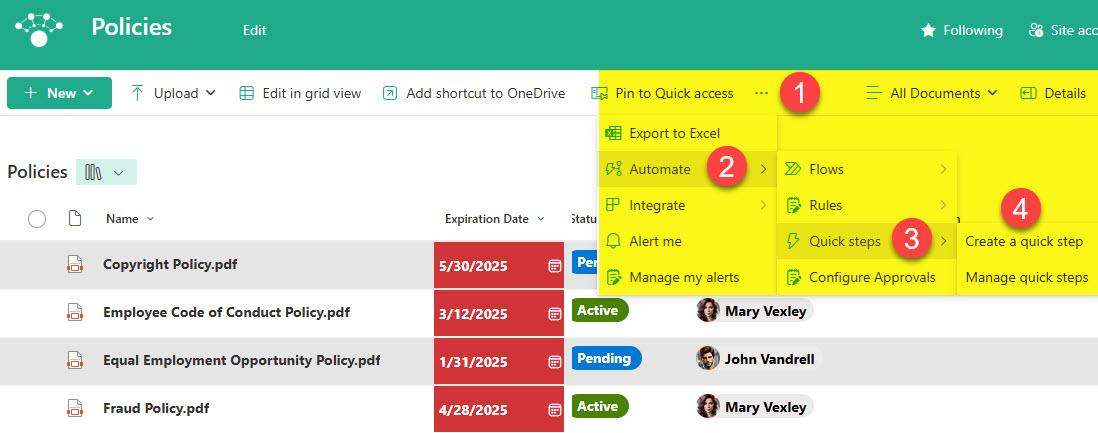
- For this example, I will use a document library where I store policies. The library has several policies tagged with various policy metadata (Status, Expiration Date, Author, etc)
- From the document library, choose three dots > Automate > Quick steps > Create a quick step
- Choose the step you would like to create. In this case, for this quick step, I want to be able to adjust the status of a Policy to Active. So, for this example, choose Set a value.
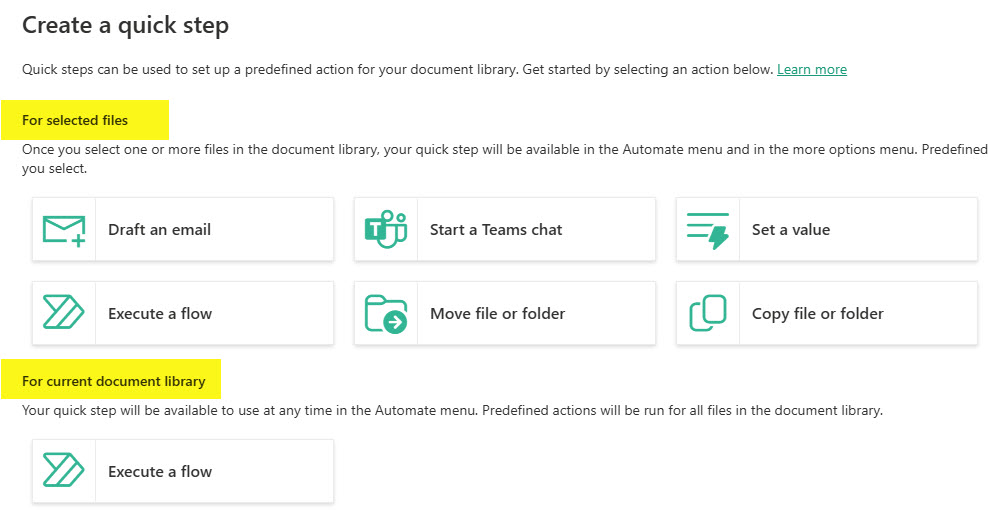
- Next, adjust the logic and assign a name for the Quick Step. Click Save.

How to execute a Quick Step Command
- Select a file or list items and click three dots > Automate > Quick Step Name
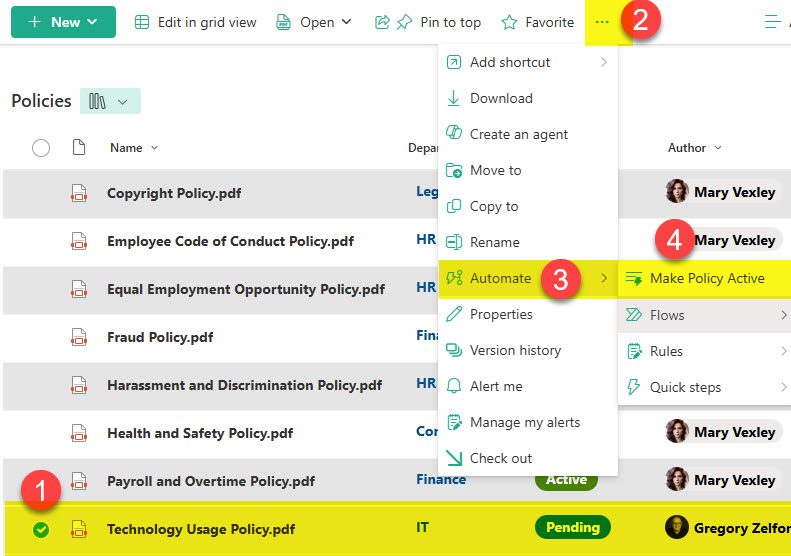
- You will see the Quick Step being executed (in our case, the policy will adjust from Status = Pending to Status = Active)
What are the available Quick Steps in Lists and Libraries?
Quick Steps available when a file/folder or list item is selected
- Draft an Email
- Start a Teams chat
- Set a value
- Execute a flow
- Move file or folder (Document Libraries only)
- Copy file or folder (Document Libraries only)
Quick Steps available when on an entire list or library
- Execute a flow
Use Cases for Document Library Quick Steps
I am sure there are many use cases you can envision for the Quick Steps. Below are a few I list for you from my experience.
- Quickly change the approval or status for a document
- Execute a pre-built Power Automate workflow for a document or list item
- Initiate a conversation in Teams for a selected file (so you do not need to copy the file link manually)
- Send an email with a link to a file (so you do not need to copy the file link manually)
- Quick way to archive items (using the move command)
- Publish revised documents from restricted collaboration sites to employee-facing Communication Sites (using the copy command)
Nuances about Quick Steps
- Lists do not have Move and Copy Quick Steps (since it is not possible to move/copy list items)
- You can select multiple files or list items and execute a quick step on them.
- Quick Steps are set up per library or list. In other words, you cannot transfer Quick Steps between lists/libraries.
- All the quick steps created by others are available to all Site members (those with Edit permissions). Site Visitors (those with Read-only access) also have access to Quick Steps created; however, they will only see Quick Steps achievable with their permisisons level. For example, they will be able to Start a Teams Chat quick step or Send an Email quick step, but won’t be able to move the file or folder via Quick Step (since that requires Edit privileges)
- A maximum of 15 quick steps can be created per list or library. My recommendation would be to have the minimum number of Quick Steps so that the menu of options is not too busy or overcrowded


Share Article