How to apply Conditional Formatting in Project for the Web
One of the recent additions to the Project for the Web application was the ability to do conditional formatting. We could do this in lists and libraries in SharePoint Online for quite some time. However, we can now make the Project for the Web schedule more relevant and user-friendly by highlighting cells/fields on the schedule with specific colors. Here is how to apply Conditional Formatting in Project for the Web.
What is Project for the Web?
Project for the Web is an application available in Microsoft 365 that allows organizations to manage projects with task dependencies. Unlike Planner, which is meant for Agile/Scrum-type projects, Project for the Web is for Waterfall-type projects where you need to set task dependencies. Think of it as a web-based version of MS Project.

Which fields can you apply Conditional Formatting to?
You can apply conditional formatting to both standard (out of the box) Project for the Web fields and custom fields created by users. You can also apply conditional formatting to any field type (Text, Choice, Number, Date, etc.).
How to apply Conditional Formatting in Project for the Web
- In the upper-right-hand-corner of the Schedule, click Conditional coloring

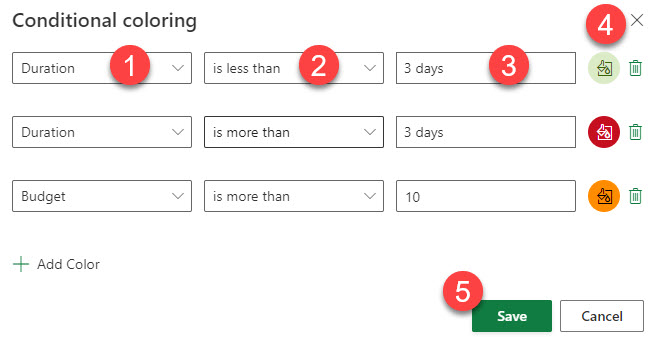
- Choose the field, then create a condition and choose a specific color. You can create multiple conditions on the same screen. Click Save.

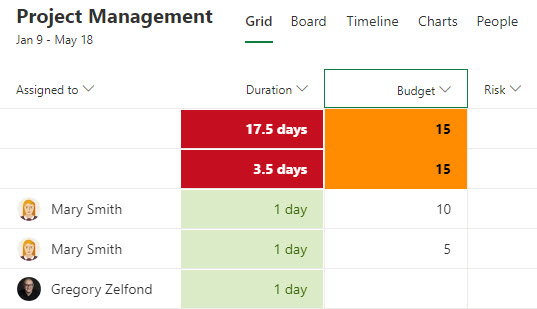
- Here is what the formatted schedule will look like based on the conditions above

Which views can you perform Conditional Formatting in?
While Project for the Web has 5 built-in views, you can only set up and display conditional formatting in the Grid View.
