How to set Security for a SharePoint site
Would you ever leave your wallet on the table in a busy restaurant? Or, may leave your car unlocked on the street overnight? I don’t think so. So how come you are so negligent and careless with your content in SharePoint? I can’t tell how many times I look at the clients’ SharePoint environment and it is like communism won over the SharePoint – all the content is up for grabs, and noone knows who is in charge. With this blog post, I want to explain how to properly set security for a SharePoint Site. There are many steps involved, but if you really want your site and content secured, you have to follow all the steps outlined below. And yes, you have to repeat these steps for all the sites individually in your environment.
How to properly set Security for a SharePoint site – 10 steps with detailed instructions
Step 1: Determine if the site will be shared externally
There is a reason I put this as Step # 1. If you share your site externally, you need to create a site in a totally separate site collection. Please reference this post for more info. Make sure to make this decision first. If you are planning to share any content from the site externally, you might need to start all over and have this site created in the separate site collection. The thing is, that external sharing is controlled at the site collection level in SharePoint.
- Go to SharePoint Admin Center
- Check the box next to site collection
- Click Sharing button
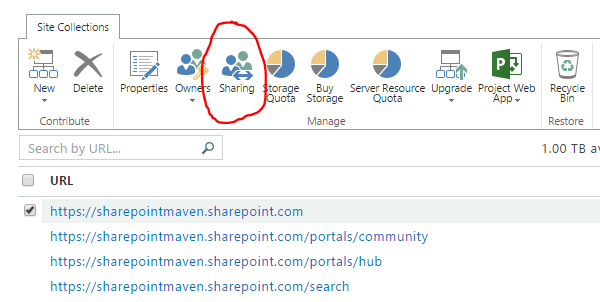
- Make sure to check the appropriate check box if you plan to enable/disable external sharing
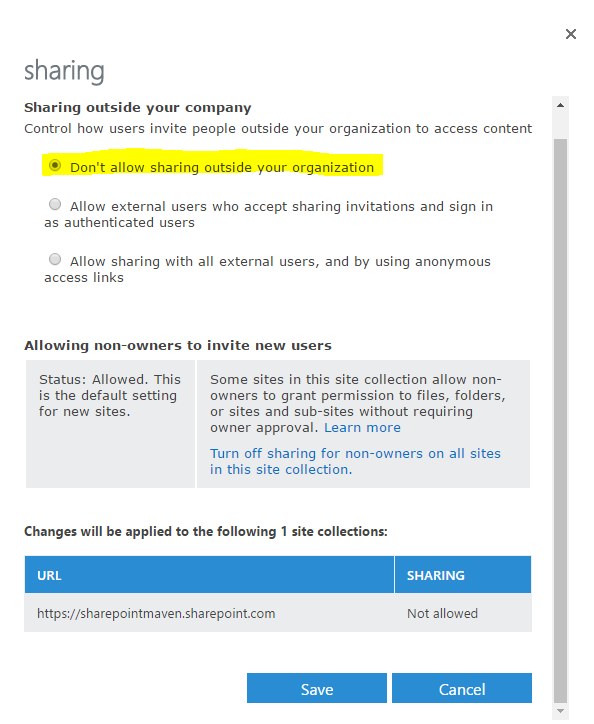


Do not allow external sharing on the same site collection where you have your Intranet site. Otherwise, any of your internal (operational) sites, like HR Department Site, can easily be shared with anyone outside of the organization
Step 2: Determine if you will inherit security from the parent site or have unique security for your subsite
This is kind of fundamental. When you create a new subsite, you are being asked a question during site creation on whether or not you are inheriting security from the parent site. If you are, all the steps below need to be taken care of at the parent site level. Let’s assume (and most likely it will be so) that you are creating subsite which will have unique permissions.
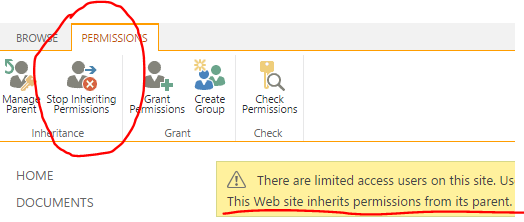
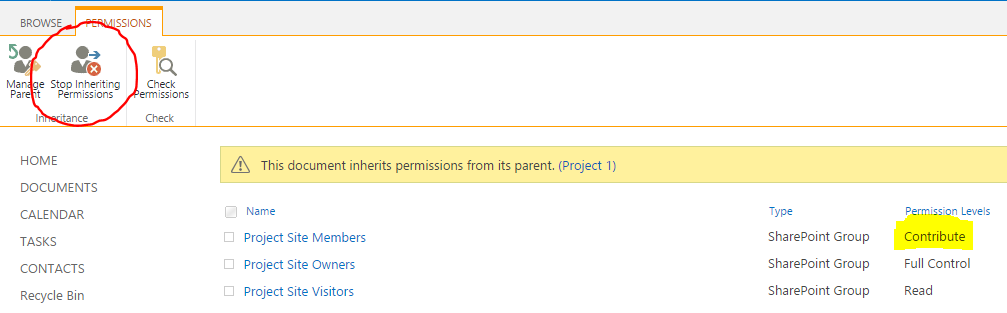
- Double check, whether you not you are inheriting permission from the parent. Go to Site Settings > Site Permissions
- If you see something like this – it means you are inheriting security from the parent site. You can break the inheritance by clicking on Stop Inheriting Permissions
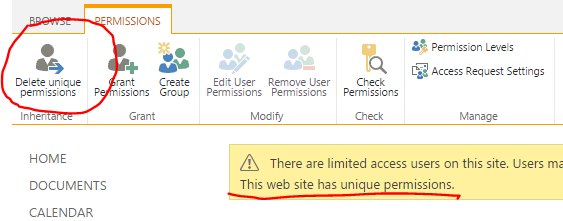
- If you see something like this – it means you already have unique permissions to this site, independent of the parent site


Step 3: Determine different groups of people and roles (level of access) you want them to have
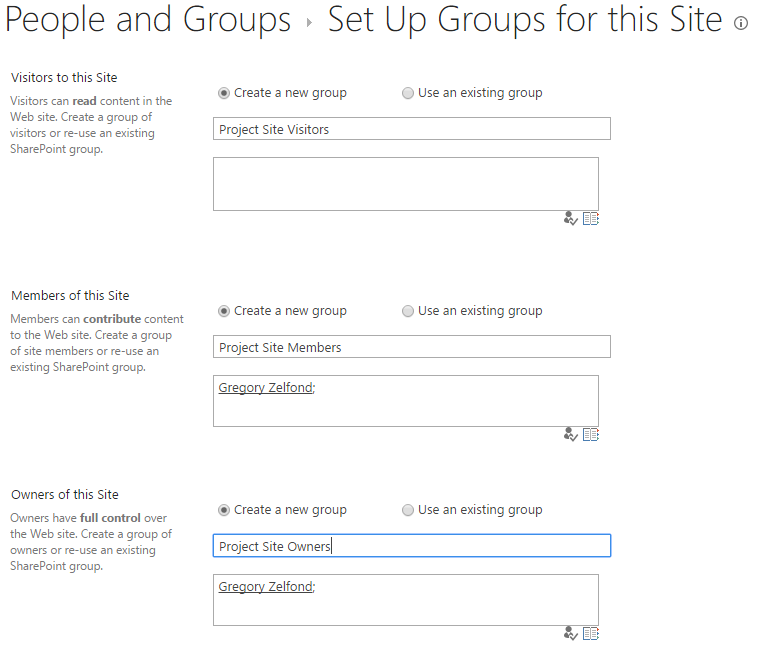
When you break the inheritance from the parent, you are prompted to create three groups: Site Owners, Site Members, and Site Visitors. You don’t necessarily need to have all three groups used on your site, but if you think about it, these are three different groups with very different roles you might need for your site.
- Site Owners are typically users that have Full Control (admin privileges) to the site
- Site Members are typically users who work with content (add/edit/delete) content
- Site Visitors are typically users who require read-only access (ability to access info, but not necessarily ability to edit it)
Think about your unique site and different groups of roles you might want to have. You might have all three groups, you might only need 1 or 2 or may be 4-5, in any case, each site/scenario is unique.
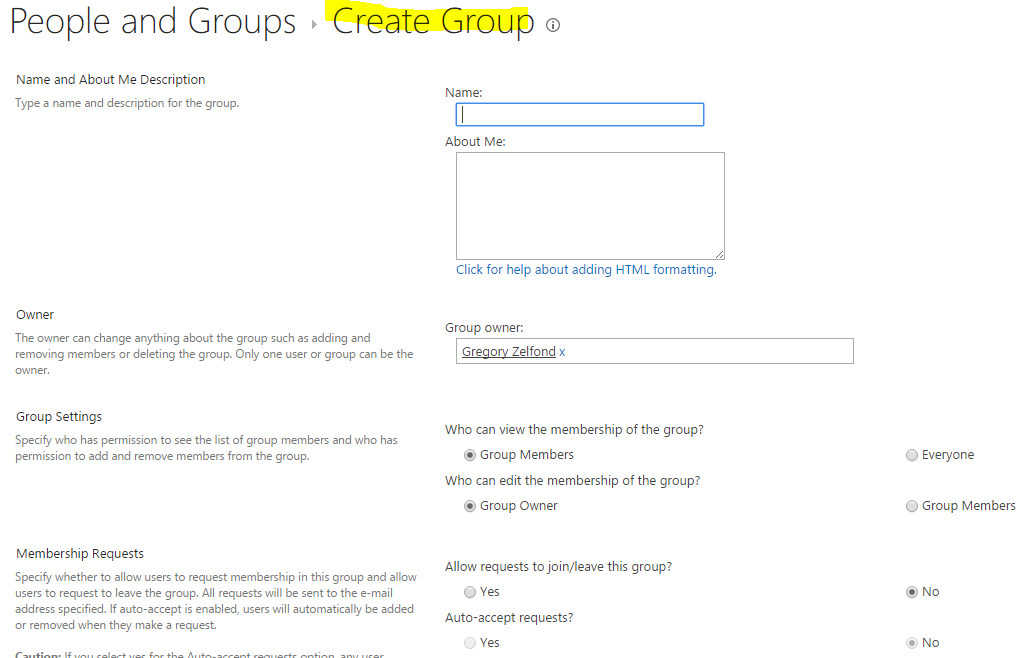
Step 4: Create Security groups
To set a real example, say you are creating a Project Site. You might benefit from the same three groups I mentioned in the previous step:
- Site Owners will be users who will maintain the site, change the look and feel, security
- Site Members will be regular project team members who will upload/edit/delete documents present on the site
- Site Visitors might be everyone else in the organization or project executives who just need to access the project site in read-only mode to check on status
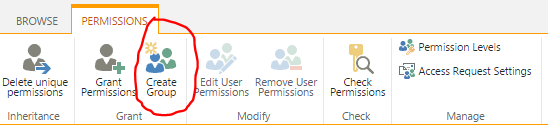
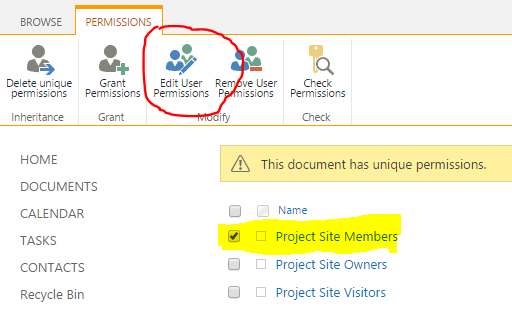
As mentioned in the previous step, you might already have three groups created. To check, go to Site Settings > Site Permissions. There are two ways for you to create security groups:
- Option 1: If you are currently inheriting permissions from the parent and click Stop Inheriting Permissions (in Step 2), you will be prompted to create your security groups “on the fly”.
- Option 2: You can create your security groups anytime by going to Site Settings > Site Permissions.


If you need to remove a security group from the site, just click on the check box next to it and hit “Remove User Permissions” button
Step 5: Set permission levels
Once the groups have been created, the next step is to assign proper permission level for each group. In case you are not sure what permission levels are, you might want to check out this post, which provides a good explanation of what they are.
You will need to figure out what kind of access each group will have.
The rule you should follow is that you should only give minimal permissions the group will require! If all the group or user requires is the ability to add/edit/delete – there is no reason why you should give them Full Control!
Another important thing – make sure you fix the default “Edit” permission level for Site Members Group. It is pretty frustrating, but by default, Site Members group is assigned Edit privileges. Edit means more than just the ability to edit the document. Users with Edit permission level can delete all web parts from a site! So if all you need is the ability for users to add/edit/delete documents, give them Contribute only privileges. I have explained this as well in my permissions blog post.

To change Permission Level for Site Members Group or any other security group:
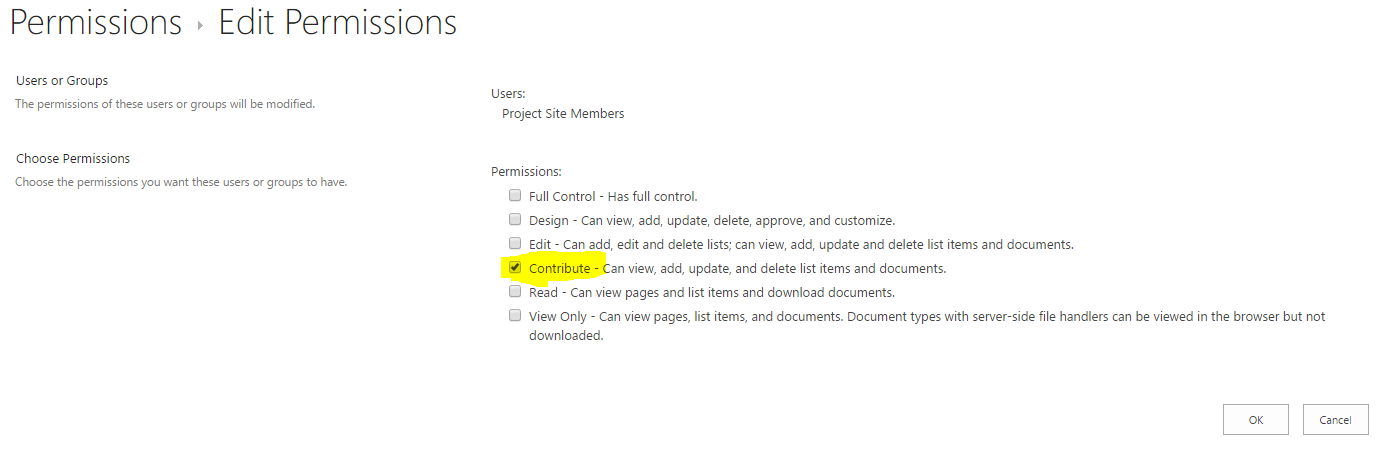
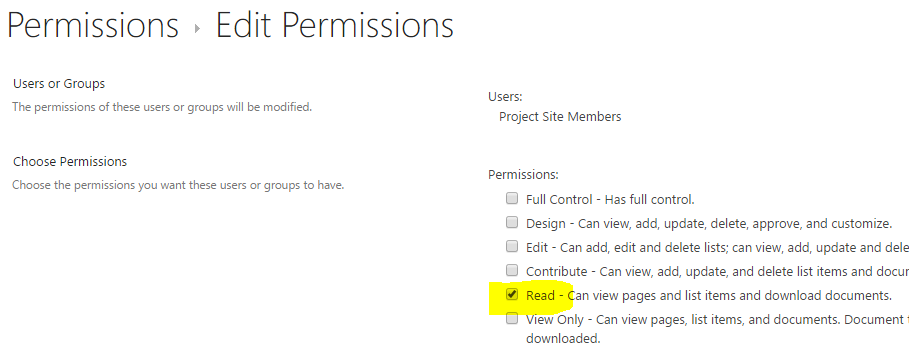
- Check the box next to the group, whose permissions you would like to edit. Click Edit User Permissions
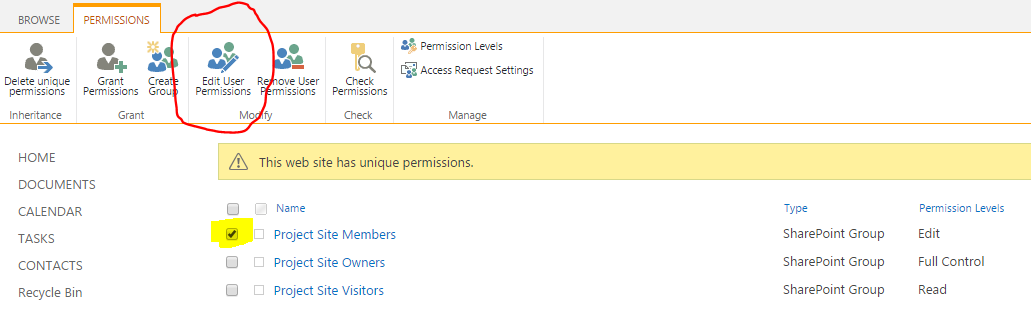
- On the next screen, click the check box next to permission level you would like to set for this group (i.e., Contribute). Hit OK


Step 6: Add people to Security groups
Now that you have security groups and permission levels figured out, you are ready to add users to the corresponding groups. To do this:
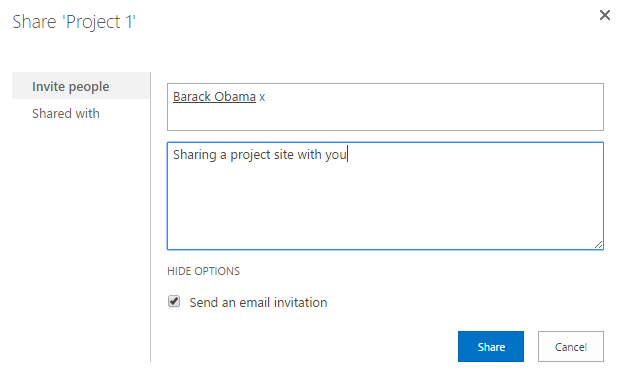
- Go to Site Settings > Site Permissions, click on a group where you would like to add users to
- Click New > Add Users
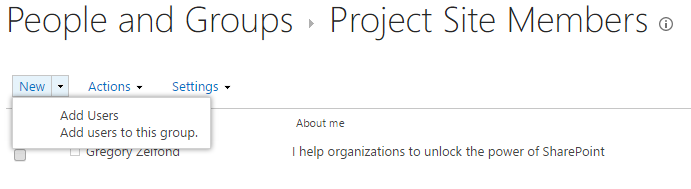
- . Type in the names of the user(s) you would like to add. You may include an optional message and send them a notification email if you wish. Click Share button


Always add users to security group! Never add users directly to the site! It is against best practice!
- Reason 1: If you add users directly, you have to manage users manually. So if you have 25 users and you need to change permission level for all 25 at some point – guess what – you have to do it manually for each. If they were all in a group, you would only need to change permission level at group level once.
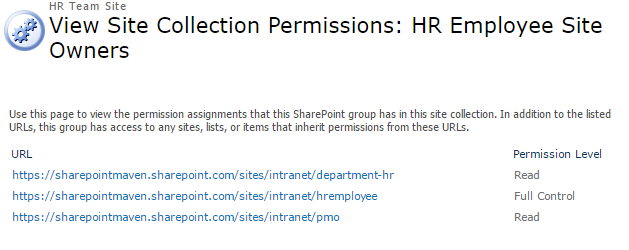
- Reason 2: If users are in a group, you can easily check groups permission for the whole site collection. In other words, you can see what other sites this particular security group has access to in this site collection. To do this:
- Click on a security group whose access you would like to check
- Click on Settings > View Group Permissions

- You will now get presented with a list of sites and permission level this particular group has


The above would not be possible if you wanted to lookup permissions for a given user. This trick only works for security groups. For individual users, you can only check permissions for them on a given site you are on at the moment, one at a time. To do this:
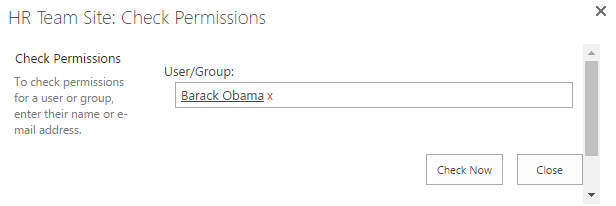
- Click Check Permissions button in the top ribbon
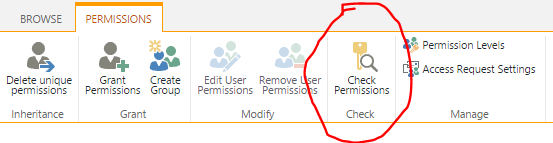
- Type in user’s name and click Check Now button
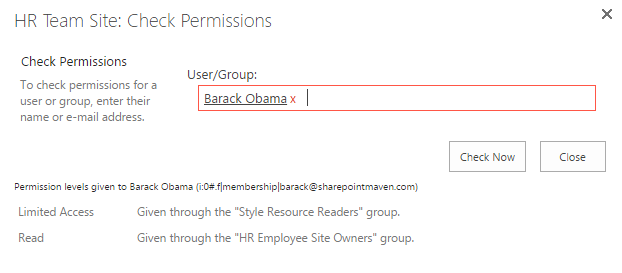
- You will get to see the level of access the user has – but only on this particular site, not the whole site collection, like with the security groups!


Step 7: Determine if you will allow users to share content
No, we are not done yet. This step is super important. The next thing we need to do is figure out whether or not you will allow users to share content on a site. The way we have setup our site up until this point – we setup initial security to let people access the site. However, if we leave everything as-is, users can freely share content from the site with everyone else in the organization (or outside). That means that users who were not added by you into security groups will be allowed access to your site or individual documents, without you even knowing about this!!!
This is because Microsoft wants us to collaborate and share. SharePoint even has word “Share” in it. So by default SharePoint is setup for sharing, unless you want to restrict it. Let me show you what I mean.
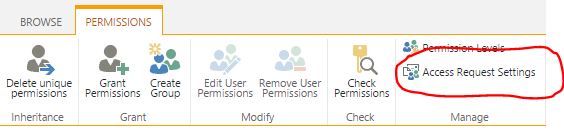
- Go to Site Settings > Site Permissions.
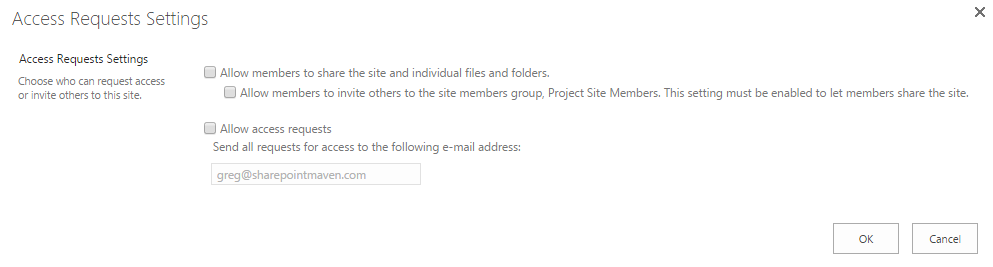
- On the top ribbon, click on Access Request Settings
- You will see the pop-up below appear, with three check boxes. Let me explain what each check box means


- Allow members to share the site and individual files and folders. If this box is checked – that will allow users to share individual files with people outside of the security groups/site. So essentially, any user who has access to the site will be able to click on Share document and share file with someone outside of the department. This also creates somewhat of a nightmare as you might end up with hundreds of documents, each with its unique security/sharing. Not a good thing for site performance and maintenance reasons.
- Allow members to invite others to the site members group, [Name of Members Group]. This setting must be enabled to let members share the site. If this box is checked – this will allow any user in Site Members group to share the whole site with other users who are not originally part of the site. Moreover, these invited users will be added to the Members Group automatically even if you, SharePoint Admin/Site Owner did not add them there in the first place!!! Ouch!
- Allow access requests. This allows you to approve or reject site access request. If this box is checked and email address has been provided – that user will get email notification asking him/her to a approve access to the site when someone lands on the site URL.
Step 8: Configure Access Request Settings (sharing permissions) for a site
So it is decision time. From the information provided in the previous step, you have to decide whether you want to:
- Option 1: Control site security via security groups
- Option 2: Allow users to freely share content
I usually recommend Option 1. I am somewhat of a control freak and prefer to control security via security groups. If the users are not in a security group, to begin with, there might be a good reason for them not to be there.
If you prefer Option 2 – do not make any changes to default settings or if you wish, confirm and check off the appropriate check boxes on Access Request Settings dialog box. Your users then will now be able to share content by clicking on the “Share” button.
If you prefer Option 1, you will need to:
- Uncheck all the boxes on the Access Request Settings dialog box
- Educate the users how to share site and documents. Since you have disabled sharing, they will get an error message when they try to Share the site or individual document. The proper way for them to share would be to send URL of a whole site to the user they are trying to share with (assuming of course that user is also part of security group) or by sending URL of individual document to the recipient (once again the user would need to have access to the site to be able to access document shared)


Step 9: Adjust Page Permissions
Even though we have setup all security groups and permissions, there is one other little thing you need to adjust. By default security is inherited from Site to Page to Web parts. So that means that if you have given a Members group Contribute Permission level, that means that those members also have Contribute access to the page. So translating this into English, they can click on Page Tab, Edit button and can move web parts around the page and even delete the web parts from the page.

They can’t delete the web parts from the site, so you are OK there, but they can alter the look of a homepage on a site. Not necessarily the permissions you would want them to have.
I personally have not seen many issues with this often overlooked “security gap”, but if you want to totally prevent this from occurring, do the following:
- Click on Page > Page Permissions

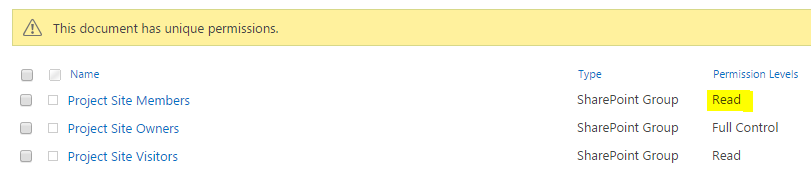
- On next screen, it shows you permissions for this page. Note that Members Group has Contribute access to the page
- Break the inheritance from Site to Page by clicking on Stop Inheriting Permissions
- Once the inheritance is broken, change the permissions for the Members Group from Contribute to Read


Step 10: Make sure you don’t reference/put any content from another site
Another thing to do before you take your SharePoint site live is to make sure you do not accidentally include content from other sites. Sometimes that is on purpose, however, let me explain a scenario that has occurred with me and might occur with you.
Say, you inserted an image into your site/page and image URL points to another site. A good example of this is the logo. When you setup Site logo, you typically point to a Site Assets Library on a site. So let’s say you have subsite, but subsite’s logo points to a Site Assets Library on a parent site. Now, imagine you have broken inheritance between the subsite and parent site.
What will happen now is that if I have access to the subsite, but no access to Parent Site, I will not be able to access the subsite either, because when subsite is displayed/rendered, it tries to access the logo from the parent site I don’t have permissions to access. So make sure you avoid this scenario by either granting appropriate access or storing all the content required to load the page on the given subsite.
Yes, now we are done. I know, there are lots of little steps involved, but they are all the necessary steps if you want to ensure your documents are safe and avoid an open wallet-type situation.

Share Article